
Introduction
The 'Linkly Cloud' is a system developed by Linkly as a hosted payment integration system, where the POS and PIN pad connect securely to our systems, enabling clients to use our systems without requiring our software to be installed in-house. This allows a POS and PIN pad to be completely independent of each other and for the PIN pad to connect to the customer's internet connection instead of to the POS via serial or USB port. The Linkly Cloud REST API is an interface developed by Linkly to interface to our cloud-hosted EFT Clients in a clean, modern, web standards-compliant way. To use the Linkly Cloud REST API the POS must also use the Linkly Cloud product. There is no REST interface for EFT-Clients installed in-house.
The advantages of this system are:
- The POS machine does not run any Linkly software.
- The PIN pad does not connect to a machine in the store. It is connected to the store's network via Ethernet cable or wi-fi and the PIN pad connects to the Linkly data center over an internet connection.
- The REST interface is easier to implement and maintain than other methods of connecting.
- The EFT Clients are hosted securely in an environment that is always kept up to date with the latest security patches.
- With a good redundant Internet connection (e.g. fibre with 4G backup), it can be just as stable as a standalone or traditional integrated PIN pad, if not more so.
Start Developing
Technical Requirements
- The POS must support TLS connections to the API, and must also support the SNI TLS extension. If SNI is not supported, the POS may get certificate errors.
- The POS must validate the cloud SSL certificate to ensure that it is valid. Invalid certificates should fail.
- The POS must resolve the DNS entry for the API addresses above for each connection attempt. The DNS mapping may change between attempts.
- The usernames and passwords should be kept secure. They are required when the operator pairs a new PIN pad.
- Session connectivity:
- A unique session ID must be randomly generated using standard UUID v4 generating algorithms for each and every session made by the POS, even if a previous session was not successful. Duplicate session IDs will be rejected.
- Security upgrades
- The POS may be required to support future TLS extensions or protocol versions if it is deemed that there are security risks in current protocols.
- The POS should be configured to update certificate revocation lists and other OS-level security upgrades to protect the integrity of financial transactions.
- The POS may be required to support future TLS extensions or protocol versions if it is deemed that there are security risks in current protocols.
- To develop for the Linkly Cloud REST API, you will require:
Accounts and Resources
Development requires an account in the Linkly Cloud sandbox environment and the Linkly Virtual PIN pad that simulates a bank PIN pad.
- Linkly Cloud test account
- For development you should request a cloud test account from Linkly. The detailed steps to request one are mentioned in Appendix F - Cloud Account
- You will need one account per PIN pad used for either production or testing.
- For production, customers must contact their bank to set up a new production cloud account.
- Linkly Virtual PIN pad
- Developers may request a copy of the Linkly Virtual PIN pad (for development only), a software application that emulates Linkly Cloud-enabled PIN pad behaviour. The steps to setup a virtual PIN pad are mentioned in Appendix G - Virtual PIN pad.
- Production PIN pads and hardware developer PIN pads must be ordered through your bank. PIN pads must be able to support Linkly Cloud, contact your bank to confirm.
- Sample code for the Linkly Cloud REST API can be viewed on Github
Please direct any questions on the Linkly Cloud REST API to [email protected]
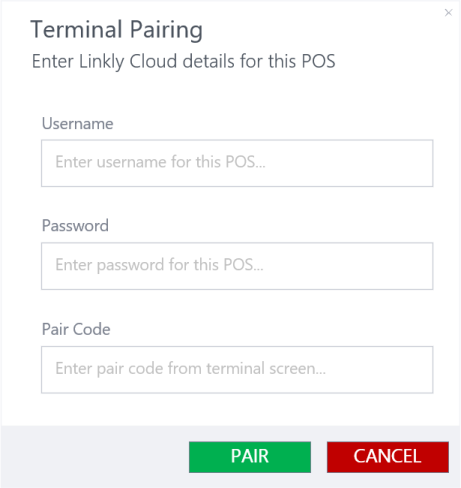
Cloud PIN pad Pairing
Whether you choose to use a hardware PIN pad or our Virtual PIN pad, you will first need to pair the PIN pad. PIN pad pairing refers to the process of using a Linkly Cloud username, password and temporary pairing code to connect the PIN pad to an account on our hosted back-end services. The pairing process generates a secret which allows the POS to initiate transactions on that specific PIN pad. See Authentication for details.
An example of the basic PIN pad pairing process is below:
- Obtain a Cloud EFT Client username and password from Linkly for either Sandbox or Production (depending on whether you have a test or production PIN pad, respectively).
- Plug the PIN pad in and connect to the Internet via cable or Wi-fi depending upon the EFTPOS hardware.
- Set the PIN pad up to connect to the Linkly cloud. Each bank may have different configuration settings.
- Once connected, the PIN pad will display a temporary 'pair code'
- The POS should now send a 'pairing request' using the username, password, and PIN pad 'pair code' from the PIN pad
- The response to the 'pairing request' is a secret which should be stored securely by the POS. This secret does not expire, and will be valid until the account password changes, or the PIN pad is paired to another POS.
- The POS can now do a sale:
- Get a REST authentication token using the secret. If the POS already has a token from a previous session it may use it until ExpirySeconds is up, or alternatively a new token may be requested for each transaction.
- Check that a valid token is received
- Do a sale using the specification below
- Wait for the transaction response, either as an HTTP response to the original transaction request (
async=false), or as a postback from the API (async=true)
Example Pairing UI
Authentication
The Linkly Cloud REST API uses a two-step authentication process.
Step 1 - PIN pad pairing request
The POS pairs with a PIN pad using the Linkly Cloud username, password, and a temporary 'pair code' which is displayed on the PIN pad. This is a one-time request which returns a non-expiring secret. This secret remains valid until either the Linkly Cloud password changes, or another POS pairs with the same PIN pad.
Step 2 - Auth Token request
The POS uses the secret obtained from step 1 to perform a token request to the Linkly Cloud authentication service. The result of this request is a token which can be used to perform a transaction on the PIN pad.
PIN pad pairing request
PIN pad pairing request
# replace <<username>>, and <<password>> with your own credentials
# replace <<paircode>> with the paircode displayed on the PIN pad
curl "https://auth.sandbox.cloud.pceftpos.com/v1/pairing/cloudpos" \
  -X POST \
  -H 'Content-Type: application/json' \
  -H 'Accept: application/json' \
  -d '{
        "username": "<<username>>",
        "password": "<<password>>",
        "paircode": "<<paircode>>"
      }'
// replace <<username>>, and <<password>> with your own credentials
// replace <<paircode>> with the paircode displayed on the PIN pad
var requestContent = new
{
    Username = "<<username>>",
    Password = "<<password>>",
    PairCode = "<<paircode>>"
};

var request = new HttpRequestMessage(HttpMethod.Post, "https://auth.sandbox.cloud.pceftpos.com/v1/pairing/cloudpos")
{
    Content = new StringContent(Newtonsoft.Json.JsonConvert.SerializeObject(requestContent), System.Text.Encoding.UTF8, "application/json")
};

var httpClient = new HttpClient(); // Note: in production don't create multiple HttpClient instances. Share one single instance.
HttpResponseMessage httpResponse = await httpClient.SendAsync(request);
string responseContent = await httpResponse.Content.ReadAsStringAsync();
import requests; # http://python-requests.org

# replace <<username>>, and <<password>> with your own credentials
# replace <<paircode>> with the paircode displayed on the PIN pad
request_payload = {
    'username': '<<username>>',
    'password': '<<password>>',
    'pairCode': '<<paircode>>'
}
response = requests.post('https://auth.sandbox.cloud.pceftpos.com/v1/pairing/cloudpos', json=request_payload)
response_payload = response.json()
URI Path
Production:
POST https://auth.cloud.pceftpos.com/v1/pairing/cloudpos
Development Sandbox environment:
POST https://auth.sandbox.cloud.pceftpos.com/v1/pairing/cloudpos
Headers
| Parameter | Value |
|---|---|
| Content-Type | application/json |
| Accept | application/json |
Request Body
Example PIN pad pairing request object
{
    "username": "123456789",
    "password": "QWERTY",
    "pairCode": "09876"
}
| Field KeyName | Required | Description |
|---|---|---|
| Username | Yes | The Linkly Cloud username |
| Password | Yes | The Linkly Cloud password |
| PairCode | Yes | The pair code displayed on the PIN pad in "pairing" mode |
Status Codes
| Code | Description | Required action |
|---|---|---|
| 200 | Pairing was successful. The response object will contain the secret. | The POS store the secret securely. |
| 401 | The username, password, or paircode was invalid. | Re-check the Cloud username, try resetting the Cloud password |
| 400 | Invalid request. | Correct the request and try again. |
| 408 | Request Timeout. This should be rare: a transient error has occurred, possibly due to server overloading. | Wait a few seconds and attempt the request again. If the problem persists, contact Linkly Support. |
| 500-599 | A server error has occurred. | Wait a few seconds and attempt the request again. If the problem persists, contact Linkly Support. |
PIN pad Pairing Response
Example PIN pad Pairing response object
{
    "secret":"R6pqwt5ThZkjDXa7WA9aAgXUcAyGjX6a"
}
| Field KeyName | Description |
|---|---|
| secret | The non-expiring secret the POS uses to request an auth token |
Auth Token Request
Token request
# replace <<secret>> with the secret returned from the cloud pairing process
# replace <<posName>> and <<posVersion>> with the name and version of your POS
# replace <<posId>> with a unique UUID v4 which identifies your POS instance
# replace <<posVendorId>> with the unique UUID v4 which identifies your POS product
curl "https://auth.sandbox.cloud.pceftpos.com/v1/tokens/cloudpos" \
  -X POST \
  -H 'Content-Type: application/json' \
  -H 'Accept: application/json' \
  -d '{
        "secret": "<<username>>",
        "posName": "<<posName>>",
        "posVersion": "<<posVersion>>",
        "posId": "<<posId>>",
        "posVendorId": "<<posVendorId>>"
      }'
// replace <<secret>> with the secret returned from the cloud pairing process
// replace <<posName>> and <<posVersion>> with the name and version of your POS
// replace <<posId>> with a unique UUID v4 that identifies your POS instance
// replace <<posVendorId>> with the unique UUID v4 which identifies your POS product
var requestContent = new
{
    Secret = "<<secret>>",
    PosName = "<<posName>>",
    PosVersion = "<<posVersion>>",
    PosId = "<<posId>>",
    PosVendorId = "<<posVendorId>>",
};

var request = new HttpRequestMessage(HttpMethod.Post, "https://auth.sandbox.cloud.pceftpos.com/v1/tokens/cloudpos")
{
    Content = new StringContent(Newtonsoft.Json.JsonConvert.SerializeObject(requestContent), System.Text.Encoding.UTF8, "application/json")
};

var httpClient = new HttpClient(); // Note: in production don't create multiple HttpClient instances. Share one single instance.
HttpResponseMessage httpResponse = await httpClient.SendAsync(request);
string responseContent = await httpResponse.Content.ReadAsStringAsync();
import requests; # http://python-requests.org

# replace <<secret>> with the secret returned from the cloud pairing process
# replace <<posName>> and <<posVersion>> with the name and version of your POS
# replace <<posId>> with a unique UUID v4 that identifies your POS instance
# replace <<posVendorId>> with the unique UUID v4 which identifies your POS product
request_payload = {
    'secret': '<<secret>>',
    'posName': '<<posName>>',
    'posVersion': '<<posVersion>>',
    'posId': '<<posId>>',
    'posVendorId': '<<posVendorId>>',
}
response = requests.post('https://auth.sandbox.cloud.pceftpos.com/v1/tokens/cloudpos', json=request_payload)
response_payload = response.json()
URI Path
Production:
POST https://auth.cloud.pceftpos.com/v1/tokens/cloudpos
Development Sandbox environment:
POST https://auth.sandbox.cloud.pceftpos.com/v1/tokens/cloudpos
Headers
| Parameter | Value |
|---|---|
| Content-Type | application/json |
| Accept | application/json |
Request Body
Example token request object
{
    "secret": "R6pqwt5ThZkjDXa7WA9aAgXUcAyGjX6a",
    "posName": "Test POS",
    "posVersion": "12.6.80.17",
    "posId": "3e7f5001-58a3-43fa-9129-6e84a7b4f2a0",
    "posVendorId": "a256b7ec-709d-4c7d-8ffe-57cc7ca1fd22",
}
| Field KeyName | Required | Description |
|---|---|---|
| Secret | Yes | The secret returned from the cloud pairing process |
| PosName | Yes | The name of the POS requesting the token |
| PosVersion | Yes | The version of the POS requesting the token |
| PosId | Yes | A unique UUID v4 which identifies the POS instance. This value is generated by the POS as a part of the POS deployment settings. e.g. Two registers at the same merchant should supply two different PosId values |
| PosVendorId | Yes | A unique UUID v4 which identifies the POS POS product. This value can be hard coded into the build of the POS. e.g. All merchants using the same POS product should supply the same posVendorId value |
Status Codes
| Code | Description | Required action |
|---|---|---|
| 200 | Authorisation was successful. The response object will contain the auth token. | Store and maintain the token based on the expirySeconds property. |
| 401 | The secret was invalid. | You will need to perform the PIN pad pairing process again |
| 400 | Invalid request. | Correct the request and try again. |
| 408 | Request Timeout. This should be rare: a transient error has occurred, possibly due to server overloading. | Wait a few seconds and attempt the request again. If the problem persists, contact Linkly Support. |
| 500-599 | A server error has occurred. | Wait a few seconds and attempt the request again. If the problem persists, contact Linkly Support. |
Auth Response
Example token response object
{
    "token":"x2MUks9vdreTp8aHjfcULkQxURurcRCb",
    "expirySeconds":86400
}
| Field KeyName | Description |
|---|---|
| token | The token to user for authentication. |
| expirySeconds | The number of seconds until the token expires. |
Using the token
The Bearer token is added to each request as an HTTP header with the keyword Bearer as shown below:
Authorization: Bearer <token goes here>
When a token is received from the Linkly Authentication service it is the responsibility of the POS to securely store and manage the lifetime of that token and request a new one when the old token has expired.
The expirySeconds is returned with each token response. This value indicates the number of seconds until the token expires. The POS can use this value to calculate and record the local expiry date and time.
We recommend requesting a new token if it is due to expire within a few minutes of the request.
The POS can request tokens as often as required, however if the POS requests a new token for each transaction or each request this will slow down transaction times. Be aware that requesting a new token does not currently cause existing valid tokens to be revoked, but this may change in future without warning.
During an async transaction, be aware that if the token expires mid-transaction it will need to be renewed if the POS needs to send a sendkey request to the PIN pad.
C# example: checks to see if the token has expired
class TokenResponse
{
    public string Token { get; set; }
    public double ExpiryMinutes {
        get
        {
            return (ExpiryDateTime - DateTime.UtcNow).TotalMinutes;
        }
        set
        {
            ExpiryDateTime = DateTime.UtcNow.AddMinutes(value);
        }
    }
    public DateTime ExpiryDateTime { get; set; } = DateTime.UtcNow;
}

TokenResponse token = null;

private async Task<T> PostRequestAsync<T>(Uri baseUri, Guid sessionId, string type, EFTRequest request, bool async)
{
    var httpClient = GetHttpClient(); // Get a pre-constucted HttpClient from some repository, factory, or static instance
    if (token == null || token.ExpiryDateTime < DateTime.UtcNow.AddSeconds(10)) // notice 10 second offset
    {
        token = await GetTokenAsync(appSettings.PinpadUsername, appSettings.PinpadPassword, appSettings.PinpadPairCode);

        if (token == null || string.IsNullOrWhiteSpace(token.Token))
        {
            throw new Exception("Failed to get valid token");
        }
    }

    var uri = new Uri(baseUri, $"sessions/{sessionId}/{type}?async={async.ToString().ToLower()}");

    var request = new HttpRequestMessage()
    {
        RequestUri = new Uri("http://www.someURI.com"),
        Method = HttpMethod.Post,
    };
    request.Headers.Accept.Add(new System.Net.Http.Headers.AuthenticationHeaderValue("Bearer", token.Token);
    HttpContent content = new StringContent(JsonConvert.SerializeObject(request), UTF8Encoding.UTF8, "application/json");

    var response = await httpClient.SendAsync(request);

    if (response.IsSuccessStatusCode)
    {
        if (async)
        {
            return default(T); // nothing to return, now it's time to wait for the postbacks
        }
        return JsonConvert.DeserializeObject<T>(await response.Content.ReadAsStringAsync());
    }
    else
    {
        switch (response.StatusCode)
        {
            case System.Net.HttpStatusCode.Unauthorized:
                throw new UnauthorizedAccessException("Looks like the username, password or pair code is no longer valid, or your account has been disabled. Try re-pairing the PIN pad or resetting the password.");
            case System.Net.HttpStatusCode.NotFound:
                throw new Exception("Ooops, this shouldn't happen.  Check that your base URI and type are correct.");
            case System.Net.HttpStatusCode.BadRequest:
                throw new Exception("That request wasn't valid! Inspect the response message to see what's wrong.");
            default:
                throw new Exception("Server error, timeout, PIN pad error, etc. Call GET /sessions/{id}/transaction to see the status of this transaction or try again later.");
        }
    }
}
Async vs Sync Mode
The Linkly Cloud REST API works using one of the two following methods, synchronous and asynchronous. The mode is selected when POSTing a request by using the URI parameter async=false or async=true
Synchronous
Synchronous mode is the simplest and supports both POS Server to API or direct POS Client to API communication, however it is more limited in utility as the POS typically gets no feedback on progress of the EFT transaction until the result is returned at the end, indicating success or failure.
- If the POS doesn't have a valid authentication token it requests one from the Linkly Token Authentication service, using credentials provided by Linkly
- The POS sends its request to the API endpoint with the token in the header
- The operator completes the sale on the PIN pad while the POS waits for an HTTP response
- The POS receives a response with the result of the transaction
When using Sync mode the Notification object is not required in the request, although if it is supplied the notifications can still be sent to a separate postback web service if required (e.g. for logging purposes).
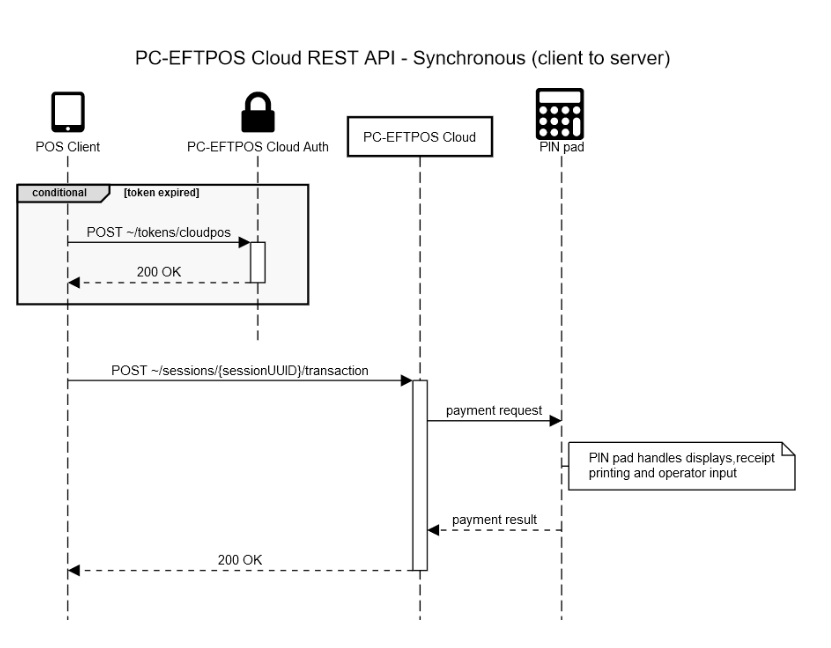
Client-to-Cloud API
Linkly Cloud Synchronous API implemented directly from POS client to Linkly Cloud API.
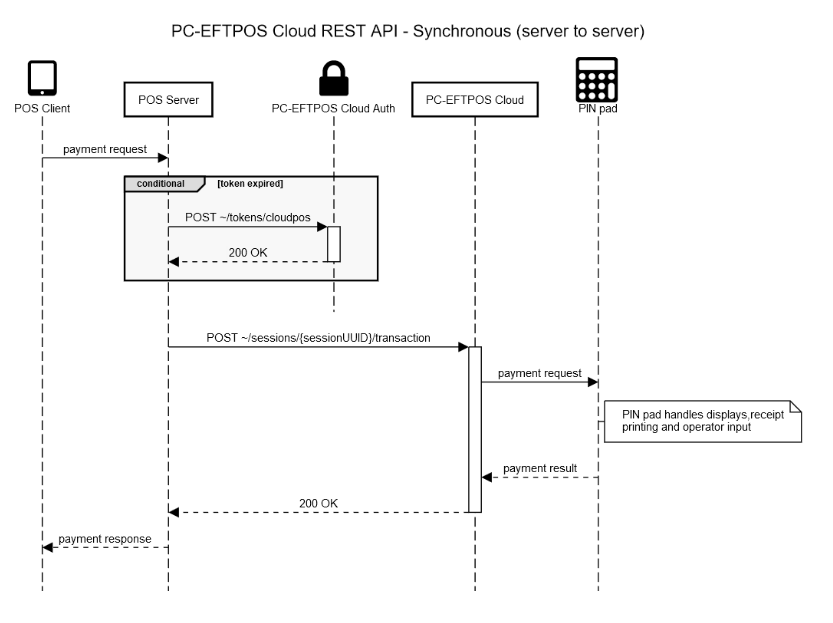
Server-to-Cloud API
Linkly Cloud Synchronous API implemented from POS server to Linkly Cloud API.
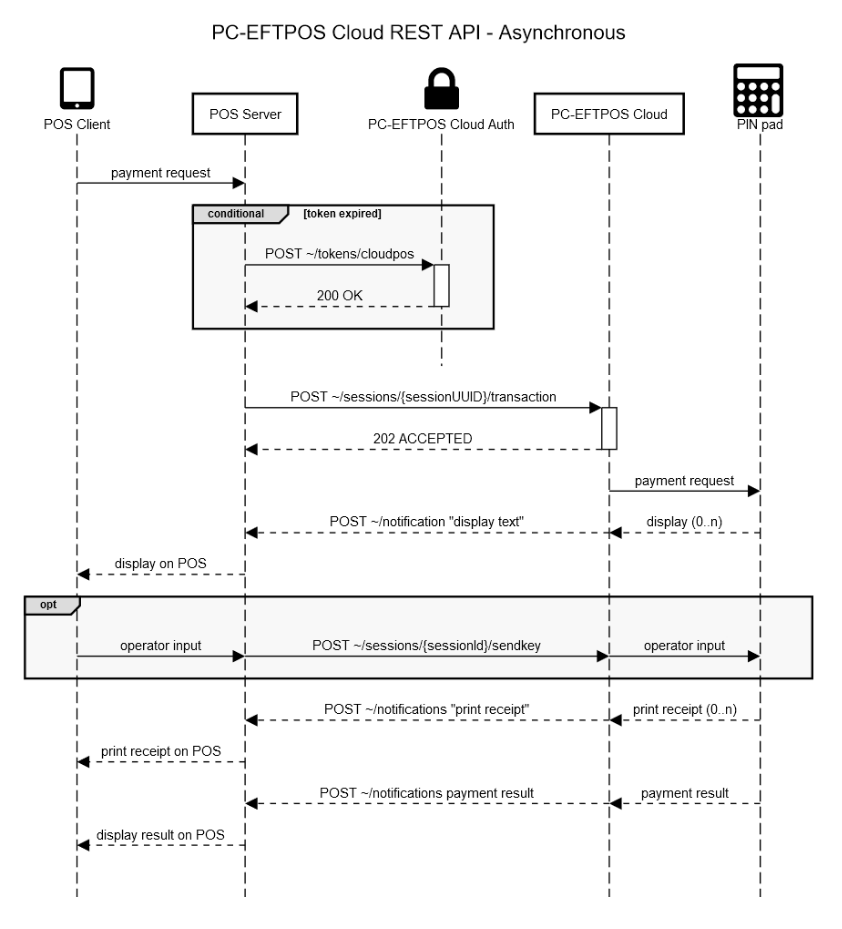
Asynchronous
Asynchronous mode supports POS Server to API communication only, as postbacks to the POS need a publicly accessible Notification URI. We recommend where possible that POS developers use this method, as it provides a better user experience, more functionality (e.g. key presses from the POS and mid-transaction status notifications) and is closer to other Linkly implementations.
- If the POS doesn't have a valid authentication token it requests one from the Linkly Token Authentication service, using credentials provided by Linkly.
- The POS sends its request to the API endpoint with the token in the header. It receives a "202 Accepted" HTTP response if successful, and the transaction begins
- The Linkly Cloud REST API sends postback messages to the provided notification URI each time the PIN pad display changes and each time a receipt is generated. The operator proceeds with the sale
- The POS can optionally POST additional sendkey requests to the PIN pad (to respond to requests for user input) via the REST interface using a valid token and the same session ID used to initiate the transaction. Examples of sendkey requests include "OK", "Cancel", "Yes", etc.
- When the transaction is complete the API sends a postback message indicating transaction completion with the result of the transaction
Server-to-Cloud API
Linkly Cloud Asynchronous API implemented from POS server to Linkly Cloud API.
API Requests
Request URI
The request URI is made up of 4 parts; the base endpoint, a sessionId, the type of request to make, and the async URI parameter.

- Base endpoints are different for authentication and requests on both production and the test sandbox.
- A
sessionIdis a valid uuid which identifies the current POS request. This must be generated by the POS using standard GUID/UUID generating libraries, ie. this must be a standard, globally unique UUID value for each and every transaction request. - The request type portion of the path needs to be one of the following strings:
| Request Types |
|---|
| transaction |
| logon |
| settlement |
| status |
| querycard |
| configuremerchant |
| reprintreceipt |
| sendkey |
- An API Request object should be constructed and POSTed to the appropriate API endpoint.
- The
asyncparameter needs to reflect the intention of the POS to either sit and wait for a response (async=false) or POST, expecting immediate return, and wait for Notifications to hit the POS's own postback endpoints, as descibed above.
Production Endpoints
For Authentication the POS should sends its token requests to:
https://auth.cloud.pceftpos.com/v1/tokens/cloudpos
The base request API endpoint is:
https://rest.pos.cloud.pceftpos.com/v1/sessions
Examples of complete production URIs:
| URI |
|---|
https://rest.pos.cloud.pceftpos.com/v1/sessions/c98433543a0d43eeba8f5876607f1df0/transaction?async=true |
https://rest.pos.cloud.pceftpos.com/v1/sessions/79e133ee3bc44339abfce86c93951193/logon?async=false |
https://rest.pos.cloud.pceftpos.com/v1/sessions/e6e2c68f217c469e977cddb56592f7ad/settlement?async=true |
https://rest.pos.cloud.pceftpos.com/v1/sessions/bc30254273d74b1dad95ef6426ee3892/status?async=false |
https://rest.pos.cloud.pceftpos.com/v1/sessions/5e833e504d124f4fb31954e76eab7691/querycard?async=true |
https://rest.pos.cloud.pceftpos.com/v1/sessions/795f214fbde645e8a7f7c8ae8dfba4f7/configuremerchant?async=true |
https://rest.pos.cloud.pceftpos.com/v1/sessions/1808c4ebc57a48fe8dba2a55f65b3c28/reprintreceipt?async=false |
https://rest.pos.cloud.pceftpos.com/v1/sessions/ba573b113af3577568546ecb327c0059/sendkey?async=true |
Development Endpoints
For Authentication the POS should sends its token requests to:
https://auth.sandbox.cloud.pceftpos.com/v1/tokens/cloudpos
The base request API endpoint is:
https://rest.pos.sandbox.cloud.pceftpos.com/v1/sessions/
Examples of complete development URIs:
| URI |
|---|
https://rest.pos.sandbox.cloud.pceftpos.com/v1/sessions/c98433543a0d43eeba8f5876607f1df0/transaction?async=false |
https://rest.pos.sandbox.cloud.pceftpos.com/v1/sessions/79e133ee3bc44339abfce86c93951193/logon?async=false |
https://rest.pos.sandbox.cloud.pceftpos.com/v1/sessions/e6e2c68f217c469e977cddb56592f7ad/settlement?async=false |
https://rest.pos.sandbox.cloud.pceftpos.com/v1/sessions/bc30254273d74b1dad95ef6426ee3892/status?async=false |
https://rest.pos.sandbox.cloud.pceftpos.com/v1/sessions/5e833e504d124f4fb31954e76eab7691/querycard?async=false |
https://rest.pos.sandbox.cloud.pceftpos.com/v1/sessions/795f214fbde645e8a7f7c8ae8dfba4f7/configuremerchant?async=false |
https://rest.pos.sandbox.cloud.pceftpos.com/v1/sessions/1808c4ebc57a48fe8dba2a55f65b3c28/reprintreceipt?async=false |
https://rest.pos.sandbox.cloud.pceftpos.com/v1/sessions/ba573b113af3577568546ecb327c0059/sendkey?async=true |
Notifications
Example notification request object
{
    "Request": { },
    "Notification":{
        "Uri": "https://pos.example.com/{{sessionid}}/{{type}}",
        "AuthorizationHeader": "Bearer <<token>>"
    }
}
The Notification object is only required if the POS uses async mode.
If a Notification object is provided as a part of the request, Linkly Cloud REST API will send information about the request such as displays, receipts and the transaction response to the endpoint specified by the POS
in the Uri field of the notification object.
The object is made up of two fields: Uri and AuthorizationHeader.
| Field KeyName | Description |
|---|---|
| Uri | Contains the Uri to send the responses to (must be https) |
| AuthorizationHeader | (Optional) value to add for the authorization header |
When providing a Notification Uri the POS can include {{sessionid}} and {{type}} in its URI which will be replaced by the session Id of the request and the type of response received, respectively.
Example:
Uri: https://pos.example.com/{{sessionId}}/{{type}}
POSTed with the session Id 12345678-90AB-CDEF-1234-1DECAFCOFFEE:https://rest.pos.sandbox.cloud.pceftpos.com/v1/sessions/12345678-90ab-cdef-1234-1decafcoffee/transaction
The API would send display responses for this transaction to https://pos.example.com/12345678-90ab-cdef-1234-1decafcoffee/display a transaction response would be https://pos.example.com/12345678-90ab-cdef-1234-1decafcoffee/transaction
These fields are optional and can be used without the other, or as a part of the query string. For example:
https://pos.example.com/{{type}}https://pos.example.com/{{sessionId}}https://pos.example.com?type={{type}}https://pos.example.com?sessionId={{sessionId}}https://pos.example.com?sessionId={{sessionId}}&type={{type}}https://pos.example.com/{{sessionId}}?type={{type}}https://pos.example.com/{{type}}?sessionId={{sessionId}}
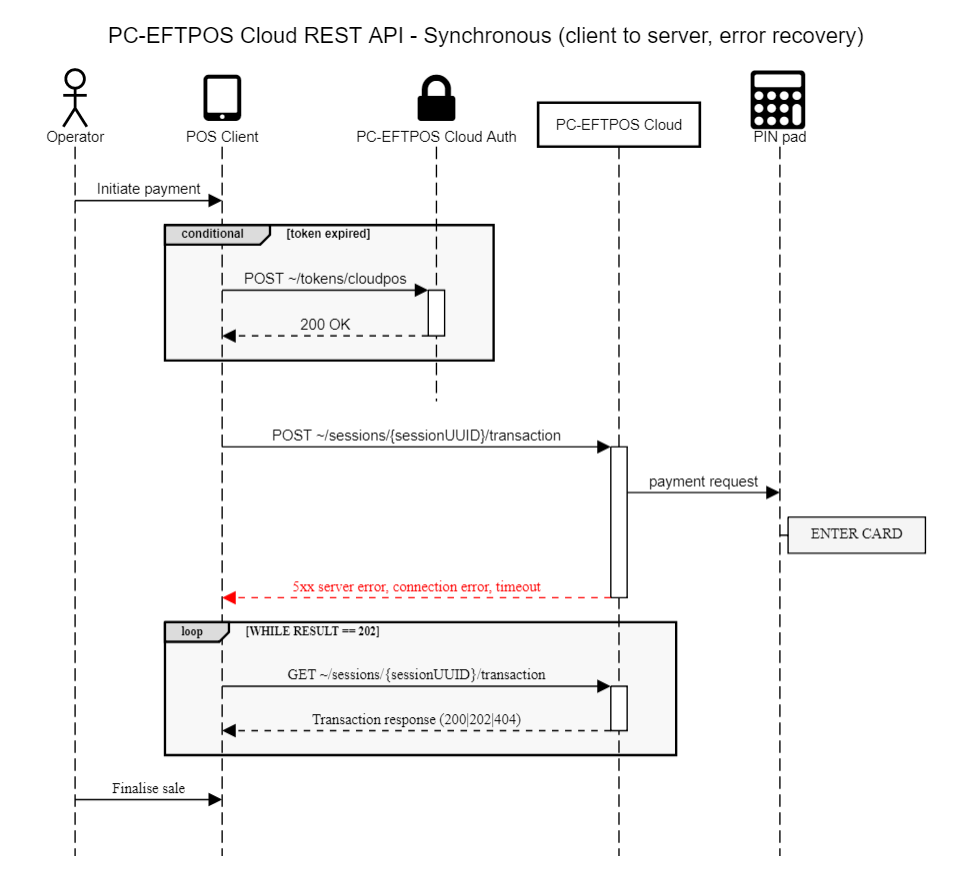
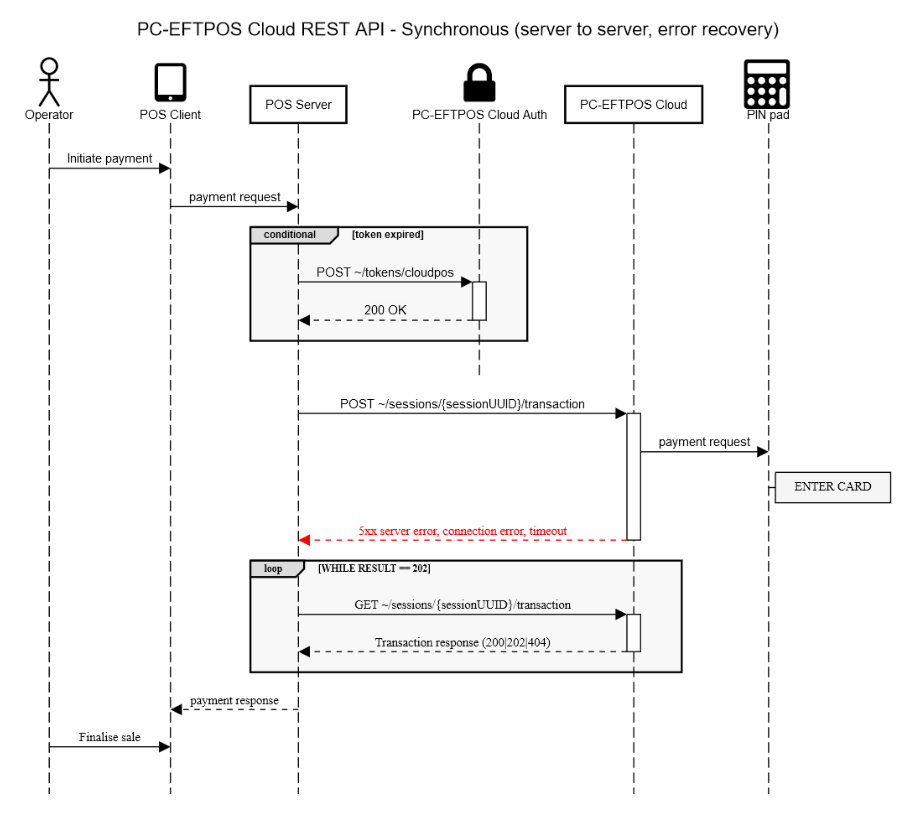
Error Recovery
Error recovery only applies to the Transaction request and simply refers to performing a GET request to the API to request the Transaction Status, using the same sessionId as the original Transaction request.
The POS must enter error recovery if, on POSTing a transaction request:
- the POS receives an HTTP 500-599 server error, connection error, or timeout whilst waiting for a POSTed transaction response, or
- (async only) a transaction response notification is not received within approximately 3 minutes (regardless of what other notifications might have been received)
In recovery the POS should use the same 'sessionId' as the original transaction to periodically call Transaction Status until one of the following HTTP Status codes is received:
- 200 OK - this response should include an APIResponse
- 400 Invalid Request - this is an error condition indicating that the Transaction Status request was invalid. Do not retry, log it and return an error to the operator (the transaction result cannot be determined).
- 401 Unauthorised - try getting a new token and then continue. If this persists, abort (the password may have changed).
- 404 Not Found - Either the Transaction Status URI used was incorrect (check configuration) or the transaction was not submitted successfully and can be resubmitted safely.
Any other HTTP status code (202, 408, 500-599) should mean the POS continues to retry. See Exponential Backoff for details and an example.
Example
- You POST a transaction to
https://rest.pos.sandbox.cloud.pceftpos.com/v1/sessions/c98433543a0d43eeba8f5876607f1df0/transaction - You receive an HTTP error 408 indicating that the request has timed out. This does not specify whether or not the transaction succeeded.
- You enter recovery mode and start polling GET
https://rest.pos.sandbox.cloud.pceftpos.com/v1/sessions/c98433543a0d43eeba8f5876607f1df0/transactionevery few seconds. - You receive an HTTP 202 each time indicating the transaction is still in progress.
- Eventually you receive an HTTP 200 with a valid transaction response. The transaction reponse object (not the HTTP Status code) indicates the financial success of the transaction.
The error recovery can end when either:
- The POS receives an HTTP 200 "OK" with a valid transaction response,
- The POS receives an HTTP 404 "Resource not found" response, which (assuming the correct GET request URI is used) indicates that the original transaction was not processed, or
- The POS receives an HTTP 400 "Invalid request" response, indicating an invalid POS request which should be investigated and resolved.
All other HTTP response codes indicate that, in one way or another, the POS should keep trying to GET the transaction response, as outlined below.
Sync Mode Recovery
The error recovery sequence diagrams for both client-to-cloud and server-to-cloud synchronous mode of communication is shown below.
Client-to-Cloud error recovery
Server-to-Cloud error recovery
HTTP Response codes returned from Transaction Status.
| HTTP Code | Description | Required action |
|---|---|---|
| 200 | OK - This will be accompanied by a valid response. The 'success' property in the response object indicates the financial status of the transaction. | Inspect the response to check the result of the financial transaction (eg. Approved, Declined, Approve with signature, etc.) |
| 202 | Accepted - The original transaction has been received but is not yet complete. Response body will be null. | The POS should retry the GET request every 1-2 seconds for up to 3 minutes, or until another HTTP code is received. |
| 400 | Invalid request - This error does NOT indicate success or failure of the original transaction, but rather that the GET request is badly formed. It is likely that the session Id is not a valid UUID. | Do NOT retry this GET request, as it is incorrectly formed. |
| 401 | Unauthorised - The token supplied is invalid. This error does NOT indicate success or failure of the original transaction. | The POS should refresh the token and attempt the GET request again. |
| 404 | Resource not found - Either the GET request URI is incorrect (the endpoint was not found) or the session Id requested was not found, hence the original transaction was not submitted successfully. | So long as the Transaction Status URI is configured correctly, the POS can safely retry the original transaction with the same (or new) sessionId. |
| 408 | Request Timeout - This should be rare: a transient error has occurred, possibly due to server overloading. | The POS should retry the GET request every few seconds for up to 3 minutes, or until another code is received. Please use exponential backoff to avoid overloading the server further. |
| 500-599 | A server error has occurred. | The POS should continue to perform the GET request using exponential backoff to avoid overloading the server. |
Async Mode Recovery
The POS must enter error recovery if no transaction response postback notifications are received from the Linkly Cloud within 3 minutes, even if all other responses (receipts/displays...) have been received.

HTTP Response codes returned from Transaction Status.
| HTTP Code | Description | Required action |
|---|---|---|
| 200 | OK - This will be accompanied by a valid response. The 'success' property in the response object indicates the financial success of the transaction. | Inspect the response to check the result of the financial transaction (eg. Approved, Declined, Approve with signature, etc.) |
| 202 | Accepted - The original transaction has been received but is not yet complete. Response body will be null. | The POS should await the result in its notification postback, or retry the GET request every 1-2 seconds for up to 3 minutes or until another HTTP code is received. |
| 400 | Invalid request - This error does NOT indicate success or failure of the original transaction, but rather that the GET request is badly formed. It is likely that the session Id is not a valid UUID. | Do NOT retry this GET request, as it is incorrectly formed. |
| 401 | Unauthorised - The token supplied is invalid. This error does NOT indicate success or failure of the original transaction. | The POS should refresh the token and attempt the request again. |
| 404 | Resource not found - Either the GET request URI is incorrect (the endpoint was not found) or the session Id requested was not found, hence the original transaction was not submitted successfully. | So long as the Transaction Status URI is configured correctly, the POS can safely retry the original transaction with the same (or new) sessionId. |
| 408 | Request Timeout - This should be rare: a transient error has occurred, possibly due to server overloading. | The POS should retry the GET request every few seconds for up to 3 minutes, or until another code is received. Please use exponential backoff to avoid overloading the server further. |
| 500-599 | A server error has occurred. | The POS should continue to perform the GET request using exponential backoff to avoid overloading the server. |
Exponential backoff
Exponential backoff is a technique used to reduce added strain on already overloaded servers, networks or infrastructure. It refers to the process of increasing the delay between each subsequent request, starting with a short delay and working up to a longer delay if the error condition continues. We request that if you get a response from our servers that may indicate overloading that you employ basic exponential backoff in your recovery attempts.
In-depth example:
- You POST a transaction to
https://rest.pos.sandbox.cloud.pceftpos.com/v1/sessions/c98433543a0d43eeba8f5876607f1df0/transaction - You receive an HTTP error 408 indicating that the request has timed out. This does not specify whether or not the transaction succeeded.
- You enter recovery mode and immediately try to GET the Transaction Status from
https://rest.pos.sandbox.cloud.pceftpos.com/v1/sessions/c98433543a0d43eeba8f5876607f1df0/transaction - You receive another HTTP 408. You delay 1 second and try the GET request again (initial delayed attempt).
- You receive another HTTP 408. You delay 2 seconds and try the GET request again (backoff by doubling delay).
- You receive another HTTP 408. You delay 4 seconds and try the GET request again (backoff by doubling delay again).
- You receive an HTTP 404 error indicating that the original transaction was NOT SUCCESSFUL, ie. the sessionId was not found. You can now exit recovery mode and retry the original transaction, POSTing a transaction to
https://rest.pos.sandbox.cloud.pceftpos.com/v1/sessions/c98433543a0d43eeba8f5876607f1df0/transactionagain. - You receive an HTTP error 408 indicating that the request has timed out. This does not specify whether or not the transaction succeeded.
- You enter recovery mode again and immediately GET from
https://rest.pos.sandbox.cloud.pceftpos.com/v1/sessions/c98433543a0d43eeba8f5876607f1df0/transaction - You receive another HTTP 408. You delay 1 second and try the GET request again.
- You receive another HTTP 408. You delay 2 seconds and try the GET request again.
- You receive an HTTP 202 indicating that the transaction is in progress. You keep trying the GET request every second, as long as you get a 202 (not an error condition, so backoff not required).
- You receive an HTTP 200 with a valid response indicating the financial success of the transaction.
Core Payments
Overview
The Core Payments API offers a simple entry point for POS developers to send card payment transactions to Linkly supported PIN pads.
Security
All communications between the third-party provider and Linkly are encrypted with TLS 1.2. All communications between the lane and Linkly Cloud are encrypted with TLS 1.2.
Supported Cipher Suites - TLS_ECDHE_RSA_WITH_AES_256_GCM_SHA384 - TLS_ECDHE_RSA_WITH_CHACHA20_POLY1305_SHA256 - TLS_ECDHE_RSA_WITH_AES_128_GCM_SHA256
Minimum Requirements
Below are the minimum requirements for a POS system to be considered for accreditation with the Linkly Core Payments API
Transaction Types
Management of merchant/bank functions
Transactional Scenarios
Error Handling
Purchase
The purchase transaction type allows the merchant to perform a sale, it uses the transaction request format.
All refunds in the Core Payments API need to be matched to an original purchase. The POS will achieve this by storing the contents of the RFN PAD tag returned in the purchase response and, if a refund for this purchase is required, sending the contents of this field in the refund request.
The 'REF' tag represents the transaction reference from the payment host. It will be printed on the receipt. The POS should record the 'REF' tag against the sale in the POS database to allow a transaction to be looked up from the receipt contents.
Purchase Request
Example transaction request object
{
    "Request":
    {
        "Merchant": "00",
        "TxnType": "P",
        "AmtPurchase": 100,
        "TxnRef": "1234567890",
        "CurrencyCode": "AUD",
        "CutReceipt": "0",
        "ReceiptAutoPrint": "0",
        "Application": "00",
        "PurchaseAnalysisData":
        {
            "OPR": "00766|test",
            "AMT": "0042000",
            "PCM": "0000"
        },
        "Basket":
        {
            "id": "t39kq18134553",
            "amt": 2145,
            "tax": 200,
            "dis": 50,
            "sur": 0,
            "items": [{
                "id": "t39kq002",
                "sku": "k24086723",
                "qty": 2,
                "amt": 2145,
                "tax": 200,
                "dis": 50,
                "name": "XData USB Drive"
            }]
        }
    },
    "Notification":
    {
        "Uri": "https://myPos.com.au/{{sessionid}}/{{type}}",
        "AuthorizationHeader": "Bearer <<token>>"
    }
}
Below are the fields from the transaction request that must be set for a purchase transaction.
| Field Name | Type | Required value | Notes |
|---|---|---|---|
| Merchant | string(2) | '00' | Instructs the Linkly components to perform a card payment |
| TxnType | string(1) | 'P' | Purchase |
| AmtPurchase | number | Variable | Left zero filled, amount of sale in cents. |
| TxnRef | string(16) | Variable | The reference number to attach to the transaction. This will appear on the receipt. |
| CurrencyCode | string(3) | Variable | Code to indicate requested currency. e.g. 'AUD' |
| CutReceipt | string(1) | Variable | Indicates whether Linkly should cut receipts. Defaults to '0' (DontCut) |
| ReceiptAutoPrint | string(1) | Variable | Indicates if the POS is to receive receipt events. See ReceiptAutoPrint for available values |
| Application | string(2) | '00' | Instructs Linkly to perform a card payment |
| PurchaseAnalysisData | object | Variable | Extended fields. See PurchaseAnalysisData note below. |
| Basket | object | Variable | See basket section for details |
PurchaseAnalysisData
| Tag | Name | Type | Notes | Example |
|---|---|---|---|---|
| OPR | OperatorReference | string(128) | POS operator name and id. Format: ID|Name | {"OPR": "66|test" } |
| AMT | TotalAmount | string(9) | Total amount of the entire sale in cents, not Tender amount | {"AMT": "20000" } $200.00 total sale |
| PCM | POSCapabilitiesMatrix | string(128) | POS Capabilities Matrix. First byte = POS can scan Barcode | {"PCM": "0000"} |
Purchase Response
Example purchase response object
{
    "SessionId": "dd250a0c81c202b66220d7379b338b8f",
    "ResponseType": "transaction",
    "Response": {
        "TxnType": "P",
        "Merchant": "00",
        "CardType": "AMEX CARD           ",
        "CardName": "05",
        "RRN": "123456789012",
        "DateSettlement": "2018-07-31T00:00:00",
        "AmtCash": 0,
        "AmtPurchase": 100,
        "AmtTip": 0,
        "AuthCode": 123456,
        "TxnRef": "1234567890      ",
        "Pan": "37601234567890      ",
        "DateExpiry": "4909",
        "Track2": "37601234567890=0949?,,S, YES, 05??????  ",
        "AccountType": "2",
        "TxnFlags": {
            "Offline": "1",
            "ReceiptPrinted": "0",
            "CardEntry": "S",
            "CommsMethod": "0",
            "Currency": "0",
            "PayPass": "0",
            "UndefinedFlag6": "0",
            "UndefinedFlag7": "0"
        },
        "BalanceReceived": false,
        "AvailableBalance": 0,
        "ClearedFundsBalance": 0,
        "Success": true,
        "ResponseCode": "00",
        "ResponseText": "APPROVED            ",
        "Date": "2018-07-31T16:14:40",
        "Catid": "12345678",
        "Caid": "0987654321     ",
        "Stan": 0,
        "PurchaseAnalysisData": {
          "RFN": "klujhadsc9ph87asd",
          "REF": "12345",
          "HRC": "ERR1",
          "HRT": "INVALID CARD"
        }
    }
}
The purchase response is in the format of the transaction response object, see the Transaction section for a detailed breakdown. The below tags are part of the PurchaseAnalysisData object in the response and are of critical importance to the core payments transactions.
PurchaseAnalysisData
| Tag | Name | Type | Notes | Example |
|---|---|---|---|---|
| RFN | Reference Number | string(128) | Transaction Reference Number to be used in a refund, can contain additional information | {"RFN":"klujhadsc9ph87asd"} |
| REF | Host reference Number | string(32) | Reference number to the sale from the provider systems, printed on receipt | {"REF":"12345"} |
| HRC | Host Response Code | string(64) | Response code from the payment processor | {"HRC":"ERR1"} |
| HRT | Host Response Text | string(999) | Response text from the payment processor | {"HRT":"INVALID CARD"} |
Refund
A refund transaction type allows the merchant to undo a sale, it uses the transaction request format. The POS must ensure that the correct 'RFN' Tag is sent when performing a refund.
Refund Request
{
    "Request":
    {
        "Merchant": "00",
        "TxnType": "R",
        "AmtPurchase": 100,
        "TxnRef": "1234567890",
        "CurrencyCode": "AUD",
        "CutReceipt": "0",
        "ReceiptAutoPrint": "0",
        "App": "00",
        "PurchaseAnalysisData":
        {
            "RFN": "klujhadsc9ph87asd",
            "OPR": "00766|test",
            "AMT": "0042000",
            "PCM": "0000"
        }
    },
    "Notification":
    {
        "Uri": "https://myPos.com.au/{{sessionid}}/{{type}}",
        "AuthorizationHeader": "Bearer <<token>>"
    }
}
| Field Name | Type | Required value | Notes |
|---|---|---|---|
| Merchant | string(2) | '00' | Instructs the Linkly components to perform a card payment |
| TxnType | string(1) | 'R' | Purchase |
| AmtPurchase | number | Variable | Left zero filled, amount of sale in cents. |
| TxnRef | string(16) | Variable | The reference number to attach to the transaction. This will appear on the receipt. |
| CurrencyCode | string(3) | Variable | Code to indicate requested currency. e.g. 'AUD' |
| CutReceipt | string(1) | Variable | Indicates whether Linkly should cut receipts. Defaults to '0' (DontCut) |
| ReceiptAutoPrint | string(1) | Variable | Indicates if the POS is to receive receipt events. See ReceiptAutoPrint for available values |
| Application | string(2) | '00' | Instructs Linkly to perform a card payment |
| PurchaseAnalysisData | object | Variable | Extended fields. See PurchaseAnalysisData note below. |
| Basket | object | Variable | See basket section for details |
PurchaseAnalysisData
| Tag | Name | Type | Notes | Example |
|---|---|---|---|---|
| RFN | Reference Number | string(128) | Reference Number from purchase request this refund is for | {"RFN":"klujhadsc9ph87asd"} |
| OPR | OperatorReference | string(128) | POS operator name and id. Format: ID|Name | {"OPR": "66|test" } |
| AMT | TotalAmount | string(9) | Total amount of the entire sale in cents, not Tender amount | {"AMT": "20000" } $200.00 total sale |
| PCM | POSCapabilitiesMatrix | string(128) | POS Capabilities Matrix. First byte = POS can scan Barcode | {"PCM": "0000"} |
Refund Response
The refund response is in the format of the transaction response object, see the Transaction section for a detailed breakdown.
PurchaseAnalysisData
| Tag | Name | Type | Notes | Example |
|---|---|---|---|---|
| REF | Host reference Number | string(128) | Reference number to the sale from the provider systems, printed on receipt | {"REF":"12345"} |
| HRC | Host Response Code | string(64) | Response code from the payment processor | {"HRC":"ERR1"} |
| HRT | Host Response Text | string(999) | Response text from the payment processor | {"HRT":"INVALID CARD"} |
Management Functions
The management functions allow the merchant to perform utility functions in addition to sales. The minimum requirements for these are; Reprint Receipt and Transaction Status
Reprint Receipt
The reprint receipt function allows for the retrieval/reprint of a financial receipt. The 'Merchant' field must be set to a unique 2-character code to specify the sale processor, this is returned in the purchase/refund response.
Reprint Receipt Request
Example reprint receipt request object
{
    "Request": {
        "Merchant": "99",
        "ReceiptAutoPrint": "0",
        "ReprintType": "2"
    },
    "Notification":
    {
        "Uri": "https://myPos.com.au/{{sessionid}}/{{type}}",
        "AuthorizationHeader": "Bearer <<token>>"
    }
}
| Field Name | Type | Required value | Notes |
|---|---|---|---|
| Merchant | string(2) | '00' | Unique ID of third-party sale to fetch. Set to '99' to indicate generic reprint |
| CutReceipt | string(1) | Variable | Indicates whether Linkly should cut receipts. Defaults to '0' (DontCut) |
| ReceiptAutoPrint | string(1) | Variable | Indicates if the POS is to receive receipt events. See ReceiptAutoPrint for available values |
Reprint Receipt Response
See Reprint Receipt Response Object for response format
Transaction Status
This function returns the last transaction event processed by Linkly. This function can be called by a POS to determine whether a transaction was successful or not following a power failure whilst an EFTPOS transaction was in progress, this is part of the error handling scenarios.
See Transaction Status for request/response format
Transactional Scenarios
Partial/Split Payments
Partial and split payments must be handled by the POS, when sending a purchase request the POS must set the 'AMT' Tag with the total amount of the entire sale the 'AmtPurchase' field should be set to the actual tender amount, in most cases these fields will be equal. When receiving a response the POS will receive the 'AmtPurchase' field set to the amount the sale was processed for if the POS receives an amount less than what was sent in the response it must continue to make payments until the entire tender is payed for.
Example 1
- POS sets AMT PurchaseAnalysisData tag to 4000 - Total sale for $40.00
- POS sets AmtPurchase = 2000 – Tender amount set to $20.00
- Process sale
- POS receives AmtPurchase = 2000 – Payment completed for $20.00
- POS sets AmtPurchase = 2000 and AMT PurchaseAnalysisData tag to 4000 – Create another sale for $20.00
- Process Sale
- POS receives AmtPurchase = 2000 – Payment completed for $20.00
- Tender complete
Example 2
- POS sets AMT PurchaseAnalysisData tag to 2000 = Total Sale for $20.00
- POS sets AmtPurchase = 2000 = Tender amount set to $20.00
- Process sale
- POS receives AmtPurchase = 1000 - Payment completed for $10.00
- POS sets AmtPurchase = 1000 and AMT PurchaseAnalysisData tag to 2000 – Create another sale for $10.00
- Process Sale
- POS receives AmtPurchase = 1000 – payment completed for $10.00
- Tender complete
Error Handling
The POS should implement error handling as outlined by the Error recovery section.
Optional Functionality
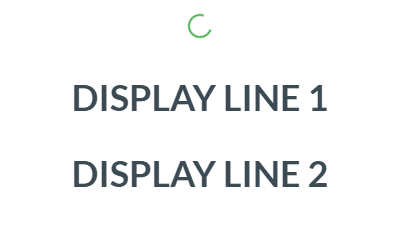
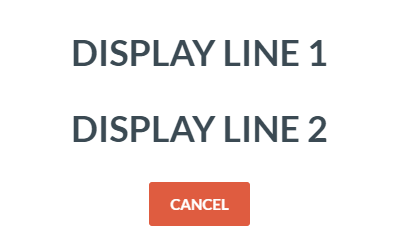
Custom Displays
To implement custom display the POS must implement the async API and handle the Display Response notification and Send Key request
If the POS is handling its own displays, it must implement the following:
- 2-line, 20 character. No keys enabled. Input type 0. Graphics code 0 to 6.
- 2-line, 20 character. Cancel key enabled. Input type 0. Graphics code 0 to 6.
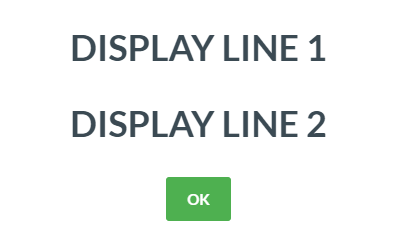
- 2-line, 20 character. OK key enabled. Input type 0. Graphics code 0 to 6.
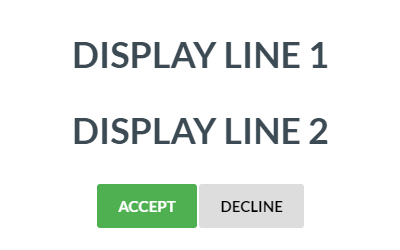
- 2-line, 20 character. Accept + decline key enabled. Input type 0. Graphics code 0 to 6.
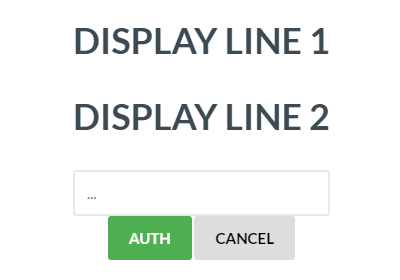
- 2-line, 20 character. Auth + cancel key enabled. Input type 1. Graphics code 0 to 6.
Input types:
- '1'= Normal ASCII input
Example displays
No keys enabled
{
  "ResponseType": "display",
  "Response": {
    "NumberOfLines": 2,
    "LineLength": 20,
    "DisplayText": [
      "DISPLAY LINE 1",
      "DISPLAY LINE 2"
    ]
  }
}
Cancel key enabled
{
  "ResponseType": "display",
  "Response": {
    "NumberOfLines": 2,
    "LineLength": 20,
    "DisplayText": [
      "DISPLAY LINE 1",
      "DISPLAY LINE 2"
    ],
    "CancelKeyFlag": true
  }
}
OK key enabled
{
  "ResponseType": "display",
  "Response": {
    "NumberOfLines": 2,
    "LineLength": 20,
    "DisplayText": [
      "DISPLAY LINE 1",
      "DISPLAY LINE 2"
    ],
    "OKKeyFlag": true
  }
}
Accept/decline keys enabled
{
  "ResponseType": "display",
  "Response": {
    "NumberOfLines": 2,
    "LineLength": 20,
    "DisplayText": [
      "DISPLAY LINE 1",
      "DISPLAY LINE 2"
    ],
    "AcceptYesKeyFlag": true,
    "DeclineNoKeyFlag": true
  }
}
Auth input enabled
{
  "ResponseType": "display",
  "Response": {
    "NumberOfLines": 2,
    "LineLength": 20,
    "DisplayText": [
      "DISPLAY LINE 1",
      "DISPLAY LINE 2"
    ],
    "CancelKeyFlag": true,
    "AuthoriseKeyFlag": true,
    "InputType": "1"
  }
}
POS Barcode Scanning
This function allows the POS to scan a barcode instead of the PIN pad. The POS will receive a DisplayEvent and must answer with a SendKey; populating the DataEntry field this will be the Barcode for the sale. POS must set the PCM PAD tag's first byte to '1' to indicate it can support this functionality and wants to use it for the transactions.
Transaction Request
Perform a sale with the following Purchase Analysis Data Tag:
| Tag Name | Tag Value | Description | Example |
|---|---|---|---|
| PCM | Flag array of functionality supported by POS | POS Capabilities Matrix. First byte = POS can scan Barcode | PCM0011 |
This will cause the EFT-Client to send a DisplayEvent to the POS with the following properties:
Display Event
| Field Name | Length (characters) | Description | Example |
|---|---|---|---|
| NumberOfLines | 2 | Number of lines of text | '02' – two lines |
| LineLength | 2 | Length of each line of text | '20' line is 20 char long |
| DisplayText | 40 | Text to display | 'SCAN BARCODE' |
| Cancel Key Flag | 1 | Indicates whether the CANCEL key can be pressed | '0' = Disabled '1' = Enabled |
| InputData Field Key | 1 | See 'Custom Displays' Section | '7' |
| OK Key Flag | 1 | Indicates whether the OK key can be pressed | '0' = Disabled '1' = Enabled |
The POS must reply to the above display event with a SendKey Request as detailed below:
Send Key Request
| Field Name | Length (characters) | Description | Example |
|---|---|---|---|
| Key | 1 | Indicated which key is to be pressed '0' for the CANCEL key '1' for the YES key '2' for the NO key '3' for the AUTH key | '0' = CANCEL |
| Data | 60 | Entry data collected by POS (the barcode) | 209849083 |
Linkly Basket
The "basket" in the transaction request contains information about items in the transaction.
Basket Command Header Fields
{
 "id": "t39kq18134553",
 "amt": 17890,
 "tax": 1790,
 "dis": 1000,
 "sur": 358,
 "items": [...]
}
The basket header contains meta information about the basket, along with the id for the basket which is needed when sending a transaction with basket data, or when changing the basket.
| Name | Required | Description | Format |
|---|---|---|---|
| id | Y | A unique ID for the basket | String, max 32 |
| amt | Y | Total price for the basket, in cents, including tax and discount, but excluding surcharge | Integer |
| tax | Total tax for the basket, in cents | Integer | |
| dis | Total discount for the basket, in cents | Integer | |
| sur | Surcharge (e.g. for Credit Card), in cents | Integer | |
| items | Y | Array of basket items | JSON array |
Basket Command Item Fields
Example basket item data object
{
    "id": "t39kq002",
    "sku": "k24086723",
    "qty": 2,
    "amt": 2145,
    "tax": 200,
    "dis": 50,
    "gtin": "831664397578",
    "name": "XData USB Drive",
    "desc": "24GB XData USB Drive, Red/Black",
    "srl": "xd546467",
    "img": "http://www.xdata.com/products/images/usb24_rb_1.jpg",
    "link": "http://www.xdata.com/products.php&pid=usb24_rb",
    "tag": "usb drive,storage"
}
The basket items are required to have at least an id, sku, quantity, and price of the item included in the item data.
Other fields can be used as desired by vendors.
| Name | Required | Description | Format |
|---|---|---|---|
| id | Y | A unique ID for the item | String, max 32 |
| sku | Y | Merchant assigned SKU for the item | String |
| qty | Y | Quantity (number of units) | Integer |
| amt | Y | Individual unit price for the item, in cents, including tax and discount | Integer |
| tax | Individual unit tax for the item, in cents | Integer | |
| dis | Individual unit discount for the item, in cents | Integer | |
| ean | The EAN (European Article Number) for the item | String | |
| upc | The UPC (Universal Product Code) for the item | String | |
| gtin | The GTIN (Global Trade Item Number) for the item | String | |
| name | A short name for the item | String, max 24 | |
| desc | A longer description for the item | String, max 255 | |
| srl | Serial code, or other identifying code, for the item | String | |
| img | URL to an image for the item | String | |
| link | URL to a product page for the item | String | |
| tag | Comma separated category or type information for the item (e.g. "food, confectionery”) | String, max 64 |
Basket Command Extended Item Fields
{
    "id": "t39kq001",
    "sku": "s63787452",
    "qty": 1,
    "amt": 1995,
    "weight": "2kg"
}
In additional to the required and optional fields, an item may also include one or more extended fields for use by specific third parties. Extended fields are simply included along with the standard fields for the item.
The example opposite includes "weight”, with a value of "2kg”, as an extended field.
See the appropriate Linkly Third Party Processor (TPP) specification for a list of supported extended fields.
Basket Command Full Example
Full Basket Example
{
    "id": "t39kq18134553",
    "amt": 18700,
    "tax": 1760,
    "dis": 650,
    "sur": 374,
    "items": [{
        "id": "t39kq002",
        "sku": "k24086723",
        "qty": 2,
        "amt": 2145,
        "tax": 200,
        "dis": 50,
        "name": "XData USB Drive"
    }, {
        "id": "t39kq003",
        "sku": "s23475697",
        "qty": 1,
        "amt": 8910,
        "tax": 810,
        "name": "MSoft OSuite",
        "srl": "ms7843k346j23"
    }, {
        "id": "t39kq004",
        "sku": "m47060855",
        "qty": 5,
        "amt": 1100,
        "tax": 110,
        "dis": 110,
        "name": "A4 Notepad"
    }]
}
The example opposite basket contains 3 items:
2 XData USB Drives, at $21.45 each, which includes tax of $2.00 and a discount of $0.50
1 MSoft OSuite, with a serial number, at $89.10, which includes tax of $8.10 and no discount
5 A4 Notepads, at $11.00 each, which includes tax of $1.10 and a discount of $1.10
The total value of the basket is $187.00, with a total tax of $17.60 and total discount of $6.50. Paying by credit card also incurred a surcharge of $3.74 (2%).
Surcharging
The Linkly surcharging solution is driven by the Linkly components and the payment terminal, this removes any need for the POS application to perform any complex card inspection or store and managed surcharging rates. Merchants can us the Linkly Merchant Portal to set their desired surcharging rates.
If a surcharge is applied:
- the SUR PAD tag will be present in the transaction response, and will contain the value of the surcharge applied in cents.
- the AMT PAD tag will be present in the transaction response, and will contain the total value of the sale (e.g. purchase amount + surcharge + tip)
Food & Beverage
Linkly has created a number of payment features that help merchants make the most of their payment solution, these help POS providers quickly add important features to their food and beverage solution.
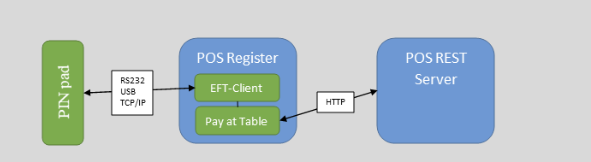
Pay at Table
The Linkly Pay at Table solution groups a number of payment features together to deliver the capability to process payment transactions at a table, the capabilities include:
- Initiate the transaction from the payment terminal
- Split billing across multiple parties
- Collect tips as part of the transaction
- Print receipts at the table
As the Pay at Table flow creates an alternate transaction flow (commenced from the terminal), there are dedicated Linkly features to enable.
Overview
The Pay at Table API provides a common interface for the terminal to utilise the EFT-Client to retrieve available tables and orders so payment functions (e.g. tender, customer receipt etc.) can be performed by an operator on the terminal without using the POS.
The Pay at Table client requires the POS to act a data source so that it can retrieve information about available tables, orders, payment options etc.
POS Data Source - REST Server
When in REST server mode the Pay at Table extension will connect directly to a REST server hosted by the POS which implements the Linkly Pay at Table REST API.
Example Transaction Flow
- The user initiates a Pay at Table transaction from the terminal
- The Linkly Pay at Table client requests the settings from the server
- The Linkly Pay at Table client requests a list of tables from the server
- Tables are presented to the user, either as a list using the DisplayName property of a Table or by allowing the user to manually key a DisplayNumber.
- Once the user selects a table, the Pay at Table client requests orders available on that table.
- If no orders are available, the Pay at Table client presents a display to the user and allows them to select another table.
- If orders are available the Pay at Table client presents available options for that order (e.g. print receipt, tender). If multiple orders are available, the Pay at Table client displays all available orders and asks the user to select which order to process.
- If the user selects the "Print Receipt" option, the Pay at Table client will request the customer receipt from the server, print it and display the order options again. If multiple print options are available from the settings, the user is asked to select which mode to print before the request is sent to the server.
- If the user selects the "Tender" option, the Pay at Table client starts a payment on the terminal. If multiple tender options are available from the settings, the Pay at Table client displays these options and asks the user to select the tender type before proceeding with the payment.
- The transaction request, display events and transaction event are sent to the server as EFTPOS commands
- Once the payment is complete, the Pay at Table client updates the tender with a completed state. It is assumed at this point the POS server would also update the order state.
- The Pay at Table client request the selected order again. If the order is complete a message is displayed on the terminal, otherwise the user is presented with the order options again.

POS Data Source - Linkly Interface
Linkly recommend the POS implements REST server mode. If the REST server mode doesn't suit your integration needs, please contact Linkly to discuss alternatives.
The POS must manage the order/tender states in case of disconnection from the Pay at Table client or the terminal. If the POS loses connection from the service at any time while a tender/order is being processed, it's recommended to inquire of the last transaction's status using the GetLastTransaction call to the EFT-Client.
Start Developing
Install required software
- Enable Pay at Table in your Linkly Cloud account
- Set up a Pay at Table REST demo application
- Start a Pay at Table sale from the PINpad
Set up Pay at Table
- Download the latest release candidate Linkly Software and install the "Offline Development" components
- DevTools will be installed to C:\PC_EFT\DevTools
- The VirtualPinpad.exe can be launched from the start menu
- Download and install the latest release candidate Linkly Pay at Table Software
- Set up a Pay at Table demo using either the REST or local Linkly API demo application
- Start a Pay at Table sale from the PINpad
REST Demo Application
To configure the REST Demo Application
- Download the REST demo source from GitHub
- Run Visual Studio 2019 as Administrator
- Open and build the project "PayAtTable.ServerCore" in Visual Studio
- Open the Project Properties, and under Debug, take note of the App URL
- When you run the Linkly Pay at Table installer, enable the REST API option and enter the App URL as the server address
- Run the project using IIS Express. The browser should open showing the Settings launch page. When you click on Swagger, it will show the available APIs.
Start a Pay at Table Sale
- Configure REST demo application
- On the Virtual PINpad, press FUNC + 8787 + OK
- Follow PINpad prompts
Pay at Table REST API
Linkly has created a lightweight solution for driving Pay at Table transactions which the POS needs to implement so the transactions can be commenced from the terminal.
HTTP Response codes
| HTTP Response code | Description |
|---|---|
| 200 OK | The request was successful |
| 201 Created | The request was successful, and a resource has been created |
| 204 No Content | The request was successful, there is no content in the response |
| 400 Bad Request | The client request is invalid |
| 401 Unauthorised | The client needs to authenticate before it can continue |
| 403 Forbidden | The client doesn't have access to the resource |
| 404 Not found | The requested resource wasn't found |
| 500 Server Error | The server encountered an internal error processing the request |
Methods
| Name | HTTP Method | Description |
|---|---|---|
| Get Settings | GET /api/settings | Get settings for the Pay at Table client |
| Get Tables | GET /api/tables | Get a lookup list of tables used to find an order |
| Get Orders By Table | GET /api/tables/{table-id}/orders | Get a list of orders associated with a table |
| Get Order | GET /api/orders/{order-id} | Get an order based on an order id. |
| Get Customer Receipt From Order | GET /api/orders/{order-id}/receipt?receiptOptionId=[string] | Get a customer receipt for a given order. Can accept an optional receipt option id. |
| Update Order | PUT /api/orders/{order-id} | Update an order |
| Create Tender | POST /api/tenders | Create a tender |
| Update Tender | PUT /api/tenders/{tender-id} | Update a tender |
| Create EFTPOS Command | POST /api/eftpos/commands | Create an EFTPOS command |
Get Settings
GET /api/settings
HTTP/1.1 200 OK
Content-type: application/json
{
    "Settings": {
        "TenderOptions": [{
            "Id": "0",
            "TenderType": 0,
            "Merchant": "0",
            "DisplayName": "EFTPOS",
            "EnableSplitTender": false,
            "EnableTipping": true,
            "CsdReservedString2": "EFTPOS",
            "TxnType": "P",
            "PurchaseAnalysisData": ""
        }],

        "ReceiptOptions": [{
            "Id": "0",
            "ReceiptType": 0,
            "DisplayName": "Customer"
        }],

        "PrinterOption": {
            "PrintMode": 0,
            "Location": -1,
            "StaticReceipt": ["line1", "line2", "line3", "line4"]
        }
    }
}
Description
Get the settings for the pay at table client
Request
Do not supply a request body for this method.
Response
If successful, the body contains a PATResponse object with the Settings property populated a Settings object.
Supported response codes: 200, 400, 401, 403 and 500.
Properties
| Name | Type | Description |
|---|---|---|
| TenderOptions | TenderOption[] | Lists the tender options available to the Pay at Table client. If left null or empty the option to tender will not be available on Pay at Table client when the user selects an order. If only one option is available, the Pay at Table client will automatically select that option when the user chooses to tender. |
| ReceiptOptions | ReceiptOption[] | Lists the tender options available to the Pay at Table client. If left null or empty the option to print will not be available on Pay at Table client when the user selects an order. If only one option is available, the Pay at Table client will automatically select that option when the user chooses an order. |
| PrinterOption | PrinterOption | Allows for custom receipt information, appended to the header/footer of the eftpos receipt, if left null no custom receipt will be printed. You can allow Linkly to print a custom header/footer with some information about the current Transaction |
TenderOption Properties
| Name | Type | Description |
|---|---|---|
| Id | String | Unique identifier. |
| TenderType | int | The type of this tender option |
| Merchant | int | The merchant code to use (see Appendix A - Merchant Codes). Default is 0. |
| DisplayName | String | The text displayed in the terminal. |
| EnableSplitTender | Boolean | If true, the split-billing workflow is enabled. |
| EnableTipping | Boolean | If true, the tipping workflow is enabled. |
| CsdReservedString2 | String | A Reserved String for additional functionality (see CsdReservedString2). Default is EFTPOS. |
| TxnType | String | The type of transaction this tender applies to. Only Purchase and Refund types are allowed. |
| PurchaseAnalysisData | String | any additional PAD value |
ReceiptOption Properties
| Name | Type | Description |
|---|---|---|
| Id | String | Unique identifier. |
| ReceiptType | int | The type of receipt for this tender option. Only 0 is supported for now. |
| DisplayName | String | The text displayed in the terminal. |
PrinterOption Properties
| Name | Type | Description |
|---|---|---|
| PrintMode | int | Determines who will handle the header/footer receipt printing, default PCEFTPOS: PCEFTPOS = 0, POS = 1, STATIC = 2. |
| Location | int | Determines where the custom receipt will print as a header prior to eftpos receipt or after as a footer, default is None: Header = 0, Footer = 1, None = -1. |
| StaticReceipt | String[] | The receipt to display if you set PrintMode to STATIC. |
Get Tables
GET /api/tables
HTTP/1.1 200 OK
Content-type: application/json
{
    "Tables": [{
            "Id": "50",
            "DisplayName": "TABLE 1",
            "DisplayNumber": 1,
            "ServerName": "Steve"
        },
        {
            "Id": "51",
            "DisplayName": "TABLE 2",
            "DisplayNumber": 2,
            "ServerName": "Steve"
        },
        {
            "Id": "52",
            "DisplayName": "TABLE 3",
            "DisplayNumber": 3,
            "ServerName": "Jake"
        }
    ]
}
Description
Get a lookup list of tables used to find an order. The Pay at Table client will either present a list of selectable items to the user using the "DisplayName" property, or request the user enter a number which will be used to find a table based on the "DisplayNumber" property. The Id property is a unique identifier for the table used in subsequent requests and is not presented to the user.
Request
Do not supply a request body for this method.
Response
If successful, the body contains a PATResponse object with the Tables property populated by an array of Table.
Supported response codes: 200, 400, 401, 403 and 500.
Properties
| Name | Type | Description |
|---|---|---|
| Id | String | Unique identifier. |
| DisplayName | String | Max 14 characters. A name which represents this table that could be displayed to a user. |
| DisplayNumber | Integer | A number which represents this table that could be displayed to a user. |
| ServerName | String | Max 8 characters. A string that represents either the servers name or employee ID. |
Get Orders by Table
GET /api/tables/{table-id}/orders
HTTP/1.1 200 OK
Content-type: application/json
{
    "Orders": [{
        "Id": "101",
        "DisplayName": "Elsa",
        "OrderState": 0,
        "AmountOwing": 100.00,
        "TableId": "50"
    }]
}
Description
Get a list of orders associated with a table.
The Pay at Table client will send this request after a user has selected one of the tables returned from a previous call to Get Tables.
Request
GET /api/tables/{table-id}/orders
Do not supply a request body for this method
| Parameter | Type | Description |
|---|---|---|
| table-id | String | Required. The id of an table orders are being requested from. |
Response
If successful, the body contains a PATResponse object with the Orders property populated by an array of Order.
Supported response codes: 200, 400, 401, 403 and 500.
Properties
| Name | Type | Description |
|---|---|---|
| Id | String | Unique identifier. Read only. |
| DisplayName | String | Max 14 characters. A name which represents this table that could be displayed to a user. |
| OrderState | Integer | The state of the order. This is used by the Pay at Table client to determine if an order is available for tender. Possible values: (0) Pending – The order exists, but isn't yet available for tender. (10) Active – The order exists and is available for tender. (20) Tendering – A tender is currently in progress. The result is not known. The order is not available for tender. (30) Complete – The order is complete and is not available for tender. |
| AmountOwing | Decimal | The outstanding amount on this order. This is used by the Pay at Table client to determine the maximum tender amount. |
| TableId | String | The id of the Table attached to this order. |
Get Order
GET /api/orders/{order-id}
HTTP/1.1 200 OK
Content-type: application/json
{
    "Order": {
        "Id": "101",
        "DisplayName": "Elsa",
        "OrderState": 0,
        "AmountOwing": 100.00,
        "TableId": "50"
    }
}
Description
Get an order based on an order id.
The Pay at Table client will send this request after a user has selected one of the orders returned from a previous call to Get Orders by Table.
Request
Do not supply a request body for this method.
| Parameter | Type | Description |
|---|---|---|
| order-id | String | Required. The id of the order being requested. |
Response
If successful, the body contains a PATResponse object with the Order property populated by an Order.
Supported response codes: 200, 400, 401, 403, 404 and 500.
Properties
| Name | Type | Description |
|---|---|---|
| Id | String | Unique identifier. Read only. |
| DisplayName | String | Max 14 characters. A name which represents this table that could be displayed to a user. |
| OrderState | Integer | The state of the order. This is used by the Pay at Table client to determine if an order is available for tender. Possible values: (0) Pending – The order exists, but isn't yet available for tender. (10) Active – The order exists and is available for tender. (20) Tendering – A tender is currently in progress. The result is not known. The order is not available for tender. (30) Complete – The order is complete and is not available for tender. |
| AmountOwing | Decimal | The outstanding amount on this order. This is used by the Pay at Table client to determine the maximum tender amount. |
| TableId | String | The id of the Table attached to this order. |
Get Customer Receipt from Order
GET /api/orders/{order-id}/receipt?receiptOptionId=[string]
HTTP/1.1 200 OK
{
    "Receipt": {
        "Lines": ["Line 1","Line 2","Line 3"]
    }
}
Description
Get a customer receipt based on an order id.
Request
Do not supply a request body for this method
| Parameter | Type | Description |
|---|---|---|
| order-id | String | Required. The id of the order the receipt is being requested from. |
| receiptOptionId | String | Optional. The id of the ReceiptOption used to generate this receipt request. Note: id '99' is reserved for custom header/footer receipt from POS |
Response
If successful, the body contains a PATResponse object with the Receipt property populated by a Receipt.
Supported response codes: 200, 400, 401, 403, 404 and 500.
Update Order
PUT /api/orders/{order-id}
Content-type: application/json
{
    "Order": {
        "Id": "200",
        "DisplayName": "Order 99",
        "OrderState": 30,
        "AmountOwing": 0.00,
        "TableId": "50"
    }
}
HTTP/1.1 200 OK
Content-type: application/json
{
    "Order": {
        "Id": "200",
        "DisplayName": "Order 99",
        "OrderState": 30,
        "AmountOwing": 0.00,
        "TableId": "50"
    }
}
Description
Updates an order. This is called before the Create Tender to mark the order as Tendering. If the update is successful, the Create Tender is called next. It is called again after a payment has been processed to mark the status of the order. The AmountOwing and OrderState will be updated according to the result of the payment. For example, if the payment was fully paid, the order will be updated as Completed and the AmountOwing is set as zero. If the payment is partial, it will be set again to Active and the AmountOwing will reflect the remaining balance. If the payment was canceled, the status will be set to Active and the AmountOwing will remain the same.
The Id property must point to a valid order and match the {order-id} in the request URL.
Request
The request body contains a PATRequest with the Tender property populated by a Tender.
| Parameter | Type | Description |
|---|---|---|
| order-id | String | Required. The id of the order being updated. |
Response
If successful, this method returns a PATResponse object with the Order property populated by a Order. In most cases the Order in the response will mirror the request.
Properties
| Name | Type | Description |
|---|---|---|
| Id | String | Unique identifier. Read only. |
| DisplayName | String | Max 14 characters. A name which represents this order that could be displayed to a user. |
| OrderState | Integer | The state of the order. This is used by the Pay at Table client to determine if an order is available for tender. Possible values: (0) Pending – The order exists, but isn't yet available for tender. (10) Active – The order exists and is available for tender. (20) Tendering – A tender is currently in progress. The result is not known. The order is not available for tender. (30) Complete – The order is complete and is not available for tender. |
| AmountOwing | Decimal | The outstanding amount on this order. This is used by the Pay at Table client to determine the maximum tender amount. |
| TableId | String | The id of the Table attached to this order. |
Create Tender
POST /api/tenders
{
    "Tender": {
        "Id" : null,
        "OrderId": "101",
        "TenderOptionId": "0",
        "TenderState": 0,
        "AmountPurchase": 100.00,
        "OriginalAmountPurchase ": 100.00
    }
}
HTTP/1.1 201 OK
Content-type: application/json
{
    "Tender": {
        "Id": "1042",
        "OrderId": "101",
        "TenderOptionId": "0",
        "TenderState": 0,
        "AmountPurchase": 100.00,
        "OriginalAmountPurchase": 100.00
    }
}
Description
Creates a tender. A tender is an object which contains information about a payment.
Request
The request body contains a PATRequest with the Tender property populated by a Tender.
The OrderId property must reference a valid order.
The TenderOptionId property references the tender option selected by the user.
Response
If successful, the body will contain a PATResponse object with the Tender property populated by a Tender. The Tender in the response will have the Id property populated by a unique Id.
Supported response codes: 201, 400, 401, 403, 404 and 500.
Properties
| Name | Type | Description |
|---|---|---|
| Id | String | Unique identifier. Read only. |
| TenderOptionId | String | The id of the tender option the operator selected to create this tender |
| TenderState | Integer | The state of a tender is defined by the TenderState property. The initial state is set to Pending (0). When the payment is complete the Tender object will be updated and the TenderState changed to CompletedSuccessful (1) or CompletedUnsuccessful (2). |
| AmountPurchase | Decimal | The amount of this tender (see notes) |
| Original AmountPurchase | Decimal | If the tender amount is changed (e.g. A $100 purchase on a gift card is completed for the remaining amount on the card - $80.50) this value will reflect the original tender amount before it was changed. |
| OrderId | String | The id of the order this tender is attached to. |
Update Tender
PUT /api/tenders/{tender-id}
Content-type: application/json
{
    "Tender": {
        "Id": "1042",
        "TenderOptionId": "0",
        "OrderId": "101",
        "TenderState": 2,
        "AmountPurchase": 80.50,
        "OriginalAmountPurchase": 100.00
    }
}
HTTP/1.1 200 OK
Content-type: application/json
{
    "Tender": {
        "Id": "1042",
        "TenderOptionId": "0",
        "OrderId": "101",
        "TenderState": 2,
        "AmountPurchase": 80.50,
        "OriginalAmountPurchase": 100.00
    }
}
Description
Updates a tender. It is possible that the AmountPurchase in an updated tender will not be the same as the AmountPurchase in the original tender. E.g. A $100 purchase on a giftcard is completed for the remaining amount on the card ($80.50).
The Id property must point to a valid tender and match the {tender-id} in the request URL. The OrderID property must point to a valid order.
Request
The request body contains a PATRequest with the Tender property populated by a Tender.
| Parameter | Type | Description |
|---|---|---|
| tender-id | String | Required. The id of the tender being updated. |
Response
If successful, this method returns a PATResponse object with the Tender property populated by a Tender. In most cases the Tender in the response will mirror the request.
Properties
| Name | Type | Description |
|---|---|---|
| Id | String | Unique identifier. Read only. |
| TenderOptionId | String | The id of the tender option the operator selected to create this tender |
| TenderState | Integer | The state of a tender is defined by the TenderState property. The initial state is set to Pending (0). When the payment is complete the Tender object will be updated and the TenderState changed to CompletedSuccessful (1) or CompletedUnsuccessful (2). |
| AmountPurchase | Decimal | The amount of this tender (see notes) |
| Original AmountPurchase | Decimal | If the tender amount is changed (e.g. A $100 purchase on a gift card is completed for the remaining amount on the card - $80.50) this value will reflect the original tender amount before it was changed. |
| OrderId | String | The id of the order this tender is attached to. |
Create EFTPOS Command
POST /api/eftpos/commands
{
    "EFTPOSCommand": {
        "TenderId": "0",
        "OriginalEFTPOSCommandId": "0",
        "EFTPOSCommandType": 0,
        "EFTPOSCommandState": 20
        "AccountType": "",
        "AmtCash": 0.0,
        "AmtPurchase": 100.0,
        "AmtTip": 0.0,
        "AmtTotal": 0.0,
        "Application": "",
        "AuthCode": "",
        "Caid": "",
        "Catid": "",
        "CardName": "",
        "CardType": "",
        "CsdReservedString1": "",
        "CsdReservedString2": "",
        "CsdReservedString3": "",
        "CsdReservedString4": "",
        "CsdReservedString5": "",
        "CsdReservedBool1": false,
        "CutReceipt": false,
        "CurrencyCode": "",
        "DataField": "",
        "Date": "",
        "DateExpiry": "",
        "DateSettlement": "",
        "DialogPosition": "",
        "DialogTitle": "",
        "DialogType": "",
        "DialogX": 0,
        "DialogY": 0,
        "EnableTip": false,
        "EnableTopmost": false,
        "Merchant": "",
        "MessageType": "",
        "PanSource": " ",
        "Pan": "",
        "PosProductId": "",
        "PurchaseAnalysisData": "",
        "ReceiptAutoPrint": false,
        "ResponseCode": "",
        "ResponseText": "",
        "Rrn": "",
        "Success": false,
        "Stan": "",
        "Time": "",
        "TxnRef": "",
        "TxnType": "",
        "Track1": "",
        "Track2": ""
    }
}
POST /api/eftpos/commands
{
   "EFTPOSCommand":{
      "CsdReservedString1":"000000002",
      "CsdReservedString5":"0",
      "DataField":"PROCESSING          PLEASE WAIT         ",
      "EFTPOSCommandType":400,
      "TenderId":"5"
    }
}
POST /api/eftpos/commands
{
   "EFTPOSCommand":{
      "CsdReservedString5":"C",
      "EFTPOSCommandType":401,
      "Receipt":"------------------------\r\n *** TRAINING MODE ***  \r\n  TEST MERCHANT TITLE   \r\n   TEST MERCHANT NAME   \r\n         LINE2          \r\n                        \r\n15:18:09 04/11/20       \r\n                        \r\nCREDIT ACCOUNT          \r\n                        \r\nPURCHASE   AUD     $1.00\r\nSURCHARGE  AUD     $0.22\r\n                --------\r\nTOTAL      AUD     $1.22\r\n                        \r\nAPPROVED -  00          \r\n                        \r\nPLEASE RETAIN AS RECORD \r\n      OF PURCHASE       \r\n------------------------\r\n",
      "TenderId":"5"
   }
}
HTTP/1.1 200 OK
Content-type: application/json
{
    "EFTPOSCommand": {
        "TenderId": "0",
        "OriginalEFTPOSCommandId": "0",
        "EFTPOSCommandType": 0,
        "EFTPOSCommandState": 20
        "AccountType": "",
        "AmtCash": 0.0,
        "AmtPurchase": 100.0,
        "AmtTip": 0.0,
        "AmtTotal": 0.0,
        "Application": "",
        "AuthCode": "",
        "Caid": "",
        "Catid": "",
        "CardName": "",
        "CardType": "",
        "CsdReservedString1": "",
        "CsdReservedString2": "",
        "CsdReservedString3": "",
        "CsdReservedString4": "",
        "CsdReservedString5": "",
        "CsdReservedBool1": false,
        "CutReceipt": false,
        "CurrencyCode": "",
        "DataField": "",
        "Date": "",
        "DateExpiry": "",
        "DateSettlement": "",
        "DialogPosition": "",
        "DialogTitle": "",
        "DialogType": "",
        "DialogX": 0,
        "DialogY": 0,
        "EnableTip": false,
        "EnableTopmost": false,
        "Merchant": "",
        "MessageType": "",
        "PanSource": " ",
        "Pan": "",
        "PosProductId": "",
        "PurchaseAnalysisData": "",
        "ReceiptAutoPrint": false,
        "ResponseCode": "",
        "ResponseText": "",
        "Rrn": "",
        "Success": false,
        "Stan": "",
        "Time": "",
        "TxnRef": "",
        "TxnType": "",
        "Track1": "",
        "Track2": ""
    }
}
Description
Create an EFTPOS command. The fields defined will vary based on the EFTPOSCommandType as described in the Properties section below. EFTPOSCommandType are 200 for TransactionEvent, 400 for DisplayEvent, and 401 for PrintEvent.
Request
The request body contains a PATRequest with the EFTPOSCommand property populated by an EFTPOSCommand
Response
If successful, this method returns a PATResponse object with the EFTPOSCommand property populated by an EFTPOSCommand. In most cases the EFTPOSCommand in the response will mirror the request.
Properties
Note: All message handling should be case-insensitive.
TransactionEvent
| Name | Type | Description |
|---|---|---|
| Id | String | Unique identifier. Read only. |
| TenderId | String | Id of the tender that this EFTPOS command is associated with |
| OriginalEFTPOS CommandId | String | The id of the original EFTPOS request if this is an event. |
| EFTPOSCommand Type | Integer | 200 |
| EFTPOSCommand State | Integer | AwaitingDeviceAck = 0, AwaitingDeviceResponse = 10, CompletedSuccessful = 20, CompletedUnsuccessful = 30 |
| AccountType | String | The account type used |
| AmtCash | Decimal | The cash amount |
| AmtPurchase | Decimal | The purchase amount |
| AmtTip | Decimal | The tip amount |
| AmtTotal | Decimal | The total amount |
| Application | String | The card application used |
| AuthCode | String | The transaction authorisation code |
| Caid | String | The CAID of the terminal used |
| Catid | String | The CATID of the terminal used |
| CardName | String | N/A |
| CardType | String | N/A |
| CsdReservedString1 | String | N/A |
| CsdReservedString2 | String | N/A |
| CsdReservedString3 | String | N/A |
| CsdReservedString4 | String | N/A |
| CsdReservedString5 | String | N/A |
| CsdReservedBool1 | Boolean | N/A |
| CutReceipt | Boolean | N/A |
| CurrencyCode | String | The transactions currency code |
| DataField | String | |
| Date | String | The date |
| DateExpiry | String | N/A |
| DateSettlement | String | The settlement date of the transaction |
| DialogPosition | String | |
| DialogTitle | String | |
| DialogType | String | |
| DialogX | Integer | |
| DialogY | Integer | |
| EnableTip | Boolean | N/A |
| EnableTopmost | Boolean | |
| Merchant | String | |
| MessageType | String | |
| PanSource | String | N/A |
| Pan | String | N/A |
| PosProductId | String | |
| PurchaseAnalysisData | String | Purchase Analysis Data, contains any transaction specific tag data |
| ReceiptAutoPrint | Boolean | |
| ResponseCode | String | The response code from the acquiring bank |
| ResponseText | String | The response text associated with the response code |
| Rrn | String | Retrieval reference number |
| Success | Boolean | Status of the transaction |
| Stan | String | System Trace Audit Number |
| Time | String | The time |
| TxnRef | String | Transaction reference number |
| TxnType | String | Transaction type, eg. Purchase |
| Track1 | String | N/A |
| Track2 | String | N/A |
DisplayEvent
| Name | Type | Description |
|---|---|---|
| EFTPOSCommand Type | Integer | 400 |
| TenderId | String | Id of the tender that this EFTPOS command is associated with |
| DataField | String | The text displayed in the terminal. |
| CsdReservedString1 | String | N/A |
| CsdReservedString5 | String | N/A |
PrintEvent
| Name | Type | Description |
|---|---|---|
| EFTPOSCommand Type | Integer | 401 |
| TenderId | String | Id of the tender that this EFTPOS command is associated with |
| Receipt | String | The id of the original EFTPOS request if this is an event. |
| CsdReservedString5 | String | N/A |
REST Server Authorization
The following options are available to secure the communication between the POS and the Pay-at-table component:
Authorisation Header
The POS server developer needs to provide the authorization header type (Basic or Bearer) and token for the Pay-at-table component to use when sending the API requests. This value must be given to Linkly Cloud Portal admin to be configured for testing and deployment.
Server-side validation
The Pay-at-table component can also be configured to validate the server certificates. The actual server CA certificate file must be given to Linkly Cloud Portal admin to be configured for testing and deployment.
Client-side validation
The Pay-at-table component can also be configured to send client certificates for each API request to the POS server. The POS server can then validate the certificate it receives based on whichever criteria agreed with Linkly. The actual certificate files must be configured by Linkly Cloud Portal admin to be configured for testing and deployment.
Error Codes
The following error codes will be displayed in the terminal if any of the described scenarios occur:
| Code | Description |
|---|---|
| ZA | Failed to retrieve table |
| ZB | Failed to create tender |
| ZC | Failed to update tender |
| ZD | Failed to retrieve order |
| ZE | Failed to retrieve settings |
| ZF | Failed to update order before tendering |
| ZG | Failed to update order after tendering |
Tipping
The Linkly tipping feature supports the ability for customers to collect a tip on the terminal as part of the payment transaction.
Linkly's components will manage the configuration and the terminal is used to interact with the cardholder to streamline the process of tipping.
To enable tipping, configure the tipping values in the Linkly Merchant Portal, and set EnableTip to '1' in the transaction request.
If a tip is applied:
- the AmtTip field will be populated in the transaction response, and will contain the value of the tip applied in cents.
- the AMT PAD tag will be present in the transaction response, and will contain the total value of the sale (e.g. purchase amount + surcharge + tip)
This feature supports the following tip entry methods:
- Manual amount entry where the cardholder selects the amount to tip
- Configurable percentages for automatic tip addition, eg. 5%, 10%, 15%
To provide POS partners with the flexibility to use their own tipping solutions Linkly supports the following requests as part of the transaction method.
The TIP tag can be used by the POS to send the TIP value to the terminal for inclusion on the customer copy of the eftpos receipt, this is only required if the POS wants to implement it's own tipping solution, for all other instances nothing is needed from the POS to enable tipping for a merchant.
API Specification
All Requests and Responses are wrapped in ApiRequest and ApiResponse JSON objects respectively.
ApiRequest
Example APIRequest object
{
    "Request":{
        "somekey":"somevalue",
        "somekey":"somevalue",
        ....
    },
    "Notification":{
        "Uri": "https://myPos.com.au/{{sessionid}}/{{type}}",
        "AuthorizationHeader": "Bearer <<token>>"
    }
}
A request to the Linkly Cloud REST API is made up of two JSON objects a "Request" and a "Notification" (optional for sync mode, mandatory for async mode).
The "Request" object will contain all the information a POS will send to make a request, be it a transaction or a settlement.
The "Notification" object contains information about the POS' web server that is capable of receiving responses from the Linkly Cloud REST API about its current requests. Most requests will generate display responses and receipt responses in addition to the original request response that the POS is expected to handle. All these will be in JSON wrapped in a "Response" object and contain a "sessionId".
GET and POST Requests
All requests are made using POST except for transaction which also has GET functionality.
When using GET on transaction the POS must send the sessionId of the transaction they want retrieved, the POS will either receive a 202 "in progress" or a 200 OK with the transaction response in the body.
ApiResponse
Example APIResponse object
{
    "sessionId":"a1b2c3d4e5",
    "responseType":"transaction",
    "Response"{
        "somekey":"somevalue",
        "somekey":"somevalue",
    }
}
An ApiResponse is made up of a "Response" object which contains the information relating to the original request such as a transaction.
It also contains a "sessionId", a valid uuid which forms the unique session identifier for this request.
Finally the Linkly Cloud REST API also sends a ResponseType field which contains an identifier for this response.
It's important to understand what the Cloud API response means, and that there are at least two layers to responses.
HTTP Response
The REST API is a layer on top of back-end EFT services. The API has its own response codes to indicate error conditions in the API itself which have no relation to anything financial or transaction-related. It does this with HTTP Status Codes. There are two "non-error" HTTP status codes, HTTP 200 and HTTP 202.
HTTP 200 OK
This indicates that the request was able to be processed successfully, but does not say what the result of that request is.
Example 1:
You POST a synchronous Transaction to the API for a purchase of $10. The API responds with HTTP 200 and an ApiResponse. The HTTP 200 response code indicates that it was able to pass on the transaction to the EFT Client, and got a transaction response. It does not mean the transaction was successful. In order to check if the transaction was successful (ie. money was actually transferred) you need to check the Response's Success flag.
Example 2:
You POST a Logon request to the API, but the PIN pad is offline. The API responds with HTTP 200, indicating that it was able to relay the request to the EFT Client, and the EFT Client gave a valid response back. Again, you need to inspect the Response to determine that the PIN pad is offline.
Example 3:
After a power failure, your POS enters error recovery to determine the status of the last transaction it sent. Upon sending the GET Transaction Status request, the API responds with an HTTP 404 Unauthorised response. This is no reflection on the original transaction, but instead the POS refreshes its token and retries the request. This time it receives an HTTP 200, which once again needs to be inspected to find out if the transaction was actually successful.
HTTP 202 Accepted
This indicates that the request has been accepted by the API and it is currently processing that request. It does not indicate that the transaction request has necessarily been "accepted" yet by either the EFT Client, PIN pad, or bank. You should wait for the transaction response and determine the result from that.
Other HTTP status codes
All other status codes besides 200 and 202 indicate that the API was unable to fulfill the REST request, not whether or not the transaction succeeded (although you can sometimes determine unsuccessful requests based on HTTP status code).
** Example 1:**
You POST a synchronous Transaction to the API for a purchase of $10. The API responds with HTTP 500. This indicates that there's something wrong with either the API itself or infrastructure around the API. Examples may include: internet outages, server overloading, etc. The POS should enter error recovery to find out whether it was successful.
** Example 2:**
You POST a synchronous Transaction to the API for a purchase of $10. The API responds with HTTP 401. This indicates that the authorisation token is not valid and needs to be renewed. In this case it can be safely assumed that the transaction was not successful yet, but the POS should renew the token and try again.
EFT Response
The next layer is the EFT Reponse, which is found inside the API Response. The EFT Response is received in one of only 3 ways:
- As a notification message posted to the POS's appropriate endpoint, if supplied
- In the body of the response to an HTTP POST request (eg. Transaction, Status or Logon), but only where the HTTP Status code is 200.
- In the body of the response to an HTTP GET transaction status request.
Methods
Transaction
Transaction request
# replace <<token>> with the token returned from your auth request
curl -v "https://rest.pos.sandbox.cloud.pceftpos.com/v1/sessions/$(uuidgen)/transaction?async=false" \
  -X POST \
  -H 'Content-Type: application/json' \
  -H 'Authorization: Bearer <<token>>' \
  -H 'Accept: application/json' \
  -d '{
        "request": {
          "txnType": "P",
          "amtPurchase": 100,
          "txnRef": "0123456789ABCDEF"
        }
      }'
var token = "<<token>>"; // replace <<token>> with the token returned from your auth request
var requestContent = new
{
    Request = new
    {
        TxnType = "P",
        AmtPurchase = 100,
        TxnRef = DateTime.Now.ToString("yyMMddhhmmssffff"),
    }
};

var request = new HttpRequestMessage(HttpMethod.Post, $"https://rest.pos.sandbox.cloud.pceftpos.com/v1/sessions/{Guid.NewGuid().ToString()}/transaction?async=false")
{
    Content = new StringContent(Newtonsoft.Json.JsonConvert.SerializeObject(requestContent), System.Text.Encoding.UTF8, "application/json")
};
request.Headers.Authorization = new AuthenticationHeaderValue("Bearer", token);
var httpClient = new HttpClient(); // Note: in production don't create multiple HttpClient instances. Share one single instance.
HttpResponseMessage httpResponse = await httpClient.SendAsync(request);
string responseContent = await httpResponse.Content.ReadAsStringAsync();
import datetime
import uuid
import requests; # http://python-requests.org

token = '<<token>>' # replace <<token>> with the token returned from your auth request
request_payload = {
    'request': {
        'txnType': 'P',
        'amtPurchase': 100,
        'txnRef': datetime.datetime.now().strftime('%y%m%d%H%M%S%f')[:-4]
    }
}
uri = 'https://rest.pos.sandbox.cloud.pceftpos.com/v1/sessions/' + str(uuid.uuid4()) + '/transaction?async=false'
headers = {'Authorization': 'Bearer ' + token}
response = requests.post(uri, json=request_payload, headers=headers)
response_payload = response.json()
Send a transaction request (e.g. purchase, refund, cash out).
URI Path
POST ~/v1/sessions/<<sessionid>>/transaction
URI Query Parameters
| Parameter | Value |
|---|---|
| async | 'true' for asynchronous mode, 'false' for synchronous mode |
Headers
| Parameter | Value |
|---|---|
| Authorization | The bearer token returned from ~/v1/tokens/cloudpos |
| Content-Type | application/json |
| Accept | application/json |
Transaction Request Object
Example transaction request object
{
    "Request":
    {
        "AmtPurchase": 100,
        "TxnType": "P",
        "TxnRef": "1234567890",
        "Basket":
        {
            "id": "t39kq18134553",
            "amt": 2145,
            "tax": 200,
            "dis": 50,
            "sur": 0,
            "items": [{
                "id": "t39kq002",
                "sku": "k24086723",
                "qty": 2,
                "amt": 2145,
                "tax": 200,
                "dis": 50,
                "name": "XData USB Drive"
            }]
        }
    },
    "Notification":
    {
        "Uri": "https://myPos.com.au/{{sessionid}}/{{type}}",
        "AuthorizationHeader": "Bearer <<token>>"
    }
}
| Field KeyName | Type | Required | Description |
|---|---|---|---|
| Merchant | string(2) | Merchant to send the Transaction to (default 0, EFTPOS 0) use merchant '0' unless performing TPP transactions | |
| ReceiptAutoPrint | string(1) | Variable | Indicates if the POS is to receive receipt events. See ReceiptAutoPrint for available values |
| CutReceipt | string(1) | Indicates whether Linkly should cut receipts. Defaults to '0' (DontCut) | |
| TxnType | string(1) | Yes | Required. Indicated the type of transaction to perform |
| CurrencyCode | string(3) | Currency code for this transaction (e.g. AUD) A 3-digit ISO currency code. Defaults to " "(NotSet) | |
| OriginalTxnType | string(1) | The original type of transaction for voucher entry. Defaults to 'P' (PurchaseCash) | |
| Date | string(12) | Yes | Nullable. Original transaction time. Used for voucher or completion only |
| Time | string(12) | Nullable. Original transaction time. Used for voucher or completion only | |
| TrainingMode | bool | Nullable. Determines if the transaction is a training mode transaction. Set to TRUE if the transaction is to be performed in training mode. The default is FALSE. |
|
| EnableTip | bool | Nullable. Set to TRUE if tipping is to be enabled for this transaction. The default is FALSE | |
| AmtCash | number | In Cents. The cash amount for the transaction. This property is mandatory for a 'C' transaction type. | |
| AmtPurchase | number | Yes | In Cents. The purchase amount for the transaction. |
| AuthCode | string(6) | Nullable. The authorisation number for the transaction. Defaults to 0 | |
| TxnRef | string(16) | Yes | Required. |
| PanSource | string(1) | Indicates the source of the PAN. Use this property for card not present transactions. Defaults to ' ' (PIN pad) | |
| Pan | string(20) | The PAN to use when pan source of POS keyed is used. Use this property in conjunction with PanSource | |
| DateExpiry | string(4) | The expiry date of the card when of POS keyed is used. In MMYY format. Use this property in conjunction with PanSource when passing the card expiry date to Linkly. | |
| Track2 | string(40) | The track 2 to use when of POS swiped is used. Use this property in conjunction with PanSource | |
| AccountType | string(1) | The account to use for this transaction. Defaults to ' ' (prompt user) | |
| RRN | string(12) | The retrieval reference number for the transaction. Only required for some transaction types | |
| PurchaseAnalysisData | object | Extended fields. See Purchase Analysis Data section for details | |
| Basket | object | See basket section for details |
Transaction Response HTTP Status Codes
| Code | Description | Required action |
|---|---|---|
| 200 | Only for synchronous mode. The transaction completed and a valid response has been returned. The 'success' property in the response object indicates the financial success of the transaction. | Check the body for an APIResponse object |
| 202 | Only for asynchronous mode. The transaction has been started. Response body will be null. | The POS should await the result in its Notification postback |
| 400 | Invalid request. The transaction has not completed successfully. | Report the error and notify the operator. Do not retry. |
| 401 | The token supplied is invalid. | The POS should refresh the token and attempt the request again. If this persists, the password may have changed. |
| 404 | Resource not found. The transaction was not submitted successfully. | The request URI is not configured properly. Report the error and notify the operator. Do not retry. |
| 408 | A transient error has occurred. | The POS should enter error recovery |
| 500-599 | A server error has occurred. | The POS should enter error recovery |
Transaction Response Object
Example transaction response object
{
    "SessionId": "dd250a0c81c202b66220d7379b338b8f",
    "ResponseType": "transaction",
    "Response": {
        "TxnType": "P",
        "Merchant": "00",
        "CardType": "AMEX CARD           ",
        "CardName": "05",
        "RRN": "123456789012",
        "DateSettlement": "2018-07-31T00:00:00",
        "AmtCash": 0,
        "AmtPurchase": 100,
        "AmtTip": 0,
        "AuthCode": 123456,
        "TxnRef": "1234567890      ",
        "Pan": "37601234567890      ",
        "DateExpiry": "4909",
        "Track2": "37601234567890=0949?,,S, YES, 05??????  ",
        "AccountType": "2",
        "TxnFlags": {
            "Offline": "1",
            "ReceiptPrinted": "0",
            "CardEntry": "S",
            "CommsMethod": "0",
            "Currency": "0",
            "PayPass": "0",
            "UndefinedFlag6": "0",
            "UndefinedFlag7": "0"
        },
        "BalanceReceived": false,
        "AvailableBalance": 0,
        "ClearedFundsBalance": 0,
        "Success": true,
        "ResponseCode": "00",
        "ResponseText": "APPROVED            ",
        "Date": "2018-07-31T16:14:40",
        "Catid": "12345678",
        "Caid": "0987654321     ",
        "Stan": 0,
        "PurchaseAnalysisData": {}
    }
}
| Field KeyName | Type (Length) | Description |
|---|---|---|
| Merchant | string(2) | Merchant to send the Transaction to (default 0, EFTPOS 0) use merchant '0' unless performing TPP transactions |
| CardType | string(20) | Indicates the card type that was used in the transaction. |
| CardName | string(2) | BIN Number of the card |
| TxnType | string(1) | Required. Indicated the type of transaction to perform |
| DateSettlement | string(12) | Indicates which settlement batch this transaction will be included in. |
| AmtTip | number | In cents. The tip amount for the transaction. |
| TxnFlags | object | Flags that indicate how the transaction was processed. |
| BalanceReceived | bool | Indicates if an available balance is present in the response. |
| AvailableBalance | number | Balance available on the processed account. |
| ClearedFundsBalance | number | Cleared balance on the processed account. |
| AmtCash | number | In cents. The cash amount for the transaction. This property is mandatory for a 'C' transaction type. |
| AmtPurchase | number | In cents. The purchase amount for the transaction. |
| Success | bool | Indicates if the request was successful. |
| TxnRef | string(16) | The reference number to attach to the transaction. This will appear on the receipt. |
| ResponseCode | string(2) | The response code of the request. |
| Pan | string(20) | The PAN to use when pan source of POS keyed is used. Use this property in conjunction with PanSource |
| ResponseText | string(20) | The response text for the response code. |
| Track2 | string(40) | The track 2 to use when of POS swiped is used. Use this property in conjunction with PanSource |
| Date | string(12) | Date and time of the response returned by the bank |
| RRN | string(12) | The retrieval reference number for the transaction. Only required for some transaction types |
| Catid | string(8) | Terminal ID configured in the PIN pad. |
| Caid | string(15) | Merchant ID configured in the PIN pad. |
| Stan | number | System Trace Audit Number |
| PurchaseAnalysisData | object | Extended fields. See Purchase Analysis Data section for details |
Synchronous mode of communication
The sequence diagram for a sample successful transaction in synchronous mode of communication is shown below
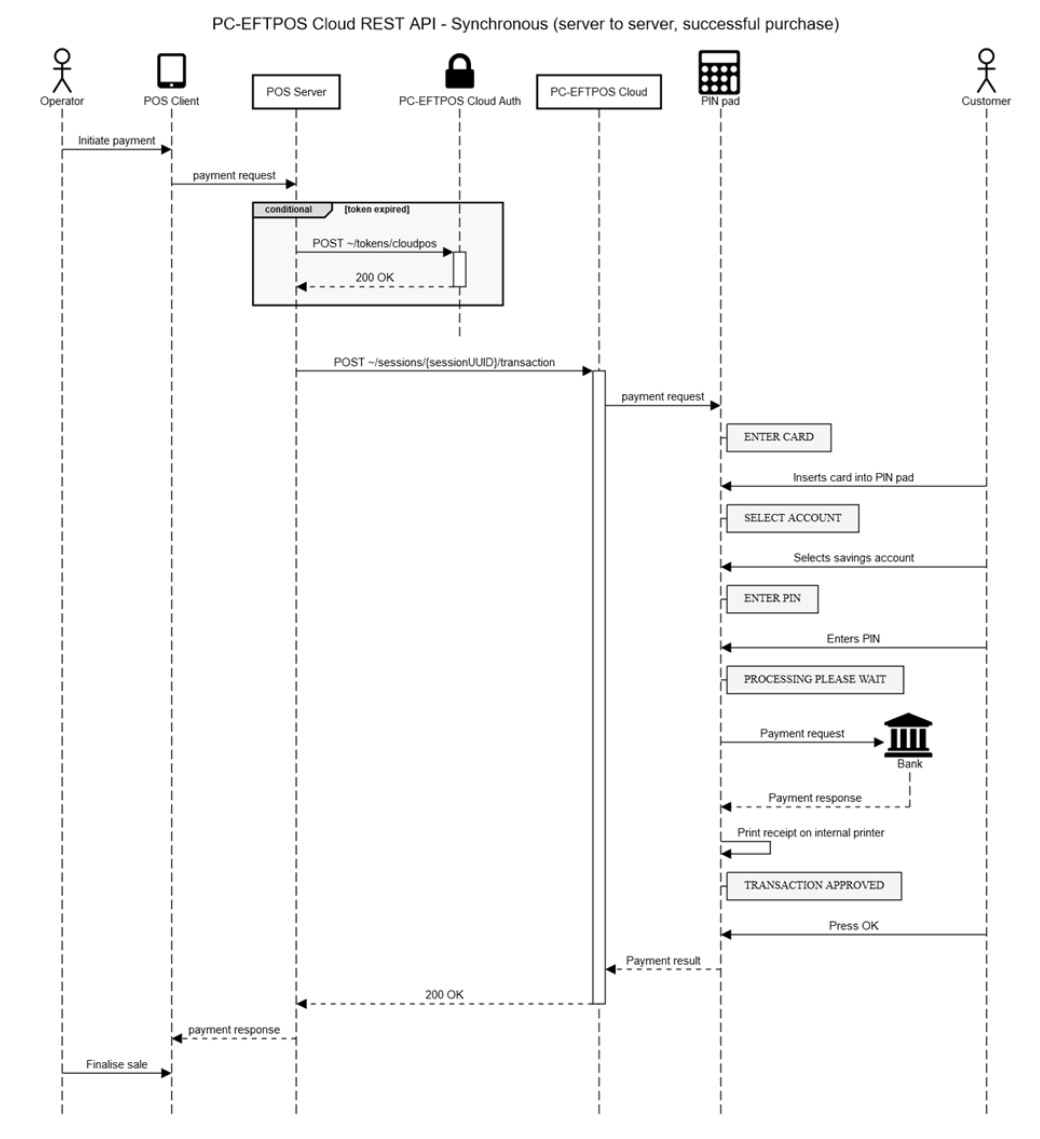
Asynchronous mode of communication
The sequence diagram for a sample successful transaction in asynchronous mode of communication is shown below
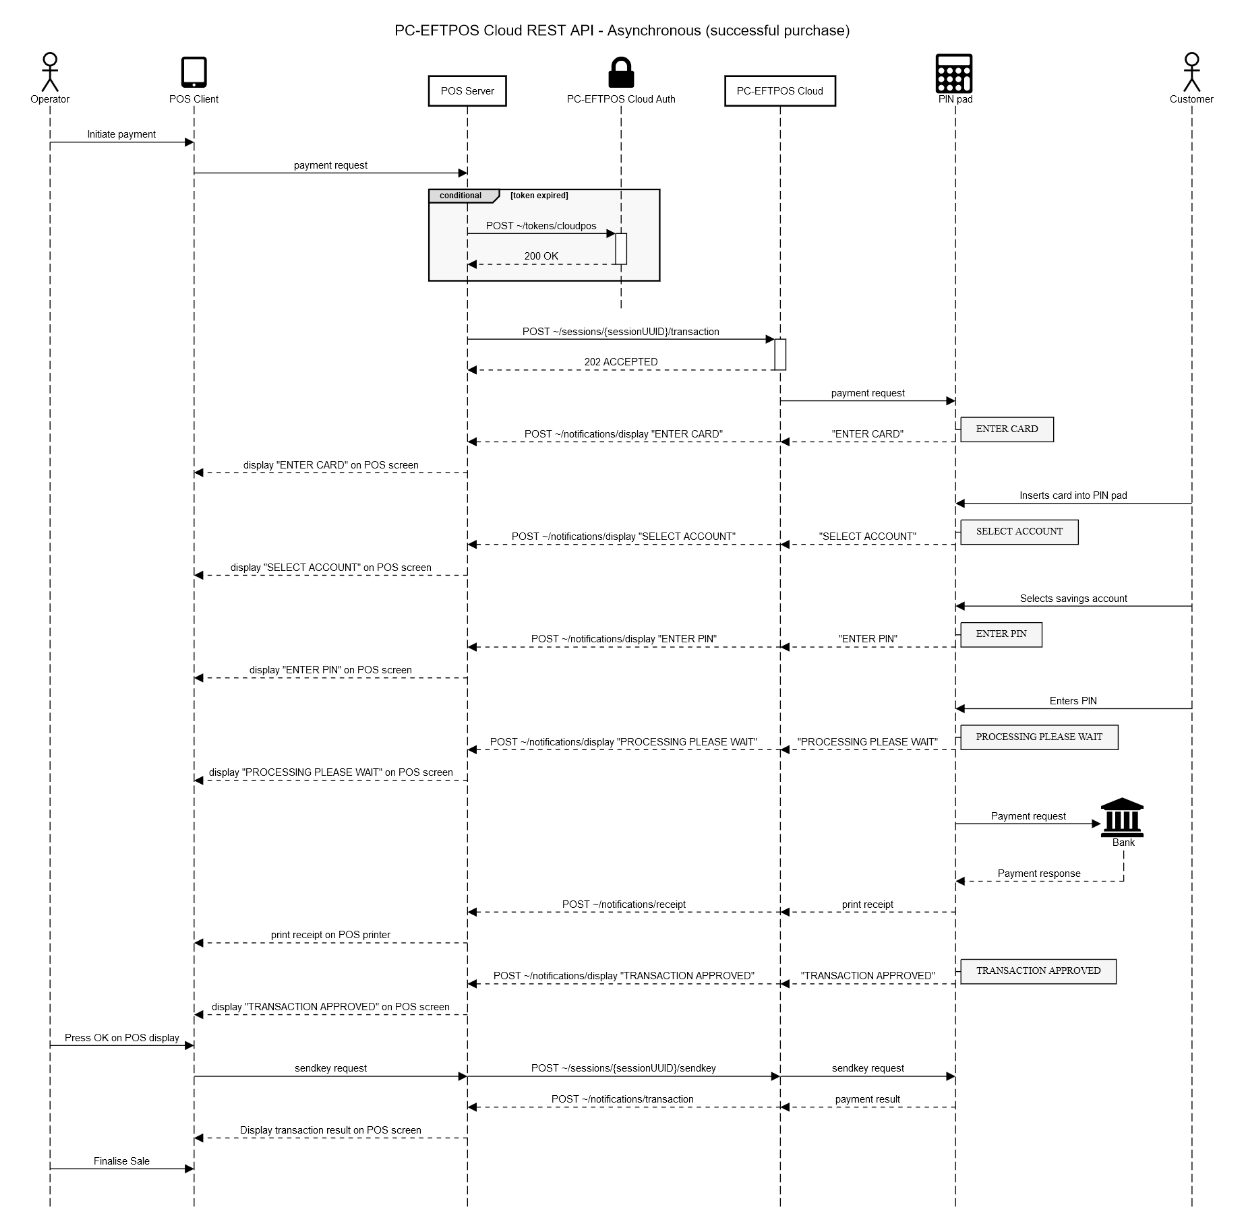
Transaction Status
Transaction status request
# replace <<sessionId>> with the sessionId of the transaction to retrieve
# replace <<token>> with the token returned from your auth request
curl -v "https://rest.pos.sandbox.cloud.pceftpos.com/v1/sessions/<<sessionId>>/transaction?async=false" \
  -X GET \
  -H 'Authorization: Bearer <<token>>' \
  -H 'Accept: application/json'
var sessionId = "<<sessionId>>"; // replace <<sessionId>> with the sessionId of the transaction to retrieve
var token = "<<token>>"; // replace <<token>> with the token returned from your auth request
var request = new HttpRequestMessage(HttpMethod.Get, $"https://rest.pos.sandbox.cloud.pceftpos.com/v1/sessions/{sessionId}/transaction?async=false");
request.Headers.Authorization = new AuthenticationHeaderValue("Bearer", token);
var httpClient = new HttpClient(); // Note: in production don't create multiple HttpClient instances. Share one single instance.
HttpResponseMessage httpResponse = await httpClient.SendAsync(request);
string responseContent = await httpResponse.Content.ReadAsStringAsync();
import datetime
import uuid
import requests; # http://python-requests.org

sessionId = '<<sessionId>>' # replace <<sessionId>> with the sessionId of the transaction to retrieve
token = '<<token>>' # replace <<token>> with the token returned from your auth request
uri = 'https://rest.pos.sandbox.cloud.pceftpos.com/v1/sessions/' + sessionId + '/transaction?async=false'
headers = {'Authorization': 'Bearer ' + token}
response = requests.get(uri, headers=headers)
response_payload = response.json()
Request the status of a previous transaction.
URI Path
GET ~/v1/sessions/<<sessionid>>/transaction
Headers
| Parameter | Value |
|---|---|
| Authorization | The bearer token returned from ~/v1/tokens/cloudpos |
| Content-Type | application/json |
| Accept | application/json |
Transaction Status Response HTTP Status Codes
| Code | Description | Required action |
|---|---|---|
| 200 | The transaction completed and a valid response has been returned. The 'success' property in the response object indicates the financial success of the requested transaction. | Check the body for an APIResponse object |
| 202 | The transaction has been started. Response body will be null. | The POS should wait a few seconds and try again. |
| 400 | Invalid request. It is likely that the session Id is not a valid UUID. | Report the error and notify the operator. Do not retry. |
| 401 | The token supplied is invalid. | The POS should refresh the token and attempt the request again. If this persists, the password may have changed. |
| 404 | Resource not found. Either the request URI is wrong or the transaction was not submitted successfully and could not be found. | Check to ensure that the URI is correct. If in Recovery mode, the original transaction can be retried. |
| 408 | A transient error has occurred. | Wait a few seconds and retry |
| 500-599 | A server error has occurred. | Wait a few seconds and retry |
Transaction Status Response Body
Exmaple transaction status response
{
    "SessionId": "dd250a0c81c202b66220d7379b338b8f",
    "ResponseType": "transaction",
    "Response": {
        "TxnType": "P",
        "Merchant": "00",
        "CardType": "AMEX CARD           ",
        "CardName": "05",
        "RRN": "123456789012",
        "DateSettlement": "2018-07-31T00:00:00",
        "AmtCash": 0,
        "AmtPurchase": 100,
        "AmtTip": 0,
        "AuthCode": 123456,
        "TxnRef": "1234567890      ",
        "Pan": "37601234567890      ",
        "DateExpiry": "4909",
        "Track2": "37601234567890=0949?,,S, YES, 05??????  ",
        "AccountType": "2",
        "TxnFlags": {
            "Offline": "1",
            "ReceiptPrinted": "0",
            "CardEntry": "S",
            "CommsMethod": "0",
            "Currency": "0",
            "PayPass": "0",
            "UndefinedFlag6": "0",
            "UndefinedFlag7": "0"
        },
        "BalanceReceived": false,
        "AvailableBalance": 0,
        "ClearedFundsBalance": 0,
        "Success": true,
        "ResponseCode": "00",
        "ResponseText": "APPROVED            ",
        "Date": "2018-07-31T16:14:40",
        "Catid": "12345678",
        "Caid": "0987654321     ",
        "Stan": 0,
        "PurchaseAnalysisData": {}
    }
}
| Field KeyName | Description |
|---|---|
| Merchant | Merchant to send the Transaction to (default 0, EFTPOS 0) use merchant '0' unless performing TPP transactions |
| CardType | Indicates the card type that was used in the transaction. |
| CardName | BIN Number of the card |
| TxnType | Required. Indicated the type of transaction to perform |
| DateSettlement | Indicates which settlement batch this transaction will be included in. |
| AmtTip | The tip amount for the transaction. |
| TxnFlags | Flags that indicate how the transaction was processed. |
| BalanceReceived | Indicates if an available balance is present in the response. |
| AvailableBalance | Balance available on the processed account. |
| ClearedFundsBalance | Cleared balance on the processed account. |
| AmtCash | In Cents. The cash amount for the transaction. This property is mandatory for a 'C' transaction type. |
| AmtPurchase | In Cents. The purchase amount for the transaction. |
| Success | Indicates if the request was successful. |
| TxnRef | Required. |
| ResponseCode | The response code of the request. |
| Pan | The PAN to use when pan source of POS keyed is used. Use this property in conjunction with PanSource |
| ResponseText | The response text for the response code. |
| Track2 | The track 2 to use when of POS swiped is used. Use this property in conjunction with PanSource |
| Date | Date and time of the response returned by the bank |
| RRN | The retrieval reference number for the transaction. Only required for some transaction types |
| Caid | Terminal ID configured in the PIN pad. |
| Stan | Merchant ID configured in the PIN pad. |
| PurchaseAnalysisData | Extended fields. See Purchase Analysis Data section for details |
Status
Status request
# replace <<token>> with the token returned from your auth request
curl -v "https://rest.pos.sandbox.cloud.pceftpos.com/v1/sessions/$(uuidgen)/status?async=false" \
  -X POST \
  -H 'Content-Type: application/json' \
  -H 'Authorization: Bearer <<token>>' \
  -H 'Accept: application/json' \
  -d '{
        "request": {
          "statusType": "0"
        }
      }'
var token = "<<token>>"; // replace <<token>> with the token returned from your auth request
var requestContent = new
{
    Request = new
    {
        StatusType = "0"
    }
};

var request = new HttpRequestMessage(HttpMethod.Post, $"https://rest.pos.sandbox.cloud.pceftpos.com/v1/sessions/{Guid.NewGuid().ToString()}/status?async=false")
{
    Content = new StringContent(Newtonsoft.Json.JsonConvert.SerializeObject(requestContent), System.Text.Encoding.UTF8, "application/json")
};
request.Headers.Authorization = new AuthenticationHeaderValue("Bearer", token);
var httpClient = new HttpClient(); // Note: in production don't create multiple HttpClient instances. Share one single instance.
HttpResponseMessage httpResponse = await httpClient.SendAsync(request);
string responseContent = await httpResponse.Content.ReadAsStringAsync();
import datetime
import uuid
import requests; # http://python-requests.org

token = '<<token>>' # replace <<token>> with the token returned from your auth request
request_payload = {
    'request': {
        'statusType': '0'
    }
}
uri = 'https://rest.pos.sandbox.cloud.pceftpos.com/v1/sessions/' + str(uuid.uuid4()) + '/status?async=false'
headers = {'Authorization': 'Bearer ' + token}
response = requests.post(uri, json=request_payload, headers=headers)
response_payload = response.json()
Instruct the EFT-Client to send a status message to the PIN pad to check if the PIN pad is available for use.
URI Path
POST ~/v1/sessions/<<sessionid>>/status
URI Query Parameters
| Parameter | Value |
|---|---|
| async | 'true' for asynchronous mode, 'false' for synchronous mode |
Headers
| Parameter | Value |
|---|---|
| Authorization | The bearer token returned from ~/v1/tokens/cloudpos |
| Content-Type | application/json |
| Accept | application/json |
Status Request Object
Example status request object
{
    "Request": {
        "Merchant": "00",
        "StatusType": "0"
    },
    "Notification":
    {
        "Uri": "https://myPos.com.au/{{sessionid}}/{{type}}",
        "AuthorizationHeader": "Bearer <<token>>"
    }
}
| Field KeyName | Required | Description |
|---|---|---|
| Merchant | Two Digit Merchant Code. Defaults to "00" (EFTPOS) | |
| Application | Indicates where the request is to be sent to. Defaults to "00" (EFTPOS) | |
| StatusType | Type of status to perform. Defaults to '0' (standard) |
Status Response HTTP Status Codes
| Code | Description |
|---|---|
| 200 | Only for synchronous mode. The request completed and a valid response has been returned from the PIN pad. The 'success' property in the response object indicates the actual success of the transaction. |
| 202 | Only for asynchronous mode. The request has been started. The POS should await the result in its notification postback (Asynchronous mode only). Response body will be null. |
| 400 | Invalid request. The request has not completed successfully. |
| 401 | The token supplied is invalid. The POS should refresh the token and attempt the request again |
| 404 | Resource not found. The request was not submitted successfully. |
| 408 | A transient error has occurred. The POS should allow the operator to try the request again. |
| 500-599 | A server error has occurred. The POS should allow the operator to try the request again. |
Status Response Object
Example status response object
{
    "SessionId": "df8db91bbb10d62057877b5df00a89b0",
    "ResponseType": "status",
    "Response": {
        "Merchant": "00",
        "AIIC": null,
        "NII": 0,
        "Catid": "123456",
        "Caid": "654321",
        "Timeout": 0,
        "LoggedOn": false,
        "PinPadSerialNumber": "",
        "PinPadVersion": "",
        "BankCode": " ",
        "BankDescription": "",
        "KVC": "",
        "SAFCount": 0,
        "NetworkType": "3",
        "HardwareSerial": "",
        "RetailerName": "",
        "OptionsFlags": {
            "Tipping": false,
            "PreAuth": false,
            "Completions": false,
            "CashOut": false,
            "Refund": false,
            "Balance": false,
            "Deposit": false,
            "Voucher": false,
            "MOTO": false,
            "AutoCompletion": false,
            "EFB": false,
            "EMV": false,
            "Training": false,
            "Withdrawal": false,
            "Transfer": false,
            "StartCash": false
        },
        "SAFCreditLimit": 0,
        "SAFDebitLimit": 0,
        "MaxSAF": 0,
        "KeyHandlingScheme": "2",
        "CashoutLimit": 0,
        "RefundLimit": 0,
        "CPATVersion": "",
        "NameTableVersion": "",
        "TerminalCommsType": "2",
        "CardMisreadCount": 0,
        "TotalMemoryInTerminal": 0,
        "FreeMemoryInTerminal": 0,
        "EFTTerminalType": "Unknown",
        "NumAppsInTerminal": 0,
        "NumLinesOnDisplay": 0,
        "HardwareInceptionDate": "0001-01-01T00:00:00",
        "Success": false,
        "ResponseCode": "PF",
        "ResponseText": "PINpad Offline      "
    }
}
| Field KeyName | Description |
|---|---|
| Merchant | Two Digit Merchant Code. Defaults to "00" (EFTPOS) |
| AIIC | The AIIC that is configured in the terminal. |
| NII | The NII that is configured in the terminal. |
| CatId | The Terminal ID configured in the PIN pad |
| CaId | The Merchant ID configured in the PIN pad |
| Timeout | The bank response timeout that is configured in the terminal |
| LoggedOn | Indicates if the PIN pad is currently logged on |
| PinPadSerialNumber | The serial number of the terminal |
| PinPadVersion | PIN pad software version |
| BankCode | the bank acquirer code |
| BankDescriptionBankDescription | the bank description |
| KVC | Key Verification Code |
| SAFCount | Current number of stored transactions |
| NetworkType | The Acquirer communications type |
| HardwareSerial | The hardware serial number |
| RetailerName | The Merchant retailer name |
| OptionFlags | PIN pad terminal supported option flags |
| SAFCreditLimit | Store-and-forward credit limit |
| SAFDebitLimit | Store-and-forward debit limit |
| MaxSAF | The maximum number of store transaction |
| KeyHandlingScheme | The terminal key handling scheme |
| CashoutLimit | The maximum cash out limit |
| RefundLimit | The Maximum refund limit |
| CPATVersion | Card prefix table version |
| NameTableVersion | Card Name Table version |
| TerminalCommsType | The terminal to PC communications type |
| CardMisreadCount | The number of card mis-reads |
| TotalMemoryInTerminal | Number of memory pages in the PIN pad Terminal |
| FreeMemoryInTerminal | number of free memory pages in the PIN pad terminal |
| EFTTerminalType | The Type of the PIN pad |
| NumAppsInTerminal | Number of applications in the terminal |
| NumLinesOnDisplay | Number of available display lines on the terminal |
| HardwareInceptionDate | The date the hardware was incepted |
| Success | Indicates if the request was successful |
| ResponseCode | The response code of the request |
| ResponseText | The response text for the response code |
Logon
Logon request
# replace <<token>> with the token returned from your auth request
curl -v "https://rest.pos.sandbox.cloud.pceftpos.com/v1/sessions/$(uuidgen)/logon?async=false" \
  -X POST \
  -H 'Content-Type: application/json' \
  -H 'Authorization: Bearer <<token>>' \
  -H 'Accept: application/json' \
  -d '{
        "request": {
          "logonType": " "
        }
      }'
var token = "<<token>>"; // replace <<token>> with the token returned from your auth request
var requestContent = new
{
    Request = new
    {
        LogonType = " "
    }
};

var request = new HttpRequestMessage(HttpMethod.Post, $"https://rest.pos.sandbox.cloud.pceftpos.com/v1/sessions/{Guid.NewGuid().ToString()}/logon?async=false")
{
    Content = new StringContent(Newtonsoft.Json.JsonConvert.SerializeObject(requestContent), System.Text.Encoding.UTF8, "application/json")
};
request.Headers.Authorization = new AuthenticationHeaderValue("Bearer", token);
var httpClient = new HttpClient(); // Note: in production don't create multiple HttpClient instances. Share one single instance.
HttpResponseMessage httpResponse = await httpClient.SendAsync(request);
string responseContent = await httpResponse.Content.ReadAsStringAsync();
import datetime
import uuid
import requests; # http://python-requests.org

token = '<<token>>' # replace <<token>> with the token returned from your auth request
request_payload = {
    'request': {
        'logonType': ' '
    }
}
uri = 'https://rest.pos.sandbox.cloud.pceftpos.com/v1/sessions/' + str(uuid.uuid4()) + '/logon?async=false'
headers = {'Authorization': 'Bearer ' + token}
response = requests.post(uri, json=request_payload, headers=headers)
response_payload = response.json()
Instruct the EFT-Client to send a logon request to the PIN pad.
URI Path
POST ~/v1/sessions/<<sessionid>>/logon
URI Query Parameters
| Parameter | Value |
|---|---|
| async | 'true' for asynchronous mode, 'false' for synchronous mode |
Headers
| Parameter | Value |
|---|---|
| Authorization | The bearer token returned from ~/v1/tokens/cloudpos |
| Content-Type | application/json |
| Accept | application/json |
Logon Request Object
Example logon request object
{
    "Request": {
        "Merchant": "00",
        "LogonType": " ",
        "Application": "00",
        "ReceiptAutoPrint": "0",
        "CutReceipt": "0"
    },
        "Notification":
    {
        "Uri": "https://myPos.com.au/{{sessionid}}/{{type}}",
        "AuthorizationHeader": "Bearer <<token>>"
    }
}
| Field KeyName | Required | Description |
|---|---|---|
| Merchant | Two Digit Merchant Code. Defaults to "00" (EFTPOS) | |
| Application | Indicates where the request is to be sent to. Defaults to "00" (EFTPOS) | |
| ReceiptAutoPrint | string(1) | Variable |
| CutReceipt | Indicates whether Linkly should cut receipts. Defaults to '0' (DontCut) | |
| LogonType | see definition | |
| PurchaseAnalysisData | Extended fields. See Purchase Analysis Data section for details |
Logon Response HTTP Status Codes
| Code | Description |
|---|---|
| 200 | Only for synchronous mode. The request completed and a valid response has been returned from the PIN pad. The 'success' property in the response object indicates the actual success of the transaction. |
| 202 | Only for asynchronous mode. The request has been started. The POS should await the result in its notification postback (Asynchronous mode only). Response body will be null. |
| 400 | Invalid request. The request has not completed successfully. |
| 401 | The token supplied is invalid. The POS should refresh the token and attempt the request again |
| 404 | Resource not found. The request was not submitted successfully. |
| 408 | A transient error has occurred. The POS should allow the operator to try the request again. |
| 500-599 | A server error has occurred. The POS should allow the operator to try the request again. |
Logon Response Object
Example logon response object
{
    "SessionId": "74a5505913df3ecd53d45930a82c3fd3",
    "ResponseType": "logon",
    "Response": {
        "PinPadVersion": "100800          ",
        "Success": true,
        "ResponseCode": "00",
        "ResponseText": "APPROVED            ",
        "Date": "0001-01-01T00:00:00",
        "Catid": "12345678",
        "Caid": "0987654321     ",
        "Stan": 0,
        "PurchaseAnalysisData": {}
    }
}
| Field KeyName | Description |
|---|---|
| PinPadVersion | PIN pad software version. |
| Success | Required. Indicates if the request was successful. |
| ResponseCode | The response code of the request |
| ResponseText | The response text for the response code |
| Date | Date and time of the response returned by the bank. |
| Catid | Terminal ID configured in the PIN pad |
| Caid | Merchant ID configured in the PIN pad |
| Stan | System Trace Audit Number |
| PurchaseAnalysisData | Extended fields. See Purchase Analysis Data section for details |
Settlement
Settlement request
# replace <<token>> with the token returned from your auth request
curl -v "https://rest.pos.sandbox.cloud.pceftpos.com/v1/sessions/$(uuidgen)/settlement?async=false" \
  -X POST \
  -H 'Content-Type: application/json' \
  -H 'Authorization: Bearer <<token>>' \
  -H 'Accept: application/json' \
  -d '{
        "request": {
          "settlementType": "S"
        }
      }'
var token = "<<token>>"; // replace <<token>> with the token returned from your auth request
var requestContent = new
{
    Request = new
    {
        SettlementType = "S"
    }
};

var request = new HttpRequestMessage(HttpMethod.Post, $"https://rest.pos.sandbox.cloud.pceftpos.com/v1/sessions/{Guid.NewGuid().ToString()}/settlement?async=false")
{
    Content = new StringContent(Newtonsoft.Json.JsonConvert.SerializeObject(requestContent), System.Text.Encoding.UTF8, "application/json")
};
request.Headers.Authorization = new AuthenticationHeaderValue("Bearer", token);
var httpClient = new HttpClient(); // Note: in production don't create multiple HttpClient instances. Share one single instance.
HttpResponseMessage httpResponse = await httpClient.SendAsync(request);
string responseContent = await httpResponse.Content.ReadAsStringAsync();
import datetime
import uuid
import requests; # http://python-requests.org

token = '<<token>>' # replace <<token>> with the token returned from your auth request
request_payload = {
    'request': {
        'settlementType': 'S'
    }
}
uri = 'https://rest.pos.sandbox.cloud.pceftpos.com/v1/sessions/' + str(uuid.uuid4()) + '/settlement?async=false'
headers = {'Authorization': 'Bearer ' + token}
response = requests.post(uri, json=request_payload, headers=headers)
response_payload = response.json()
Send a settlement request.
URI Path
POST ~/v1/sessions/<<sessionid>>/settlement
URI Query Parameters
| Parameter | Value |
|---|---|
| async | 'true' for asynchronous mode, 'false' for synchronous mode |
Headers
| Parameter | Value |
|---|---|
| Authorization | The bearer token returned from ~/v1/tokens/cloudpos |
| Content-Type | application/json |
| Accept | application/json |
Settlement Request Object
Example settlement request object
{
    "Request": {
        "Merchant": "00",
        "SettlementType": "S",
        "Application": "00",
        "ReceiptAutoPrint": "0",
        "CutReceipt": "0"
    },
        "Notification":
    {
        "Uri": "https://myPos.com.au/{{sessionid}}/{{type}}",
        "AuthorizationHeader": "Bearer <<token>>"
    }
}
| Field KeyName | Required | Description |
|---|---|---|
| Merchant | Two Digit Merchant Code. Defaults to "00" (EFTPOS) | |
| Application | Indicates where the request is to be sent to. Defaults to "00" (EFTPOS) | |
| SettlementType | Type of settlement to perform. Defaults to 'S' (Settlement) | |
| ReceiptAutoPrint | string(1) | Variable |
| CutReceipt | Indicates whether Linkly should cut receipts. Defaults to '0' (DontCut) | |
| ResetTotals | Reset totals after settlement. Only used for settlement type 'H' (SubShiftTotals). Defaults to false |
Settlement Reponse HTTP Status Codes
| Code | Description |
|---|---|
| 200 | Only for synchronous mode. The request completed and a valid response has been returned from the PIN pad. The 'success' property in the response object indicates the actual success of the transaction. |
| 202 | Only for asynchronous mode. The request has been started. The POS should await the result in its notification postback (Asynchronous mode only). Response body will be null. |
| 400 | Invalid request. The request has not completed successfully. |
| 401 | The token supplied is invalid. The POS should refresh the token and attempt the request again |
| 404 | Resource not found. The request was not submitted successfully. |
| 408 | A transient error has occurred. The POS should allow the operator to try the request again. |
| 500-599 | A server error has occurred. The POS should allow the operator to try the request again. |
Settlement Response Object
Example settlement response object
{
    "SessionId": "7a2c33ce29b985f52f2bab7dfa4cce7d",
    "ResponseType": "settlement",
    "Response": {
        "Merchant": "00",
        "SettlementData": "000000002138VISA                000000100001000000100001000000100001+000000300003DEBIT               000000100001000000100001000000100001+000000300003069TOTAL               000000300001000000300001000000300001+000000900009",
        "Success": true,
        "ResponseCode": "00",
        "ResponseText": "APPROVED            "
    }
}
| Field KeyName | Description |
|---|---|
| Merchant | Two Digit Merchant Code. Defaults to "00" (EFTPOS) |
| Success | Required. Indicates if the request was successful. |
| ResponseCode | The response code of the request |
| ResponseText | The response text for the response code |
| SettlementData | Settlement Data returned from the bank |
QueryCard
Query card request
# replace <<token>> with the token returned from your auth request
curl -v "https://rest.pos.sandbox.cloud.pceftpos.com/v1/sessions/$(uuidgen)/querycard?async=false" \
  -X POST \
  -H 'Content-Type: application/json' \
  -H 'Authorization: Bearer <<token>>' \
  -H 'Accept: application/json' \
  -d '{
        "request": {
          "queryCardType": "0"
        }
      }'
var token = "<<token>>"; // replace <<token>> with the token returned from your auth request
var requestContent = new
{
    Request = new
    {
        QueryCardType = "0"
    }
};

var request = new HttpRequestMessage(HttpMethod.Post, $"https://rest.pos.sandbox.cloud.pceftpos.com/v1/sessions/{Guid.NewGuid().ToString()}/querycard?async=false")
{
    Content = new StringContent(Newtonsoft.Json.JsonConvert.SerializeObject(requestContent), System.Text.Encoding.UTF8, "application/json")
};
request.Headers.Authorization = new AuthenticationHeaderValue("Bearer", token);
var httpClient = new HttpClient(); // Note: in production don't create multiple HttpClient instances. Share one single instance.
HttpResponseMessage httpResponse = await httpClient.SendAsync(request);
string responseContent = await httpResponse.Content.ReadAsStringAsync();
import datetime
import uuid
import requests; # http://python-requests.org

token = '<<token>>' # replace <<token>> with the token returned from your auth request
request_payload = {
    'request': {
        'queryCardType': '0'
    }
}
uri = 'https://rest.pos.sandbox.cloud.pceftpos.com/v1/sessions/' + str(uuid.uuid4()) + '/querycard?async=false'
headers = {'Authorization': 'Bearer ' + token}
response = requests.post(uri, json=request_payload, headers=headers)
response_payload = response.json()
Send a query card request.
URI Path
POST ~/v1/sessions/<<sessionid>>/querycard
URI Query Parameters
| Parameter | Value |
|---|---|
| async | 'true' for asynchronous mode, 'false' for synchronous mode |
Headers
| Parameter | Value |
|---|---|
| Authorization | The bearer token returned from ~/v1/tokens/cloudpos |
| Content-Type | application/json |
| Accept | application/json |
Query Card Request Object
Example querycard request object
{
    "Request": {
        "Merchant": "00",
        "QueryCardType": "0",
        "Application": "00"
    },
    "Notification":
    {
        "Uri": "https://myPos.com.au/{{sessionid}}/{{type}}",
        "AuthorizationHeader": "Bearer <<token>>"
    }
}
| Field KeyName | Required | Description |
|---|---|---|
| Merchant | Two Digit Merchant Code. Defaults to "00" (EFTPOS) | |
| Application | Indicates where the request is to be sent to. Defaults to "00" (EFTPOS) | |
| QueryCardType | Type of querycard to perform. Defaults to '0' | |
| PurchaseAnalysisData | Extended fields. See Purchase Analysis Data section for details |
Query Card Response HTTP Status Codes
| Code | Description |
|---|---|
| 200 | Only for synchronous mode. The request completed and a valid response has been returned from the PIN pad. The 'success' property in the response object indicates the actual success of the transaction. |
| 202 | Only for asynchronous mode. The request has been started. The POS should await the result in its notification postback (Asynchronous mode only). Response body will be null. |
| 400 | Invalid request. The request has not completed successfully. |
| 401 | The token supplied is invalid. The POS should refresh the token and attempt the request again |
| 404 | Resource not found. The request was not submitted successfully. |
| 408 | A transient error has occurred. The POS should allow the operator to try the request again. |
| 500-599 | A server error has occurred. The POS should allow the operator to try the request again. |
Query Card Response Object
Example querycard response object
{
  "sessionId": "7a2c33ce29b985f52f2bab7dfa4cce7d",
  "responseType": "querycard",
  "response": {
    "merchant": "00",
    "isTrack1Available": false,
    "isTrack2Available": true,
    "isTrack3Available": false,
    "track1": "",
    "track2": "1234567890=0949?,,S, YES, 05???????\u0000",
    "track3": "",
    "cardName": "32",
    "accountType": " ",
    "success": true,
    "responseCode": "00",
    "responseText": "APPROVED            ",
    "purchaseAnalysisData": {}
  }
}
| Field KeyName | Description |
|---|---|
| Merchant | Two Digit Merchant Code. Defaults to "00" (EFTPOS) |
| Success | Required. Indicates if the request was successful. |
| ResponseCode | The response code of the request |
| ResponseText | The response text for the response code |
| AccountType | Account type selected |
| isTrack1Available | Indicates if track1 was read |
| isTrack2Available | Indicates if track2 was read |
| isTrack3Available | Indicates if track3 was read |
| Track1 | Data encoded on track1 of the card |
| Track2 | Data encoded on track2 of the card |
| Track3 | Data encoded on track3 of the card |
| CardName | The BIN number of the card |
| PurchaseAnalysisData | Extended fields. See Purchase Analysis Data section for details |
ConfigureMerchant
Configure merchant request
# replace <<token>> with the token returned from your auth request
curl -v "https://rest.pos.sandbox.cloud.pceftpos.com/v1/sessions/$(uuidgen)/configuremerchant?async=false" \
  -X POST \
  -H 'Content-Type: application/json' \
  -H 'Authorization: Bearer <<token>>' \
  -H 'Accept: application/json' \
  -d '{
        "request": {
          "catid": "12345678",
          "caid": "0123456789ABCDE"
        }
      }'
var token = "<<token>>"; // replace <<token>> with the token returned from your auth request
var requestContent = new
{
    Request = new
    {
        Catid = "12345678",
        Caid = "0123456789ABCDE"
    }
};

var request = new HttpRequestMessage(HttpMethod.Post, $"https://rest.pos.sandbox.cloud.pceftpos.com/v1/sessions/{Guid.NewGuid().ToString()}/configuremerchant?async=false")
{
    Content = new StringContent(Newtonsoft.Json.JsonConvert.SerializeObject(requestContent), System.Text.Encoding.UTF8, "application/json")
};
request.Headers.Authorization = new AuthenticationHeaderValue("Bearer", token);
var httpClient = new HttpClient(); // Note: in production don't create multiple HttpClient instances. Share one single instance.
HttpResponseMessage httpResponse = await httpClient.SendAsync(request);
string responseContent = await httpResponse.Content.ReadAsStringAsync();
import datetime
import uuid
import requests; # http://python-requests.org

token = '<<token>>' # replace <<token>> with the token returned from your auth request
request_payload = {
    'request': {
        'Catid': '12345678',
        'Caid': '0123456789ABCDE'
    }
}
uri = 'https://rest.pos.sandbox.cloud.pceftpos.com/v1/sessions/' + str(uuid.uuid4()) + '/configuremerchant?async=false'
headers = {'Authorization': 'Bearer ' + token}
response = requests.post(uri, json=request_payload, headers=headers)
response_payload = response.json()
Send a configure merchant request.
URI Path
POST ~/v1/sessions/<<sessionid>>/configuremerchant
URI Query Parameters
| Parameter | Value |
|---|---|
| async | 'true' for asynchronous mode, 'false' for synchronous mode |
Headers
| Parameter | Value |
|---|---|
| Authorization | The bearer token returned from ~/v1/tokens/cloudpos |
| Content-Type | application/json |
| Accept | application/json |
Configure Merchant Request Object
Example configure merchant request object
{
    "Request": {
        "Merchant": "00",
        "Catid": "12345678",
        "Caid": "0123456789"
    },
    "Notification":
    {
        "Uri": "https://myPos.com.au/{{sessionid}}/{{type}}",
        "AuthorizationHeader": "Bearer <<token>>"
    }
}
| Field KeyName | Required | Description |
|---|---|---|
| Merchant | Two Digit Merchant Code. Defaults to "00" (EFTPOS) | |
| Application | Indicates where the request is to be sent to. Defaults to "00" (EFTPOS) | |
| Catid | The terminal ID (CatID) to configure the terminal with | |
| CaId | The merchant ID (CaID) to configure the terminal with | |
| AIIC | The AIIC to configure the terminal with. Defaults to 0 | |
| NII | The NII to configure the terminal with. Defaults to 0 | |
| Timeout | The bank response timeout specified in seconds. Defaults to 45 |
Configure Merchant Response HTTP Status Codes
| Code | Description |
|---|---|
| 200 | Only for synchronous mode. The request completed and a valid response has been returned from the PIN pad. The 'success' property in the response object indicates the actual success of the transaction. |
| 202 | Only for asynchronous mode. The request has been started. The POS should await the result in its notification postback (Asynchronous mode only). Response body will be null. |
| 400 | Invalid request. The request has not completed successfully. |
| 401 | The token supplied is invalid. The POS should refresh the token and attempt the request again |
| 404 | Resource not found. The request was not submitted successfully. |
| 408 | A transient error has occurred. The POS should allow the operator to try the request again. |
| 500-599 | A server error has occurred. The POS should allow the operator to try the request again. |
Configure Merchant Response Object
Example configure merchant response object
{
  "sessionId": "7a2c33ce29b985f52f2bab7dfa4cce7d",
  "responseType": "configuremerchant",
  "response": {
    "merchant": "00",
    "success": true,
    "responseCode": "00",
    "responseText": "APPROVED            "
  }
}
| Field KeyName | Description |
|---|---|
| Merchant | Two Digit Merchant Code. Defaults to "00" (EFTPOS) |
| Success | Required. Indicates if the request was successful. |
| ResponseCode | The response code of the request |
| ResponseText | The response text for the response code |
Reprint Receipt
Reprint receipt request
# replace <<token>> with the token returned from your auth request
curl -v "https://rest.pos.sandbox.cloud.pceftpos.com/v1/sessions/$(uuidgen)/reprintreceipt?async=false" \
  -X POST \
  -H 'Content-Type: application/json' \
  -H 'Authorization: Bearer <<token>>' \
  -H 'Accept: application/json' \
  -d '{
        "request": {
          "reprintType": "2"
        }
      }'
var token = "<<token>>"; // replace <<token>> with the token returned from your auth request
var requestContent = new
{
    Request = new
    {
        ReprintType = "2"
    }
};

var request = new HttpRequestMessage(HttpMethod.Post, $"https://rest.pos.sandbox.cloud.pceftpos.com/v1/sessions/{Guid.NewGuid().ToString()}/reprintreceipt?async=false")
{
    Content = new StringContent(Newtonsoft.Json.JsonConvert.SerializeObject(requestContent), System.Text.Encoding.UTF8, "application/json")
};
request.Headers.Authorization = new AuthenticationHeaderValue("Bearer", token);
var httpClient = new HttpClient(); // Note: in production don't create multiple HttpClient instances. Share one single instance.
HttpResponseMessage httpResponse = await httpClient.SendAsync(request);
string responseContent = await httpResponse.Content.ReadAsStringAsync();
import datetime
import uuid
import requests; # http://python-requests.org

token = '<<token>>' # replace <<token>> with the token returned from your auth request
request_payload = {
    'request': {
        'reprintType': '2'
    }
}
uri = 'https://rest.pos.sandbox.cloud.pceftpos.com/v1/sessions/' + str(uuid.uuid4()) + '/reprintreceipt?async=false'
headers = {'Authorization': 'Bearer ' + token}
response = requests.post(uri, json=request_payload, headers=headers)
response_payload = response.json()
Send a reprint receipt request.
URI Path
POST ~/v1/sessions/<<sessionid>>/reprintreceipt
URI Query Parameters
| Parameter | Value |
|---|---|
| async | 'true' for asynchronous mode, 'false' for synchronous mode |
Headers
| Parameter | Value |
|---|---|
| Authorization | The bearer token returned from ~/v1/tokens/cloudpos |
| Content-Type | application/json |
| Accept | application/json |
Reprint Receipt Request Object
Example reprint receipt request object
{
    "Request": {
        "Merchant": "00",
        "Application": "00",
        "ReceiptAutoPrint": "0",
        "ReprintType": "2"
    },
    "Notification":
    {
        "Uri": "https://myPos.com.au/{{sessionid}}/{{type}}",
        "AuthorizationHeader": "Bearer <<token>>"
    }
}
| Field KeyName | Required | Description |
|---|---|---|
| Merchant | Two Digit Merchant Code. Defaults to "00" (EFTPOS) | |
| Application | Indicates where the request is to be sent to. Defaults to "00" (EFTPOS) | |
| ReceiptAutoPrint | string(1) | Variable |
| CutReceipt | Indicates whether Linkly should cut receipts. Defaults to '0' (DontCut) | |
| ReprintType | Indicates whether the receipt should be returned or reprinted. Defaults to '2' (GetLast) '1' is Reprint | |
| OriginalTxnRef | The original txnRef of the transaction | |
| PurchaseAnalysisData | Extended fields. See Purchase Analysis Data section for details |
Reprint Receipt Response HTTP Status Codes
| Code | Description |
|---|---|
| 200 | Only for synchronous mode. The request completed and a valid response has been returned from the PIN pad. The 'success' property in the response object indicates the actual success of the transaction. |
| 202 | Only for asynchronous mode. The request has been started. The POS should await the result in its notification postback (Asynchronous mode only). Response body will be null. |
| 400 | Invalid request. The request has not completed successfully. |
| 401 | The token supplied is invalid. The POS should refresh the token and attempt the request again |
| 404 | Resource not found. The request was not submitted successfully. |
| 408 | A transient error has occurred. The POS should allow the operator to try the request again. |
| 500-599 | A server error has occurred. The POS should allow the operator to try the request again. |
Reprint Receipt Response Object
Example reprint receipt response object
{
  "sessionId": "7a2c33ce29b985f52f2bab7dfa4cce7d",
  "responseType": "reprintreceipt",
  "response": {
    "merchant": "00",
    "receiptText": [
            "------------------------",
            " *** TRAINING MODE ***  ",
            "  TEST MERCHANT TITLE   ",
            "   TEST MERCHANT NAME   ",
            "         LINE2          ",
            "                        ",
            "14:45:52 03/08/18       ",
            "                        ",
            "CREDIT ACCOUNT          ",
            "                        ",
            "PURCHASE   AUD     $1.00",
            "                --------",
            "TOTAL      AUD     $1.00",
            "                        ",
            "APPROVED -  00          ",
            "                        ",
            "PLEASE RETAIN AS RECORD ",
            "      OF PURCHASE       ",
            "------------------------"
        ],
    "success": true,
    "responseCode": "00",
    "responseText": "APPROVED            "
  }
}
| Field KeyName | Description |
|---|---|
| Merchant | Two Digit Merchant Code. Defaults to "00" (EFTPOS) |
| Success | Required. Indicates if the request was successful. |
| ResponseCode | The response code of the request |
| ResponseText | The response text for the response code |
| ReceiptText | Receipt text to be printed. Returned as an array of lines |
Send Key
Send a key press from the POS to an existing active session.
# replace <<uuid>> with the uuid from your transaction request
# replace <<token>> with the token returned from your auth request
curl -v "https://rest.pos.sandbox.cloud.pceftpos.com/v1/sessions/<<uuid>>/sendkey?async=false" \
  -X POST \
  -H 'Content-Type: application/json' \
  -H 'Authorization: Bearer <<token>>' \
  -H 'Accept: application/json' \
  -d '{
        "request": {
          "key": "0"
        }
      }'
var token = "<<token>>"; // replace <<token>> with the token returned from your auth request
var uuid = "<<uuid>>"; // replace <<uuid>> with the uuid your transaction request
var requestContent = new
{
    Request = new
    {
        Key = "0"
    }
};

var request = new HttpRequestMessage(HttpMethod.Post, $"https://rest.pos.sandbox.cloud.pceftpos.com/v1/sessions/{uuid}/sendkey?async=false")
{
    Content = new StringContent(Newtonsoft.Json.JsonConvert.SerializeObject(requestContent), System.Text.Encoding.UTF8, "application/json")
};
request.Headers.Authorization = new AuthenticationHeaderValue("Bearer", token);
var httpClient = new HttpClient(); // Note: in production don't create multiple HttpClient instances. Share one single instance.
HttpResponseMessage httpResponse = await httpClient.SendAsync(request);
string responseContent = await httpResponse.Content.ReadAsStringAsync();
import datetime
import requests; # http://python-requests.org

uuid = '<<uuid>>' # replace <<uuid>> with the uuid from your transaction request
token = '<<token>>' # replace <<token>> with the token returned from your auth request
request_payload = {
    'request': {
        'key': '0'
    }
}
uri = 'https://rest.pos.sandbox.cloud.pceftpos.com/v1/sessions/' + uuid + '/sendkey?async=false'
headers = {'Authorization': 'Bearer ' + token}
response = requests.post(uri, json=request_payload, headers=headers)
response_payload = response.json()
Send a key press request.
URI Path
POST ~/v1/sessions/<<sessionid>>/sendkey
URI Query Parameters
| Parameter | Value |
|---|---|
| async | 'true' for asynchronous mode, 'false' for synchronous mode |
Headers
| Parameter | Value |
|---|---|
| Authorization | The bearer token returned from ~/v1/tokens/cloudpos |
| Content-Type | application/json |
| Accept | application/json |
Send Key Request Object
Example send key request object
{
    "Request": {
        "Key": "0",
        "Data": ""
    }
}
| Field KeyName | Required | Description |
|---|---|---|
| Key | true | Indicates the key to be pressed. '0' for the CANCEL key or OK key (see Note 1) '1' for the YES key '2' for the NO key '3' for the AUTH key |
| Data | Entry data collected by POS. Maximum length of 60 characters |
Note 1:
The OK and CANCEL key are the same key. Only one can be displayed at a time.
Send Key Response HTTP Status Codes
| Code | Description |
|---|---|
| 200 | Only for synchronous mode. The request completed and a valid response has been returned from the PIN pad. The 'success' property in the response object indicates the actual success of the transaction. |
| 202 | Only for asynchronous mode. The request has been started. The POS should await the result in its notification postback (Asynchronous mode only). Response body will be null. |
| 400 | Invalid request. The request has not completed successfully. |
| 401 | The token supplied is invalid. The POS should refresh the token and attempt the request again |
| 404 | Resource not found. The request was not submitted successfully. |
| 408 | A transient error has occurred. The POS should allow the operator to try the request again. |
| 500-599 | A server error has occurred. The POS should allow the operator to try the request again. |
Send Key Response Object
Example send key response object
{
  "sessionId": "7a2c33ce29b985f52f2bab7dfa4cce7d",
  "responseType": "sendkey",
  "response": null
}
Notifications
This section contains all the responses that return to the POS if its using async mode. This does not cover the response to the original requests.
Display Response
Example display response object
{
    "SessionId": "3a3cff3bf4cfe3bf59a5f442d5f40496",
    "ResponseType": "display",
    "Response": {
        "NumberOfLines": 2,
        "LineLength": 20,
        "DisplayText": [
            "     SWIPE CARD     ",
            "                    "
        ],
        "CancelKeyFlag": true,
        "AcceptYesKeyFlag": false,
        "DeclineNoKeyFlag": false,
        "AuthoriseKeyFlag": false,
        "OKKeyFlag": false,
        "InputType": "0",
        "GraphicCode": "3",
        "PurchaseAnalysisData": {}
    }
}
| Field KeyName | Description |
|---|---|
| NumberOfLines | The number of lines to display |
| LineLength | Line length of the display |
| DisplayText | Array of strings, containing each line to display |
| CancelKeyFlag | if the cancel button is available |
| AcceptYesKeyFlag | if the accept/yes button is available |
| AuthoriseKeyFlag | if the authorise button is available |
| OKKeyFlag | if the OK button is available |
| InputType | Type of input requested by the PIN pad. See input type table below for details |
| GraphicCode | Type of graphics to display. See graphics code table below for details |
| PurchaseAnalysisData | Extended fields. See Purchase Analysis Data section for details |
| Graphics Code | Description |
|---|---|
| 0 | Processing |
| 1 | Verify |
| 2 | Question |
| 3 | Card entry |
| 4 | Account entry |
| 5 | PIN entry |
| 6 | Complete |
| Input Type | Description |
|---|---|
| 0 | Input disabled |
| 1 | Normal ASCII input |
| 2 | Formatted amount entry ($0.cc) |
| 3 | 2 decimal place formatted entry without dollar sign |
| 4 | Masked Password entry |
| 5 | Supervisor Request from PIN pad |
| 6 | One key input from POS. As soon as one key is pressed on the POS, the key is sent to the PIN pad |
Receipt Response
Example receipt response object
{
    "SessionId": "3a3cff3bf4cfe3bf59a5f442d5f40496",
    "ResponseType": "receipt",
    "Response": {
        "Type": "C",
        "ReceiptText": [
            "------------------------",
            " *** TRAINING MODE ***  ",
            "  TEST MERCHANT TITLE   ",
            "   TEST MERCHANT NAME   ",
            "         LINE2          ",
            "                        ",
            "10:20:19 06/08/18       ",
            "                        ",
            "CREDIT ACCOUNT          ",
            "                        ",
            "PURCHASE   AUD     $1.00",
            "                --------",
            "TOTAL      AUD     $1.00",
            "                        ",
            "APPROVED -  00          ",
            "                        ",
            "PLEASE RETAIN AS RECORD ",
            "      OF PURCHASE       ",
            "------------------------"
        ],
        "IsPrePrint": false
    }
}
| Field KeyName | Description |
|---|---|
| Type | Type of receipt either C for customer of M for merchant, L for logon, S for settlement |
| ReceiptText | Array of strings, containing each line of the receipt |
| IsPrePrint | indicates if this response is a preprint |
Properties
AccountType
This property is used in both events and methods, and because of this, there needs to be careful control over the setting of this property.
Event results for this property:
| Returned Property | Description |
|---|---|
| From a 'TransactionEvent' | The Customer account type that was selected in a transaction will be returned as: 'Cheque','Savings', 'Credit', "Account 1", "Account 2", "Account 3", "Account 4" or "Account 5". |
| From a 'QueryCardEvent' | It will be "0" = Savings, "2" = Cheque, "3" = Credit |
Aiic
Acquiring Institution Identification Code.
Returned by Status.
Applies to configMerchant.
Note: Not supported by all acquirers.
AmtCash
The amount of cash out for the transaction.
The STG Agency Deposit function uses this property to hold the total cash amount to deposit.
Applies to Transaction.
AmtCreditLimit
Credit limit amount.
Not used - Reserved for future use.
AmtPurchase
The purchase amount for the transaction.
Returned by transaction.
AmtTip
The tip amount for the transaction. Contains 0 if no tip was added. Returned by transaction.
Application
| Value | Description |
|---|---|
| "00" | Make EFTPOS payment |
| "02" | Make payment using extension |
Applies to Transaction.
AuthCode
Authorisation code. Returned by Transaction if the EFTPOS Acquirer returned the AuthCode
field. Also required as input to DoTransaction when a Completion is being performed.
Returned by if the acquirer returned a reference.
Returned by Transaction
Applies to Transaction.
AvailableBalance
The balance amount remaining on the card, only used on fixed value payment products.
Caid
Card Acceptor ID, also known as the "Merchant" ID.
Returned by Transaction, LogonEvent, Status.
Applies to DoConfigMerchant.
CancelKeyFlag
Enables / disables the availability of the cancel button on the display.
- 0 = No cancel button
- 1 = Cancel button
CardType
Indicates the card type used for the transaction as described by the bank. Examples may include: 'AMEX', 'VISA', 'DEBIT'. The possible values of this field may change between acquirers and pinpad versions. To identify the payment type used, reference the CardName field. Returned by TransactionEvent.
CardName
This property returns the Card BIN which can be used to identify the type of card payment used.
| Card BIN | Description |
|---|---|
| 0 | Unknown |
| 1 | Debit Card |
| 2 | China Union Pay |
| 3 | MasterCard |
| 4 | Visa |
| 5 | American Express |
| 6 | Diners Club |
| 7 | JCB |
| 8 | Private Label Card |
| 9 | JCB |
| 10 | Maestro |
| 11 | JCB |
| 12 | Other |
| 13 | Cabcharge |
| 14 | Bartercard |
| 15 | Fuel Card |
| 16 | Loyalty |
| 17 | Gift Card |
| 18 | Return Card |
| 19 | Shop Card |
| 20 | GE Card |
| 21 | Non-FI Card |
| 22 | Myer Black Card |
| 23 | Fleet Card |
| 24 | Motopass |
| 25 | Motorcharge |
| 26 | Logo 1 |
| 27 | Logo 2 |
| 28 | Visa Debit |
| 29 | Mastercard Debit |
| 30 | Unionpay credit |
| 31 | Unionpay debit |
| 51 | Wishlist |
| 52 | GiveX |
| 53 | Blackhawk |
| 54 | PayPal |
| 55 | Reserved |
| 56 | Reserved |
| 57 | FDI |
| 58 | Reserved |
| 59 | WrightExpress |
| 60 | Reserved |
| 61 | Reserved |
| 63 | ePay Universal |
| 64 | Incomm |
| 65 | AfterPay |
| 66 | AliPay |
| 67 | Humm |
| 68 | First Data Gift Card |
| 69 | |
| 70 | Klarna |
| 89 | Zip Money |
| 90 | TruRating |
| 98 | Reserved |
| 99 | Reserved |
Catid
Card Acceptor Terminal ID.
Returned by Transaction, LogonEvent, Status.
Applies to configMerchant.
ChqAccount
Cheque Account Number.
Applies to .
NOT Used
ChqBranch
Cheque Branch Number.
Applies to .
NOT Used
ChqSerialNumber
Cheque Serial Number.
Applies to .
NOT Used
ClearedFundsBalance
The cleared funds balance amount.
CommandCode
Used to indicate what command is being passed to Linkly
- 'N' = Get last transaction
ConfigLocked
Set to True if the PIN pad configuration parameters are locked.
(If the terminal has stored transactions or there is a reversal pending the terminal details cannot be altered).
NOT Used
CurrencyCode
Currency code for this transaction (e.g. AUD) A 3-digit ISO currency code. Defaults to " "(NotSet).
CutReceipt
Set to "1" if the receipt should be cut by the printer after the receipt is printed.
"0" Don't cut
DataField
A private Data Field.
- For the DisplayEvent this field contains multiple lines of text to display (usually 2 lines of 20 characters each).
For the QueryCard Event
It will contain the following if it was available in the PIN pad CPAT:
| Description | Length |
|---|---|
| Card Bin number | 1 byte(non ascii) |
| Account Grouping Code | 1 byte |
| Extended Service Code | 1 byte |
| Processing Code | 1 byte |
| AIIC | 6 byte |
For the Transaction, this field contains the TO/FROM data when a Funds Transfer is performed.
For the LogonEvent, this property contains a byte array of values: Currently assigned bytes are byte 0 = EFTPOS txns allowed, byte 1 = Agency txns allowed.
The array will be in the following order:
| Index | Content |
|---|---|
| 0 | Settlement |
| 1 | Pre-Settlement |
| 2 | Last-Settlement |
| 3 | Sub-Totals |
| 4 | Terminal Shift Totals |
| 5 | Reserved |
| 6 | Transaction Listing |
| 7 | SAF Totals |
| 8 | Mini-Statement |
| 9 | Detailed Cash Statement (STG Agency) |
| 10-15 | Reserved |
For the Status, this field will contain the Extra Status information which is used in PX328 Linkly systems and onward.
For a Transaction Request, if the TxnType is set to "K", this property will contain data for the PIN pad to use in processing the Enhanced PIN command.
This data is in the following format when the MessageType = "0" (status):
| Name | Length | Description |
|---|---|---|
| SAF Count | 4 | SAF Count (if PIN pad has a SAF) |
| Network Type | 1 | '1' = Leased, '2' = Dial-up |
| Hardware Serial # | 16 | Actual Serial Number that is unique to the h/w |
| Retailer Name | 40 | AS2805 Field 43 (if supported by host) |
| Options Flags | 32 | These flags denote the support of various options within the terminal. |
| Stand in Credit card Limit | 9 | Max limit allowed for stand-in on credit cards |
| Stand in Debit card limit | 9 | Max Limit allowed for stand-in on debit cards |
| Max number of stand-in transactions | 3 | |
| Key-handling scheme | 1 | '0' = Single DES '1' = Triple DES |
| Maximum Cash Out Limit | 9 | $$$$$$$cc |
| Maximum Refund Limit | 9 | $$$$$$$cc |
| Current CPAT version | 6 | |
| Current Name table version | 6 | |
| Terminal Comms Type | 1 | '0' = Cable, '1' = Infra-red |
| Card Misread Count | 6 | |
| Total # memory pages | 4 | |
| # free memory pages | 4 | |
| EFT Terminal Type | 4 | |
| # applications in terminal | 2 | |
| # lines on terminal display | 2 | |
| Hardware inception Date | 6 | DDMMYY - Date that the hardware serial number was entered into this device. |
Supported Functionality Index:
| Byte | Description |
|---|---|
| 0 | Tipping |
| 1 | Pre-Auth |
| 2 | Completions |
| 3 | Cash-Out |
| 4 | Refund |
| 5 | Balance Enquiries |
| 6 | Deposits |
| 7 | Voucher Entry |
| 8 | MOTO Transactions |
| 9 | Auto Completions |
| 10 | Electronic Fallback |
| 11 | EMV |
| 12 | Training Mode |
| 13 | Withdrawal |
| 14 | Funds Transfer |
| 15 | Start Cash |
The Data in the following format is for MessageType = '1' (Terminal Info)
| Name | Byte | Description |
|---|---|---|
| Eprom Type | 1 | 'Y' = 1Mb, 'X' = 2Mb |
| Terminal Type | 2 | |
| OS Version | 2 | |
| OS CRC | 4 | |
| BIOS Version | 2 | |
| BIOS CRC | 4 | |
| # Free Pages | 3 | |
| # Applications | 2 |
For each application in the terminal the following will be present:
| Name | Byte |
|---|---|
| Application Number | 2 |
| Application Version | 2 |
| Active Flag | 1 |
| Corrupted Flag | 1 |
| Number of code pages | 2 |
| CRC for each code page | #pages * 2 |
| Number of data pages |
The Data in the following format is for MessageType = '2' (CPAT)
| Name | Byte |
|---|---|
| CPAT Version # | 6 |
| # Offline Transactions allowed | 3 |
| #card prefix entries | 3 |
For each CPAT entry, the following will be sent:
| Name | Byte | Description |
|---|---|---|
| Prefix | 10 | |
| Card Index | 2 | |
| Card Bin# | 2 | |
| Account Grouping Code | 1 | |
| AIIC | 11 | |
| Processing Code | 2 | |
| DB card limit | 6 | |
| CR card limit | 6 | |
| ESC flag | 1 | Indicated if the Extended Service code table is to be used for this card. |
• The data is in the following format for MessageType = '3' (card name table)
| Name | Byte |
|---|---|
| Card Table version # | 6 |
| # card prefix entries | 3 |
For each card name entry, the following will be sent:
| Name | Byte |
|---|---|
| Card Name | 20 |
| Bin # | 2 |
| Index | 2 |
• The Data is in the following format for MessageType = "4" (Offline Txns)
| Name | Byte | |
|---|---|---|
| Reversal Present | 1 | True if the reversal is present in the SAF. The first entry will be the reversal. The remainder will be the SAF transactions. |
| Number of entries | 3 |
For each entry in the SAF, the following will be present:
| Name | Byte | |
|---|---|---|
| Processing Code | 6 | |
| Transaction Amount | 12 | |
| Transmission Date/Time | 2 | MMDDhhmmss |
| POS entry mode | 3 | |
| Card Seq # | 3 | |
| Track2 Details | 40 | "card data", '=', "expiry date", "pad with end sentinels (?)" |
| RRN | 12 | |
| Auth # | 6 | |
| Cash Out Amount | 12 |
Date
Date of transaction
Returned by Transaction
DateExpiry
Set before calling Transaction if a customer's card details are manually entered by the operator.
Used in conjunction with the Pan property.
Returned by Transaction.
Applies to Transaction.
DateSettlement
Contains the settlement date for the transaction in 'DDMMYYYY' format.
Used as input to Settlement with certain EFTPOS acquirers to specify the date for which
the settlement details are to be retrieved.
In this case DateSettlement should be blank if the current days totals are to be retrieved.
Returned by Transaction and Settlement
Applies to Settlement.
DisplayText
An array of strings containing the text to display.
EftPosNetwork
Indicates the network to which the PIN pad is connected.
Returned by Status.
EnableTip
Set before calling Transaction. If EnableTip is True before calling Transaction, the customer
receipt will have an area for a TIP to be entered. The POS should store all details related to Tip
Adjustments, so that the POS can send the tip adjustment to the Linkly system with the Transaction method (with TxnType = "T").
Applies to Transaction.
Note: Not supported by all acquirers.
InputData
The Input Data that is returned if the POS is implementing a custom display with Input using the Display Request, maximum 20 characters.
InputDataFieldKey
Note 1: This tag is set if the Authorise Key Flag is set. the Input Field Key values can be: - '1'= Normal ASCII input - '2'= Formatted Amount entry ($0.cc) - '3'= 2 decimal place formatted entry without dollar sign - '4'= Masked Password entry - '5'= Supervisor Request from pinpad - '6'= One key input from POS. As soon as one key is pressed on the POS, the key is sent to the pinpad It is mandatory that a POS support option '1' for this key type
KeyPressed
Indicates which key is to be pressed '0' for the CANCEL key '1' for the YES key '2' for the NO key '3' for the AUTH key
KVC
This property is used to hold the CVV (card verification value ) of the magnetic card stripe. This field is not mandatory.
LastTxnSuccess
Set to True if the last transaction was successful.
Returned by GetLastTransaction.
LineLength
The length of the lines in the display.
LoggedOn
Set to True if the PIN pad is in a logged on state, False if a logon is required. It is never necessary
for an application to use DoLogon to explicitly logon a PIN pad as auto-logons are performed.
Returned by Status.
LogonType
The type of logon to perform.
| Value | Description |
|---|---|
| " " | Standard |
| "4" | RSA logon |
| "5" | TMSFull |
| "6" | TMSParams |
| "7" | TMSSoftware |
| "8" | Logoff |
| "1" | Diagnostics |
Merchant
Indicates the active merchant. (Reserved for future use) - Currently only merchant 0 is supported and setting this property to any other value will result in an error.
| Value | Description |
|---|---|
| "00" | Default value to indicate EFTPOS |
| "65" | AfterPay payment |
| "66" | Alipay payment |
| "67" | Humm payment |
| "89" | ZipMoney payment |
Applies to Transaction, Logon, Settlement, and Status.
MessageType
A property to represent:
- The Message type returned by Transaction.
- The Subcode to select in a Status request.
- The resulting subcode in a Status
Nii
EFTPOS Network International Identifier.
Returned by Status.
Applies to ConfigMerchant.
Note: Not supported by all acquirers.
NumberOfLines
The number of lines in the display.
OkKeyFlag
Enables / disables the availability of the OK button on the display.
- 0 = No OK button
- 1 = OK button
Pan
Primary Account Number. Loaded with the customer PAN for manually entered transactions.
Only credit card details may be entered manually. Refer also to the properties DateExpiry, and PanSource.
Returned by Transaction (return format is acquirer dependent any may be in short 6...3 format).
Applies to Transaction.
PanSource
Indicates the source of the customer card details. The following values are valid for PanSource:
| Value | Description |
|---|---|
| ' ' (Space) | PIN pad will read card using internal card reader |
| 'K' | Manual Entry of card details using DateExpiry and Pan properties |
| 'S' | Track2 property contains application supplied card details read directly form a magnetic stripe reader (MSR) |
The following additional options are only used in MOTO (mail order/telephone order systems) where the pan source is a manually entered card. Use the above 'K' option for all other manual card options.
| Value | Description |
|---|---|
| '0' | Internet originated transaction |
| '1' | Telephone originated transaction |
| '2' | Mail order originated transaction |
| '3' | Customer present |
| '4' | Recurring transaction |
| '5' | Installment |
Applies to Transaction.
PinPadPort
The port to which the PIN pad is attached. On input, this property may be used to set the specific
PIN pad port to use. On output, it indicates the PIN pad port used for the transaction.
Applies to Transaction, Logon, Settlement
Note: Not supported by all acquirers.
PinPadSerialNumber
The hardware ID or Serial Number of the attached PIN pad.
Returned by StatusEvent.
PinPadVersion
The PIN pad software name and version (Up to 16 characters).
Returned by Status
PHN
Humm only. Customer phone number. Applies to Humm Invite
QueryCardType
The type of query to perform during a QueryCard request
| Value | Description |
|---|---|
| "0" | Read card only |
| "1" | read card + select account |
| "5" | select account only |
| "7" | pre-swipe |
| "8" | Preswipe special |
Receipt
Formatted EFTPOS receipt information (Up to 2048 characters).
Returned by PrintReceipt, GetLastReceipt.
ReceiptAutoPrint
| ReceiptAutoPrint | Description |
|---|---|
| "0" | Return all receipts to the POS in a receipt event. Only supported when async=true |
| "1" | Not supported in the REST API |
| "7" | Print all merchant/signature receipts from the PINpad printer, return all other receipts to the POS in the transaction/logon/settlement response |
| "9" | Print all receipts from the PINpad printer |
ResetTotals
This property should be set to True if the current totals should be reset when calling Settlement
with TxnType of shift Totals.
Applies to Settlement.
ResponseCode
A 2 character code returned by the bank indicating the result of the transaction.
Returned by all events.
ResponseText
A textual description of the bank response code (up to 20 characters).
Returned by all events.
ResponseType
The type of response that is being returned. This can be used to help sort responses sent to POS postback endpoints.
| ResponseType |
|---|
| transaction |
| logon |
| settlement |
| status |
| querycard |
| configuremerchant |
| reprintreceipt |
| display |
| receipt |
RRN
Retrieval Reference Number this value is used to trace transactions.
SettleCardTotals
Ascii records containing settlement data for each card type settled. The ascii card records are defined as follows:
| Length | Description |
|---|---|
| 20 | Card Name |
| 9 | Purchase Amount |
| 3 | Purchase Count |
| 9 | Cash-Out Amount |
| 3 | Cash-Out Count |
| 9 | Refund Amount |
| 3 | Refund Count |
| 1 | Totals sign (+ or -) |
| 9 | Totals Amount |
| 3 | Totals Count |
Returned by Settlement.
SettlementType
| Value | Description |
|---|---|
| "S" | Settlement |
| "P" | Pre-Settlement |
| "L" | Last Settlement |
| "U" | Sub Totals or Summary Totals for ANZ |
| "H" | Shift Totals or Subtotals for ANZ |
| "I" | Txn Listing |
| "M" | Start Cash |
| "F" | Store and forward (SAF) totals report |
| "D" | Daily cash statement (STG Agency) |
Stan
The Systems Trace Audit Number of the last transaction performed. (0-999999).
Returned by Transaction, GetLastTransaction, Logon.
StatusType
The type of status to perform
| Value | Description |
|---|---|
| "0" | Standard |
| "1" | TerminalAppInfo |
| "2" | AppCPAT |
| "3" | AppNameTable |
| "4" | Undefined |
| "5" | Preswipe |
SubCode
Used to control behavor of methods:
Reprint receipt Indicates to reprint or retrieve (sent to POS)
- '1' = reprint receipt
- '2' = get last receipt
Get last transaction
- '0' = Standard request
Success
Boolean value indicating success or failure of relevant event/method call. eg. If the request was of type transaction, this flag indicates that the financial transaction (sale) succeeded.
Returned by all events.
Time
Transaction time returned by the acquirer. 'HHMMSS' format.
Returned by Transaction, Logon.
Timeout
EFTPOS transaction timeout. Determines the maximum amount of time that the PIN pad will wait
for a reply from the EFTPOS network. Value is from 10-255 seconds.
Returned by Status.
Applies to ConfigMerchant.
Note: Not all acquirers support modification of this value.
TotalsData
A totals record containing the locally stored terminal totals.
| Length | Description |
|---|---|
| 20 | Totals Description |
| 9 | Purchase Amount |
| 3 | Purchase Count |
| 9 | Cash-out amount |
| 3 | Cash-out count |
| 9 | Refund Amount |
| 3 | Refund Count |
| 1 | Total Sign |
| 9 | Total Amount |
| 3 | Total Count |
For a Mini Statement or a Store and Forward totals message, this field will contain the data sent back in those responses as defined by the bank.
For a Settlement with a txntype of "A" (Daily Cash Statement), this field will contain data to be sent to the terminal.
The format of this data is up to the terminal application that needs the data.
For each charge card:
| Length | Description |
|---|---|
| 11 | Card Name |
| 02 | Totals bin |
| 03 | Credit count |
| 09 | Credit amount |
| 03 | Debit count |
| 09 | Debit amount |
| 09 | Net amount |
Note: there is only one base record, but the number of charge cards is variable.
Returned by Settlement.
Track1
Contents of magnetic card track 1 or 3, if either is read by the PIN pad.
Returned by QueryCard.
TotalPurchaseCount
The total number of cheques that are to be processed by a STG Agency terminal Deposit function.
Applies to: Transaction.
Track2
Contents of magnetic card track 2. This property should be loaded by the application prior to calling
Transaction if the customer card is read by an application Magnetic Stripe Reader.
QueryCard returns the contents of track 2 for any card. The format of this field is acquirer dependent any may be in shorted format.
Returned by Transaction, QueryCard.
Applies to Transaction.
TxnFlags
The transaction flags that apply to the transaction
- "Offline" = 0/1
- "ReceiptPrinted" = 0/1
- "CardEntry" = '0' = unknown; 'S' = Swiped; 'K' = Keyed 'C' = Contactless Chip card 'E' = Contact Chip Card
- "CommsMethod" = '1' = P66, '2' = Argent, '3' = X25, '4'&'5' = HostEm, '6' = Non-EFT
- "Currency" = '0' = AUD, '1' = Converted Currency. (Transfer Data will contain Currency Code, Amount and Exponent if this is set).
- "PayPass" = '0' = Non Paypass '1' = Paypass.
- "UndefinedFlag6" = 0/?
- "UndefinedFlag7" = 0/?
TxnRef
Application supplied reference number up to 16 characters in length. TxnRef can contain any ascii characters between 32 and 127 (decimal).
Returned by Transaction, GetLastTransaction.
Applies to Transaction.
TxnType
This property should be set to indicate the type of transaction to be performed when calling Transaction or Settlement.
See Appendix E - Txn type.
Value Added Applications
One Button
Overview
The Linkly One button offers a simple entry point for POS developers to send transactions to Linkly supported third party payment applications.
Customers will still need to support each payment type, and have it enabled within the Linkly environment for One button to work.
Instead of needing to implement different transaction types for different applications, the POS need only implement this one. This API requires knowledge of the Linkly Basket.
When a purchase is sent to Merchant 99, the PIN pad will display a menu asking the customer to select which payment type they would like to use for the transaction.
For example, if the merchant has Afterpay, Alipay, and Humm enabled will have the following menu options:
Payment Type
- Afterpay
- Alipay
- Humm
The customer is then able to select which payment option to use.
Payment supported by the One Button API:
- Afterpay
- Alipay
- ePay Wallet (Alipay, WeChat Pay)
- Humm
- Zip
- Klarna
Prerequisites
The One Button API is based on the Core Payments API and requires the POS to implement the same minimum requirements.
Onboarding
Each AppHub product requires a set of credentials to identify and authorise the merchant on the third party's platform. These credentials range from username/password to one-time activation keys and are normally entered manually into the local registry or via a Linkly provided installer. The process for onboarding via Connect is as follows:
- Merchant gets credentials from the third party
- Linkly register merchant in Cloud Portal as instore or cloud customer
- Merchant enters ActivationCode into their lane
- Linkly perform activation process on customer's AppHub products
- Linkly deploy and configure selected AppHub products to customer's lane
- Merchant can now perform AppHub sales.
Transaction Types
Supported Transaction Types
The One Button API provides the following transactional types across AppHub products:
Transaction Types
- Purchase (P)
- Refund (R)
Management of merchant/bank functions
- Reprint Receipt
- Transaction Status
Transactional Scenarios
- Partial/Split Payments
Error Handling
Purchase
Example One Button purchase request object
{
    "Request":
    {
        "Merchant": "99",
        "TxnType": "P",
        "AmtPurchase": 100,
        "TxnRef": "1234567890",
        "CurrencyCode": "AUD",
        "CutReceipt": "0",
        "ReceiptAutoPrint": "0",
        "Application": "02",
        "PurchaseAnalysisData":
        {
            "OPR": "00766|test",
            "AMT": "0042000",
            "PCM": "0000"
        },
        "Basket":
        {
            "id": "t39kq18134553",
            "amt": 2145,
            "tax": 200,
            "dis": 50,
            "sur": 0,
            "items": [{
                "id": "t39kq002",
                "sku": "k24086723",
                "qty": 2,
                "amt": 2145,
                "tax": 200,
                "dis": 50,
                "name": "XData USB Drive"
            }]
        }
    },
    "Notification":
    {
        "Uri": "https://myPos.com.au/{{sessionid}}/{{type}}",
        "AuthorizationHeader": "Bearer <<token>>"
    }
}
Purchase Request
To call the One Button purchase request, make a Core Payments purchase request with Merchant "99" and Application "02".
Example One Button purchase response object
{
    "SessionId": "dd250a0c81c202b66220d7379b338b8f",
    "ResponseType": "transaction",
    "Response": {
        "TxnType": "P",
        "Merchant": "61",
        "CardType": "AMEX CARD           ",
        "CardName": "05",
        "RRN": "123456789012",
        "DateSettlement": "2018-07-31T00:00:00",
        "AmtCash": 0,
        "AmtPurchase": 100,
        "AmtTip": 0,
        "AuthCode": 123456,
        "TxnRef": "1234567890      ",
        "Pan": "37601234567890      ",
        "DateExpiry": "4909",
        "Track2": "37601234567890=0949?,,S, YES, 05??????  ",
        "AccountType": "2",
        "TxnFlags": {
            "Offline": "1",
            "ReceiptPrinted": "0",
            "CardEntry": "S",
            "CommsMethod": "0",
            "Currency": "0",
            "PayPass": "0",
            "UndefinedFlag6": "0",
            "UndefinedFlag7": "0"
        },
        "BalanceReceived": false,
        "AvailableBalance": 0,
        "ClearedFundsBalance": 0,
        "Success": true,
        "ResponseCode": "00",
        "ResponseText": "APPROVED            ",
        "Date": "2018-07-31T16:14:40",
        "Catid": "12345678",
        "Caid": "0987654321     ",
        "Stan": 0,
        "PurchaseAnalysisData": {
          "RFN": "klujhadsc9ph87asd",
          "REF": "12345",
          "HRC": "ERR1",
          "HRT": "INVALID CARD"
        }
    }
}
Purchase Response
The CardName and Merchant properties in the response will indicate the payment type selected.
Refund
Example One Button refund request object
{
    "Request":
    {
        "Merchant": "99",
        "TxnType": "R",
        "AmtPurchase": 100,
        "TxnRef": "1234567890",
        "CurrencyCode": "AUD",
        "CutReceipt": "0",
        "ReceiptAutoPrint": "0",
        "Application": "02",
        "PurchaseAnalysisData":
        {
            "RFN": "klujhadsc9ph87asd",
            "OPR": "00766|test",
            "AMT": "0042000",
            "PCM": "0000"
        }
    },
    "Notification":
    {
        "Uri": "https://myPos.com.au/{{sessionid}}/{{type}}",
        "AuthorizationHeader": "Bearer <<token>>"
    }
}
Refund Request
To call the One Button refund request, make a Core Payments refund request with Merchant "99" and Application "02".
Refund Response
The refund response is in the format of the transaction response object, see the Transaction section for a detailed breakdown.
The CardName and Merchant properties in the response will indicate the payment type used for the refund.
Management Functions
The POS should implement: * Reprint Receipt from the Linkly Core Payments management functions with Merchant "99" and Application "02". * Transaction Status from Linkly Core Payments management functions
Error Handling
The POS should implement error handling as outlined by the Error recovery section.
Third Party payment barcode/QR code timeout
The table below lists how long the bar code or QR code from the payment provider is valid for once it's generated by the customer.
| Third Party | Payment Method | Timeout |
|---|---|---|
| ZipMoney | Barcode | 5 minutes |
| AfterPay | Barcode | 10 minutes |
| Alipay | QR Code | Unknown |
| QR Code | Unknown | |
| Humm | Barcode | 5 minutes |
| Klarna | QR Code | 2 minutes |
Optional Functionality
Custom Displays
The POS can implement custom display handling using the Core Payments Optional Functionality.
Query Card Functionality
This function can be used by the POS display the app selection screen on the PIN pad to obtain a two digit "merchant id" which can be used in subsequent purchase or refund requests.
The primary use of this function is to allow the POS to perform actions based on the payment type selected by the customer before the payment continues, such as validating if any items exist in the basket which are prohibited for the selected payment type.
If the POS is using this function it must follow the payment flow detailed below:
- POS sends QueryCard to Linkly
- Linkly prompts customer to select payment type
- Customer selects payment
- Linkly return selected payment to POS
- POS processes based on returned value
- POS blocks transaction and ends sale OR POS initiates transaction using Merchant Code in QueryCard response
- Transaction initiates automatically without additional customer input
Query Card Request
Perform a standard QueryCard with the following property set:
| Field Name | Length (characters) | Description | Example |
|---|---|---|---|
| Merchant | 2 | Must be '99' Identifies this sale as One Button | '99' |
| App | 2 | Must be '02' to indicate a |
Query Card Response
| Field Name | Length (characters) | Description | Example |
|---|---|---|---|
| Merchant | 2 | Must be '99' Identifies this sale as One Button | '99' |
| Success | 1 | Indicates if the transaction was successful | '1' = Success '0' = Failed |
| Response Code | 2 | Response code indicating sale status | '00' = Approved 'X0' = No response |
| Response Text | 20 | Response message associated with the response code | 'TRANSACTION APPROVED' |
| [Bin Number] | 2 | 2-digit Merchant identifier of payment method selected | '89' = Zip '66' = Alipay '65' = Afterpay |
POS Barcode Scanning
This function allows the POS to scan a barcode instead of the PIN pad. The POS will receive a DisplayEvent and must answer with a SendKey; populating the DataEntry field this will be the Barcode for the sale. POS must set the PCM PAD tag's first byte to '1' to indicate it can support this functionality and wants to use it for the transactions.
Transaction Request
Perform a sale with the following Purchase Analysis Data Tag:
| Tag Name | Tag Value | Description | Example |
|---|---|---|---|
| PCM | Flag array of functionality supported by POS | POS Capabilities Matrix. First byte = POS can scan Barcode | PCM0011 |
This will cause the EFT-Client to send a DisplayEvent to the POS with the following properties:
Display Event
| Field Name | Length (characters) | Description | Example |
|---|---|---|---|
| NumberOfLines | 2 | Number of lines of text | '02' – two lines |
| LineLength | 2 | Length of each line of text | '20' line is 20 char long |
| DisplayText | 40 | Text to display | 'SCAN BARCODE' |
| Cancel Key Flag | 1 | Indicates whether the CANCEL key can be pressed | '0' = Disabled '1' = Enabled |
| InputData Field Key | 1 | See 'Custom Displays' Section | '7' |
| OK Key Flag | 1 | Indicates whether the OK key can be pressed | '0' = Disabled '1' = Enabled |
The POS must reply to the above display event with a SendKey Request as detailed below:
Send Key Request
| Field Name | Length (characters) | Description | Example |
|---|---|---|---|
| KeyPressed | 1 | Indicated which key is to be pressed '0' for the CANCEL key '1' for the YES key '2' for the NO key '3' for the AUTH key | '0' = CANCEL |
| InputData | 60 | Entry data collected by POS (the barcode) | 209849083 |
Purchase online, refund in-store
When completing a refund in-store for an online purchase: * The REF pad tag indicates the unique identifier returned from the online purchase * The RFN pad tag does not need to be set * The Merchant field indicates the payment provider to perform the refund
Example One Button refund request object
{
    "Request":
    {
        "Merchant": "70",
        "TxnType": "R",
        "AmtPurchase": 100,
        "TxnRef": "1234567890",
        "CurrencyCode": "AUD",
        "CutReceipt": "0",
        "ReceiptAutoPrint": "0",
        "Application": "02",
        "PurchaseAnalysisData":
        {
            "REF": "0b072c9f-7e96-4de3-a367-d7da6231a919",
            "OPR": "00766|test",
            "AMT": "0042000",
            "PCM": "0000"
        }
    },
    "Notification":
    {
        "Uri": "https://myPos.com.au/{{sessionid}}/{{type}}",
        "AuthorizationHeader": "Bearer <<token>>"
    }
}
Refund
To call the One Button refund request, make a Core Payments refund request with Application "02", Merchant, and REF pad tag set.
| Third Party | Merchant | REF |
|---|---|---|
| Klarna | 70 | Set to Order Id returned from Klarna API |
Refund Response
The refund response is in the format of the transaction response object, see the Transaction section for a detailed breakdown.
The CardName and Merchant properties in the response will indicate the payment type used for the refund.
AppHub Payment specific details:
For response codes related to One button transactions please see the response code section.
ZipMoney:
Receipts:
Below is a Zipmoney Purchase Receipt

Below is a ZipMoney Refund Receipt

Field Mapping:
References:
Zip Transaction Receipt
This Reference is generated by ZipMoney and sent to Linkly after a transaction request. Linkly will send this field in the 'REF' PAD Tag. This field is also printed on the receipt under the heading 'ZipMoney Reference:'
Merchant Transaction Reference
This reference is the POS transaction Reference passed to ZipMoney via Linkly. The POS generates this field and passes it in a Transaction Request in the 'TxnRef' field. This field is returned to the POS in a TransactionResponse in the 'TxnRef' field.
AfterPay:
Receipts:
Below is an Afterpay purchase Receipt

Below is an AfterPay Refund Receipt

Field Mapping:
References:
merchantReference
This reference is the POS transaction Reference passed to Afterpay via Linkly. The POS generates this field and passes it in a Transaction Request in the 'TxnRef' field. This field is returned to the POS in a TransactionResponse in the 'TxnRef' field.
orderId
This reference is the AfterPay reference for the sale, this is returned to the POS in the 'REF' PAD Tag. This reference is printed on the receipt under the heading 'AfterPay Order ID:'. This reference is required to perform a refund.
refundId
This reference is only sent for Refunds; it is the AfterPay reference for the refund, this is returned to the POS in the 'REF' PAD Tag. This reference is printed on the receipt under the heading 'AfterPay Refund ID:'
AfterPay
This extension adds to the core EFTPOS payment API that is provided to the POS by the Linkly EFT Client and allows the POS to perform the AfterPay transactions outlined in this section.
Purchase
This transaction can be used to perform a Puchase using AfterPay. Please Note: AfterPay does not support automatic reversals, and as such the POS must implement and initiate idempotent retires in the case that a response is not received for Puchase transactions; the Response Code to indicate this is 'X0'. The POS must pass in the total purchase amount for the sale in the 'AmtPurchase' in cents. Tag The POS will receive an AfterPay purchase number on the conclusion of the sale.
Example purchase request object
{
    "Request":
    {
        "Merchant": "65",
        "Application": "02",
        "AmtPurchase": "200",
        "ReceiptAutoPrint":"0",
        "TxnType": "P",
        "TxnRef": "1234567890"
    },
    "Notification":
    {
        "Uri": "https://myPos.com.au/{{sessionid}}/{{type}}",
        "AuthorizationHeader": "Bearer <<token>>"
    }
}
Example purchase response object
{
    "AmtPurchase": 200,
    "AvailableBalance": 0,
    "BalanceReceived": false,
    "Caid": "C00004600001004",
    "ClearedFundsBalance": 0,
    "Date": "2019-01-24T02:40:02",
    "Merchant": "00",
    "Pan": "36536170",
    "PurchaseAnalysisData":
    {
        "REF": "<AfterPay Order Id>"
    },
    "ResponseCode": "00",
    "ResponseText": "TRANSACTION APPROVED",
    "Stan": 17,
    "Success": true,
    "TxnRef": "J23AOI4KYHBQKQP8",
    "TxnType": "P"
}
To perform a sale, the POS will:
- Connect to the Authentication Service
- Request a token using Username, Password and PIN pad PairCode
- Send a Transaction request
- Set Merchant to "65", which determines AfterPay merchant for the sale. See Appendix A - Merchant Codes for other codes.
- Set Application to "02" to make extension payment.
- Set TxnType to "P".
- Set AmtPurchase to the actual purchase amount in cents (For AfterPay $2.00 is minimun sum for transaction).
- Set TxnRef to a unique number for this transaction.
- Set PAN and PANSource IF the POS has handled the customer presenting their card.
- Set the remaining properties as they apply to your specific sale or leave as their default is it does not.
- Send the Transaction Message to the Linkly Cloud REST API endpoint
- Handle display responses
- Listen for responses from Linkly Cloud REST API: these are usually display events notifying the POS that Linkly will display a message to the customer and on the POS PC (such as Present Card or Select Account)
- Note that if the PIN pad has not settled or logged on prior to the sale it will do so automatically before firing the transaction, you will need to handle these cases.
- Listen for responses from Linkly Cloud REST API: these are usually display events notifying the POS that Linkly will display a message to the customer and on the POS PC (such as Present Card or Select Account)
- Handle receipt responses
- Listen for receipt responses from Linkly Cloud REST API notifying the POS that a receipt needs to be printed.
- Note if the PIN pad has not settled or logged on prior to the sale it will send logon receipts and settlement receipts prior to starting the sale. These need to be handled.
- Handle Merchant and Customer receipts.
- Listen and Handle the Transaction response from Linkly Cloud REST API.
Refund
This transaction can be used to perform a Refund using AfterPay. The POS must pass in the AfterPay Order Id in the 'REF' Tag. Please Note: AfterPay does not support automatic reversals, and as such the POS must implement and initiate idempotent retires in the case that a valid response is not received for Refund transactions; the Response Code to indicate this is 'X0'.
Example refund request object
{
    "Request":
    {
        "Merchant": "65",
        "Application": "02",
        "AmtPurchase": "200",
        "PurchaseAnalysisData":
        {
            "REF" : "<AfterPay Order Id>"
        },
        "ReceiptAutoPrint":"0",
        "TxnType": "R",
        "TxnRef": "123532465"
    },
    "Notification":
    {
        "Uri": "https://myPos.com.au/{{sessionid}}/{{type}}",
        "AuthorizationHeader": "Bearer <<token>>"
    }
}
Example refund response
{
    "AmtPurchase": 200,
    "AuthCode": 0,
    "AvailableBalance": 0,
    "BalanceReceived": false,
    "Caid": "C00004600001004",
    "CardName": "00",
    "ClearedFundsBalance": 0,
    "Date": "2019-01-24T02:58:02",
    "Merchant": "00",
    "PurchaseAnalysisData":
    {
        "REF": "27390"
    },
    "ResponseCode": "00",
    "ResponseText": "TRANSACTION APPROVED",
    "Stan": 18,
    "Success": true,
    "TxnRef": "AQF5W1KL476XBO9I",
    "TxnType": "R"
}
A refund is where the amount is transferred from merchant's account to customer account:
- Connect to the Authentication Service
- Request a token using Username, Password and PIN pad PairCode
- Build a Transaction request
- Set Merchant to "65", which determines AfterPay merchant for the sale. See Appendix A - Merchant Codes for other codes.
- Set Application to "02" to make extension payment.
- Set AmtPurchase to the actual refund amount requested.
- Set TxnType to "R".(Refund always 'R')
- Set TxnRef to a unique number for this transaction.
- Set REF Reference (AfterPay Order Id) of the purchase to refund
- Send the Transaction Message to the Linkly Cloud REST API endpoint
- Handle display responses
- Listen for responses from Linkly Cloud REST API: these are usually display events notifying the POS that Linkly will display a message to the customer and on the POS PC (such as Present Card or Select Account)
- Note that if the PIN pad has not settled or logged on prior to the sale it will do so automatically before firing the transaction, you will need to handle these cases.
- Listen for responses from Linkly Cloud REST API: these are usually display events notifying the POS that Linkly will display a message to the customer and on the POS PC (such as Present Card or Select Account)
- Handle receipt responses
- Listen for receipt responses from Linkly Cloud REST API notifying the POS that a receipt needs to be printed.
- Note if the PIN pad has not settled or logged on prior to the sale it will send logon receipts and settlement receipts prior to starting the sale. These need to be handled.
- Handle Merchant and Customer receipts.
- Listen and Handle the Transaction response from Linkly Cloud REST API.
Alipay
This extension adds to the core EFTPOS payment API that is provided to the POS by the Linkly EFT Client and allows the POS to perform the Alipay transactions outlined in this section.
Purchase
This transaction can be used to perform a Puchase using Alipay. Please Note: Alipay does not support automatic reversals, and as such the POS must implement and initiate idempotent retires in the case that a response is not received for Puchase transactions; the Response Code to indicate this is 'X0'. The POS must pass in the total purchase amount for the sale in the 'AmtPurchase' in cents. Tag The POS will receive an Alipay purchase number on the conclusion of the sale.
Example purchase request object
{
    "Request":
    {
        "Application": "02",
        "AmtPurchase": "200",
        "Merchant": "66",
        "ReceiptAutoPrint":"0",
        "TxnRef": "96B32M9UNZ421MEI",
        "TxnType": "P"
    },
    "Notification":
    {
        "Uri": "https://myPos.com.au/{{sessionid}}/{{type}}",
        "AuthorizationHeader": "Bearer <<token>>"
    }
}
Example purchase response object
{
    "AmtPurchase": 200,
    "AvailableBalance": 0,
    "BalanceReceived": false,
    "Caid": "C00004600001002",
    "ClearedFundsBalance": 0,
    "Date": "2019-02-20T01:20:05",
    "Merchant": "00",
    "Pan": "36536170",
    "PurchaseAnalysisData":
    {
        "HRC": "SUCCESS",
        "STS": "TRADE_SUCCESS",
        "REF": "<Alipay Trade Number>",
        "RFN": "MCH00266RF1024<Alipay Retrieval Reference>RF2028<Alipay Trade Number>"
    },
    "ResponseCode": "00",
    "ResponseText": "TRANSACTION APPROVED",
    "Stan": 22,
    "Success": true,
    "TxnRef": "96B32M9UNZ421MEI",
    "TxnType": "P"
}
To perform a sale, the POS will:
- Connect to the Authentication Service
- Request a token using Username, Password and PIN pad PairCode
- Send a Transaction request
- Set Merchant to "66", which determines Alipay merchant for the sale. See Appendix A - Merchant Codes for other codes.
- Set Application to "02" to make extension payment.
- Set TxnType to "P".
- Set AmtPurchase to the actual purchase amount in cents.
- Set TxnRef to a unique number for this transaction.
- Set PAN and PANSource IF the POS has handled the customer presenting their card.
- Set the remaining properties as they apply to your specific sale or leave as their default is it does not.
- Send the Transaction Message to the Linkly Cloud REST API endpoint
- Handle display responses
- Listen for responses from Linkly Cloud REST API: these are usually display events notifying the POS that Linkly will display a message to the customer and on the POS PC (such as Present Card or Select Account)
- Note that if the PIN pad has not settled or logged on prior to the sale it will do so automatically before firing the transaction, you will need to handle these cases.
- Listen for responses from Linkly Cloud REST API: these are usually display events notifying the POS that Linkly will display a message to the customer and on the POS PC (such as Present Card or Select Account)
- Handle receipt responses
- Listen for receipt responses from Linkly Cloud REST API notifying the POS that a receipt needs to be printed.
- Note if the PIN pad has not settled or logged on prior to the sale it will send logon receipts and settlement receipts prior to starting the sale. These need to be handled.
- Handle Merchant and Customer receipts.
- Listen and Handle the Transaction response from Linkly Cloud REST API.
Refund
This transaction can be used to perform a Refund using Alipay. The POS must pass in the Alipay Order Id in the 'REF' Tag. Please Note: Alipay does not support automatic reversals, and as such the POS must implement and initiate idempotent retires in the case that a valid response is not received for Refund transactions; the Response Code to indicate this is 'X0'.
Example refund request object
{
    "Request":
    {
        "AmtPurchase": "200",
        "Application": "02",
        "Merchant": "65",
        "PurchaseAnalysisData":
        {
            "REF" : "<Alipay Trade Number>"
        },
        "ReceiptAutoPrint":"0",
        "TxnRef": "VHWIAT4081T4DBR5",
        "TxnType": "R"
    },
    "Notification":
    {
        "Uri": "https://myPos.com.au/{{sessionid}}/{{type}}",
        "AuthorizationHeader": "Bearer <<token>>"
    }
}
Example refund response
{
    "AmtPurchase": 200,
    "AuthCode": 0,
    "AvailableBalance": 0,
    "BalanceReceived": false,
    "Caid": "C00004600001002",
    "CardName": "00",
    "ClearedFundsBalance": 0,
    "Date": "2019-02-20T01:38:02",
    "Merchant": "66",
    "PurchaseAnalysisData":
    {
        "HRC": "SUCCESS",
        "REF": "<Alipay Trade Number>",
        "RFN": "MCH00266RF1024<Alipay Retrieval Reference>RF2028<Alipay Trade Number>"
    },
    "ResponseCode": "00",
    "ResponseText": "TRANSACTION APPROVED",
    "Stan": 28,
    "Success": true,
    "TxnRef": "VHWIAT4081T4DBR5",
    "TxnType": "R"
}
A refund is where the amount is transferred from merchant's account to customer account:
- Connect to the Authentication Service
- Request a token using Username, Password and PIN pad PairCode
- Build a Transaction request
- Set Merchant to "66", which determines Alipay merchant for the sale. See Appendix A - Merchant Codes for other codes.
- Set Application to "02" to make extension payment.
- Set AmtPurchase to the actual refund amount requested.
- Set TxnType to "R".(Refund always 'R')
- Set TxnRef to a unique number for this transaction.
- Set REF Reference (Alipay Trade Number) of the purchase to refund
- Send the Transaction Message to the Linkly Cloud REST API endpoint
- Handle display responses
- Listen for responses from Linkly Cloud REST API: these are usually display events notifying the POS that Linkly will display a message to the customer and on the POS PC (such as Present Card or Select Account)
- Note that if the PIN pad has not settled or logged on prior to the sale it will do so automatically before firing the transaction, you will need to handle these cases.
- Listen for responses from Linkly Cloud REST API: these are usually display events notifying the POS that Linkly will display a message to the customer and on the POS PC (such as Present Card or Select Account)
- Handle receipt responses
- Listen for receipt responses from Linkly Cloud REST API notifying the POS that a receipt needs to be printed.
- Note if the PIN pad has not settled or logged on prior to the sale it will send logon receipts and settlement receipts prior to starting the sale. These need to be handled.
- Handle Merchant and Customer receipts.
- Listen and Handle the Transaction response from Linkly Cloud REST API.
Epay Wallet
This extension adds to the core EFTPOS payment API that is provided to the POS by the Linkly EFT Client and allows the POS to perform the EPay transactions outlined in this section.
Purchase
This transaction can be used to purchase using a EpayWallet payment. Please see the purchase section of Alipay for alipay purchases - WeChat <!--No We chat so blah blAH add request for wechat-->
Example wechat purchase request object
{
    "Request":
    {
        "Application": "02",
        "AmtPurchase": "200",
        "Merchant": "69",
        "ReceiptAutoPrint":"0",
        "TxnRef": "96B32M9UNZ421MEI",
        "TxnType": "P"
    },
    "Notification":
    {
        "Uri": "https://myPos.com.au/{{sessionid}}/{{type}}",
        "AuthorizationHeader": "Bearer <<token>>"
    }
}
Example wechat purchase response object
{
    "AmtPurchase": 200,
    "Caid": "C00004600001002",
    "ClearedFundsBalance": 0,
    "Date": "2019-02-20T01:20:05",
    "Merchant": "00",
    "Pan": "36536170",
  "OPR": "<Operator ID>",
    "PurchaseAnalysisData":
    {
        "HRC": "<Wechat Response Code>",
        "REF": "<WeChat Purchase Reference Number>",
        "RFN": "<Refund Code>"
    },
    "ResponseCode": "00",
    "ResponseText": "TRANSACTION APPROVED",
    "Stan": 22,
    "Success": true,
    "TxnRef": "96B32M9UNZ421MEI",
    "TxnType": "P"
}
To perform a sale, the POS will:
- Connect to the Authentication Service
- Request a token using Username, Password and PIN pad PairCode
- Send a Transaction request
- Set Merchant to "69", which determines wechat merchant for the sale. See Appendix A - Merchant Codes for other codes.
- Set Application to "02" to make extension payment.
- Set TxnType to "P".
- Set AmtPurchase to the actual purchase amount in cents.
- Set TxnRef to a unique number for this transaction.
- Set OPR to the operator ID who performed the sale
- Set PAN and PANSource IF the POS has handled the customer presenting their card.
- Set the remaining properties as they apply to your specific sale or leave as their default is it does not.
- Send the Transaction Message to the Linkly Cloud REST API endpoint
- Handle display responses
- Listen for responses from Linkly Cloud REST API: these are usually display events notifying the POS that Linkly will display a message to the customer and on the POS PC (such as Present Card or Select Account)
- Note that if the PIN pad has not settled or logged on prior to the sale it will do so automatically before firing the transaction, you will need to handle these cases.
- Listen for responses from Linkly Cloud REST API: these are usually display events notifying the POS that Linkly will display a message to the customer and on the POS PC (such as Present Card or Select Account)
- Handle receipt responses
- Listen for receipt responses from Linkly Cloud REST API notifying the POS that a receipt needs to be printed.
- Note if the PIN pad has not settled or logged on prior to the sale it will send logon receipts and settlement receipts prior to starting the sale. These need to be handled.
- Handle Merchant and Customer receipts.
- Listen and Handle the Transaction response from Linkly Cloud REST API.
Refund
This transaction can be used to refund using a EpayWallet payment. Please see the refund section of Alipay for alipay refunds - WeChat <!--No We chat so blah blAH add request for wechat-->
Example wechat refund request object
{
    "Request":
    {
        "Application": "02",
        "AmtPurchase": "200",
        "Merchant": "69",
        "ReceiptAutoPrint":"0",
        "TxnRef": "96B32M9UNZ421MEI",
        "TxnType": "R",
    "RFN": "<Refund Code>",
    "OPR": "<Operator ID>"
    },
    "Notification":
    {
        "Uri": "https://myPos.com.au/{{sessionid}}/{{type}}",
        "AuthorizationHeader": "Bearer <<token>>"
    }
}
Example wechat refund response object
{
    "AmtPurchase": 200,
    "Caid": "C00004600001002",
    "ClearedFundsBalance": 0,
    "Date": "2019-02-20T01:20:05",
    "Merchant": "00",
    "Pan": "36536170",
    "PurchaseAnalysisData":
    {
        "HRC": "<Wechat Response Code>",
        "REF": "<WeChat Purchase Reference Number>",
        "RFN": "<Refund Code>"
    },
    "ResponseCode": "00",
    "ResponseText": "TRANSACTION APPROVED",
    "Stan": 22,
    "Success": true,
    "TxnRef": "96B32M9UNZ421MEI",
    "TxnType": "R"
}
A refund is where the amount is transferred from merchant's account to customer account:
- Connect to the Authentication Service
- Request a token using Username, Password and PIN pad PairCode
- Build a Transaction request
- Set Merchant to "69", which determines wechat merchant for the sale. See Appendix A - Merchant Codes for other codes.
- Set Application to "02" to make extension payment.
- Set AmtPurchase to the actual refund amount requested.
- Set TxnType to "R".(Refund always 'R')
- Set TxnRef to a unique number for this transaction.
- Set OPR to the operator ID who performed the sale
- Set RFN Reference (Wechat Refund Code) of the purchase to refund
- Send the Transaction Message to the Linkly Cloud REST API endpoint
- Handle display responses
- Listen for responses from Linkly Cloud REST API: these are usually display events notifying the POS that Linkly will display a message to the customer and on the POS PC (such as Present Card or Select Account)
- Note that if the PIN pad has not settled or logged on prior to the sale it will do so automatically before firing the transaction, you will need to handle these cases.
- Listen for responses from Linkly Cloud REST API: these are usually display events notifying the POS that Linkly will display a message to the customer and on the POS PC (such as Present Card or Select Account)
- Handle receipt responses
- Listen for receipt responses from Linkly Cloud REST API notifying the POS that a receipt needs to be printed.
- Note if the PIN pad has not settled or logged on prior to the sale it will send logon receipts and settlement receipts prior to starting the sale. These need to be handled.
- Handle Merchant and Customer receipts.
- Listen and Handle the Transaction response from Linkly Cloud REST API.
Humm
This extension adds to the core EFTPOS payment API that is provided to the POS by the Linkly EFT Client and allows the POS to perform the Humm transactions outlined in this section.
Purchase
This method can be used to initiate an Humm transaction. The POS must pass in the total purchase amount for the sale in the 'AmtPurchase' in cents. Tag The POS will receive an Humm purchase number on the conclusion of the sale.
Example purchase request object
{
    "Request":
    {
        "Merchant": "67",
        "Application": "02",
        "AmtPurchase": "2000",
        "ReceiptAutoPrint":"0",
        "TxnType": "P",
        "TxnRef": "1234567890"
    },
    "Notification":
    {
        "Uri": "https://myPos.com.au/{{sessionid}}/{{type}}",
        "AuthorizationHeader": "Bearer <<token>>"
    }
}
Example purchase response object
{
    "AmtPurchase": 2000,
    "AvailableBalance": 0,
    "BalanceReceived": false,
    "Caid": "C00004600003001",
    "ClearedFundsBalance": 0,
    "Date": "2019-01-11T04:17:06",
    "Merchant": "00",
    "Pan": "956850",
    "PurchaseAnalysisData":
    {
        "HRC": "SPRA01",
        "REF": "<Humm Purchase Number>"
    },
    "ResponseCode": "00",
    "ResponseText": "TRANSACTION APPROVED",
    "Stan": 32,
    "Success": true,
    "TxnRef": "HR6RMVYUKZUZQ9S5",
    "TxnType": "P"
}
To perform a sale, the POS will:
- Connect to the Authentication Service
- Request a token using Username, Password and PIN pad PairCode
- Send a Transaction request
- Set Merchant to "67", which determines Humm merchant for the sale. See Appendix A - Merchant Codes for other codes.
- Set Application to "02" to make extension payment.
- Set TxnType to "P".
- Set AmtPurchase to the actual purchase amount in cents (For Humm $20.00 is minimun sum for transaction).
- Set TxnRef to a unique number for this transaction.
- Set PAN and PANSource IF the POS has handled the customer presenting their card.
- Set the remaining properties as they apply to your specific sale or leave as their default is it does not.
- Send the Transaction Message to the Linkly Cloud REST API endpoint
- Handle display responses
- Listen for responses from Linkly Cloud REST API: these are usually display events notifying the POS that Linkly will display a message to the customer and on the POS PC (such as Present Card or Select Account)
- Note that if the PIN pad has not settled or logged on prior to the sale it will do so automatically before firing the transaction, you will need to handle these cases.
- Listen for responses from Linkly Cloud REST API: these are usually display events notifying the POS that Linkly will display a message to the customer and on the POS PC (such as Present Card or Select Account)
- Handle receipt responses
- Listen for receipt responses from Linkly Cloud REST API notifying the POS that a receipt needs to be printed.
- Note if the PIN pad has not settled or logged on prior to the sale it will send logon receipts and settlement receipts prior to starting the sale. These need to be handled.
- Handle Merchant and Customer receipts.
- Listen and Handle the Transaction response from Linkly Cloud REST API.
Refund
This transaction can be used to perform a Refund using Humm. The POS must pass in the Humm Purchase Number in the 'REF' Tag
Example refund request object
{
    "Request":
    {
        "Merchant": "67",
        "Application": "02",
        "AmtPurchase": "2000",
        "PurchaseAnalysisData":
        {
            "REF" : "<Humm Purchase Number>"
        },
        "ReceiptAutoPrint":"0",
        "TxnType": "R",
        "TxnRef": "1234567890"
    },
    "Notification":
    {
        "Uri": "https://myPos.com.au/{{sessionid}}/{{type}}",
        "AuthorizationHeader": "Bearer <<token>>"
    }
}
Example refund response
{
    "AmtPurchase": 2000,
    "AuthCode": 0,
    "AvailableBalance": 0,
    "BalanceReceived": false,
    "Caid": "C00004600003001",
    "CardName": "00",
    "ClearedFundsBalance": 0,
    "Date": "2019-01-11T04:27:03",
    "Merchant": "00",
    "PurchaseAnalysisData":
    {
        "HRC": "SPSA01"
    },
    "ResponseCode": "00",
    "ResponseText": "TRANSACTION APPROVED",
    "Stan": 33,
    "Success": true,
    "TxnRef": "SR1GWD6OBEJV9E8Y",
    "TxnType": "R"
}
A refund is where the amount is transferred from merchant's account to customer account:
- Connect to the Authentication Service
- Request a token using Username, Password and PIN pad PairCode
- Build a Transaction request
- Set Merchant to "67", which determines Humm merchant for the sale. See Appendix A - Merchant Codes for other codes.
- Set Application to "02" to make extension payment.
- Set AmtPurchase to the actual refund amount requested.
- Set TxnType to "R".(Refund always 'R')
- Set TxnRef to a unique number for this transaction.
- Set REF Reference (Humm Purchase Number) of the purchase to refund
- Send the Transaction Message to the Linkly Cloud REST API endpoint
- Handle display responses
- Listen for responses from Linkly Cloud REST API: these are usually display events notifying the POS that Linkly will display a message to the customer and on the POS PC (such as Present Card or Select Account)
- Note that if the PIN pad has not settled or logged on prior to the sale it will do so automatically before firing the transaction, you will need to handle these cases.
- Listen for responses from Linkly Cloud REST API: these are usually display events notifying the POS that Linkly will display a message to the customer and on the POS PC (such as Present Card or Select Account)
- Handle receipt responses
- Listen for receipt responses from Linkly Cloud REST API notifying the POS that a receipt needs to be printed.
- Note if the PIN pad has not settled or logged on prior to the sale it will send logon receipts and settlement receipts prior to starting the sale. These need to be handled.
- Handle Merchant and Customer receipts.
- Listen and Handle the Transaction response from Linkly Cloud REST API.
Invite
This Method can be used to perform an Humm Invite The POS must pass in the customer phone number in the 'PHN' Tag
Example invite request object
{
    "Request":
    {
        "Merchant": "67",
        "Application": "02"
        "AmtPurchase": "2000",
        "PurchaseAnalysisData":
        {
            "PHN" : "0401222333"
        },
        "ReceiptAutoPrint":"0",
        "TxnType": "K",
        "TxnRef": "1234567890"
    },
    "Notification":
    {
        "Uri": "https://myPos.com.au/{{sessionid}}/{{type}}",
        "AuthorizationHeader": "Bearer <<token>>"
    },
}
An invite request :
- Connect to the Authentication Service
- Request a token using Username, Password and PIN pad PairCode
- Build a Invite request
- Set Merchant to "67", which determines Humm merchant for the sale. See Appendix A - Merchant Codes for other codes.
- Set Application to "02" to make extension payment.
- Set AmtPurchase to the actual refund amount requested.
- Set TxnType to "K" to indicate an Invite
- Set TxnRef to a unique number for this transaction.
- Set PHN, the customer's phone number
- Send the Invite Message to the Linkly Cloud REST API endpoint
- Handle display responses
- Listen for responses from Linkly Cloud REST API: these are usually display events notifying the POS that Linkly will display a message to the customer and on the POS PC (such as Present Card or Select Account)
- Note that if the PIN pad has not settled or logged on prior to the sale it will do so automatically before firing the transaction, you will need to handle these cases.
- Listen for responses from Linkly Cloud REST API: these are usually display events notifying the POS that Linkly will display a message to the customer and on the POS PC (such as Present Card or Select Account)
- Handle receipt responses
- Listen for receipt responses from Linkly Cloud REST API notifying the POS that a receipt needs to be printed.
- Note if the PIN pad has not settled or logged on prior to the sale it will send logon receipts and settlement receipts prior to starting the sale. These need to be handled.
- Handle Merchant and Customer receipts.
- Listen and Handle the Transaction response from Linkly Cloud REST API.
Klarna
Introduction
Klarna is a large Swedish bank that provides international financial services. They eliminate financial risks related to consumer credit by providing in-store credit checks and handling of customer payments.
The Linkly Klarna extension enables the POS to perform Klarna transactions outlined in this section.
Start Developing
Cloud Setup
- Contact Linkly for a Cloud account, see Appendix F - Cloud Account
- Create a Klarna dev account and obtain test credentials.
- Contact Linkly POS Integrations Support - [email protected] - for test gateway credentials
- Linkly will setup and activate your Klarna extension in the Linkly Cloud
- Testing can be done using the Linkly Virtual Pinpad
- Implement the Klarna API as outlined below
Methods
Once a purchase transaction request is made, the Klarna Cloud Extension will initiate a Klarna payment session, providing a QRCode for the customer to scan. Alternatively, the customer can choose to enter their phone number by clicking the button on the pinpad to receive the Payment Session link via SMS. After the customer has confirmed the payment the approved transaction will be sent back to the POS. The RFN PAD tag will contain the order id and should be stored for any future refunds.
To integrate Klarna, it is recommended that all transactions go through the One Button API via the '99' Merchant number. Regardless, this integration must meet the minimum Core Payments requirements.
Purchase
This transaction can be used to perform a Purchase (QR code / SMS) using Klarna.
Note: QR code only works on compatible terminals. Depending on registry settings and PAD fields a direct SMS purchase can be performed instead of a QR code purchase.
Note: Selecting the SMS option (on the pinpad) at the QR code display will cancel the QR code transaction and fall back to an SMS transaction, prompting the customer to enter their phone number.
Note: This transaction can be cancelled while the QR Code is displayed (using the Cancel button on
the POS dialog), but only before the customer completes the purchase.
Example Klarna purchase request object
{
    "Request":
    {
        "Application": "02",
        "AmtPurchase": "200",
        "Merchant": "70",
        "ReceiptAutoPrint":"0",
        "TxnRef": "96B32M9UNZ421MEI",
        "TxnType": "P",
        "CountryCode": "AU",
        "PurchaseAnalysisData":
        {
            "OPR": "00766|test",
            "AMT": "0042000",
            "PCM": "0000"
        },
        "Basket":
        {
            "id": "t39kq18134553",
            "amt": 2145,
            "tax": 200,
            "dis": 50,
            "sur": 0,
            "items": [{
                    "id": "t39kq002",
                    "sku": "k24086723",
                    "qty": 2,
                    "amt": 2145,
                    "tax": 200,
                    "dis": 50,
                    "name": "XData USB Drive"
            }]
        }
  },
    "Notification":
    {
        "Uri": "https://myPos.com.au/{{sessionid}}/{{type}}",
        "AuthorizationHeader": "Bearer <<token>>"
    }
}
Example Klarna purchase response object
{
    "AmtPurchase": 200,
    "Caid": "C00004600001002",
    "ClearedFundsBalance": 0,
    "Date": "2019-02-20T01:20:05",
    "Merchant": "00",
    "Pan": "36536170",
  "OPR": "<Operator ID>",
    "CountryCode": "AU",
    "PurchaseAnalysisData":
    {
        "HRC": "<Klarna Response Code>",
        "REF": "<Klarna Purchase Reference Number>",
        "RFN": "<Refund Code>"
    },
    "ResponseCode": "00",
    "ResponseText": "TRANSACTION APPROVED",
    "Stan": 22,
    "Success": true,
    "TxnRef": "96B32M9UNZ421MEI",
    "TxnType": "P"
}
To perform a sale, the POS will:
- Connect to the Authentication Service
- Request a token using Username, Password and PIN pad PairCode
- Send a Transaction request
- Set Merchant to "70", which determines Klarna merchant for the sale. See Appendix A - Merchant Codes for other codes.
- Set Application to "02" to make extension payment.
- Set TxnType to "P".
- Set AmtPurchase to the actual purchase amount in cents.
- Set TxnRef to a unique number for this transaction.
- Set OPR to the operator ID who performed the sale
- Set PAN and PANSource IF the POS has handled the customer presenting their card.
- Set the remaining properties as they apply to your specific sale or leave as their default is it does not.
- Send the Transaction Message to the Linkly Cloud REST API endpoint
- Handle display responses
- Listen for responses from Linkly Cloud REST API: these are usually display events notifying the POS that Linkly will display a message to the customer and on the POS PC (such as Present Card or Select Account)
- Note that if the PIN pad has not settled or logged on prior to the sale it will do so automatically before firing the transaction, you will need to handle these cases.
- Listen for responses from Linkly Cloud REST API: these are usually display events notifying the POS that Linkly will display a message to the customer and on the POS PC (such as Present Card or Select Account)
- Handle receipt responses
- Listen for receipt responses from Linkly Cloud REST API notifying the POS that a receipt needs to be printed.
- Note if the PIN pad has not settled or logged on prior to the sale it will send logon receipts and settlement receipts prior to starting the sale. These need to be handled.
- Handle Merchant and Customer receipts.
- Listen and Handle the Transaction response from Linkly Cloud REST API.
Refund
This transaction can be used to perform a full or partial Refund using Klarna.
Please Note: Klarna does not support the cancellation (or reversal) of refunds
Example Klarna refund request object
{
    "Request":
    {
        "Application": "02",
        "AmtPurchase": "200",
        "Merchant": "70",
        "ReceiptAutoPrint":"0",
        "TxnRef": "96B32M9UNZ421MEI",
        "TxnType": "R",
        "CountryCode": "AU",
        "PurchaseAnalysisData":
        {
            RFN": "<Refund Code>",
            "OPR": "00766|test",
            "AMT": "0042000",
            "PCM": "0000",
        },
    },
    "Notification":
    {
        "Uri": "https://myPos.com.au/{{sessionid}}/{{type}}",
        "AuthorizationHeader": "Bearer <<token>>"
    }
}
Example Klarna refund response object
{
    "AmtPurchase": 200,
    "Caid": "C00004600001002",
    "ClearedFundsBalance": 0,
    "Date": "2019-02-20T01:20:05",
    "Merchant": "00",
    "Pan": "36536170",
    "PurchaseAnalysisData":
    {
        "HRC": "<KLarna Response Code>",
        "REF": "<Klarna Purchase Reference Number>",
        "RFN": "<Refund Code>"
    },
    "ResponseCode": "00",
    "ResponseText": "TRANSACTION APPROVED",
    "Stan": 22,
    "Success": true,
    "TxnRef": "96B32M9UNZ421MEI",
    "TxnType": "R"
}
A refund is where the amount is transferred from merchant's account to customer account:
- Connect to the Authentication Service
- Request a token using Username, Password and PIN pad PairCode
- Build a Transaction request
- Set Merchant to "70", which determines Klarna merchant for the sale. See Appendix A - Merchant Codes for other codes.
- Set Application to "02" to make extension payment.
- Set AmtPurchase to the actual refund amount requested.
- Set TxnType to "R".(Refund always 'R')
- Set TxnRef to a unique number for this transaction.
- Set OPR to the operator ID who performed the sale
- Set RFN Reference (Klarna Refund Code (Order Id)) of the purchase to refund
- Send the Transaction Message to the Linkly Cloud REST API endpoint
- Handle display responses
- Listen for responses from Linkly Cloud REST API: these are usually display events notifying the POS that Linkly will display a message to the customer and on the POS PC (such as Present Card or Select Account)
- Note that if the PIN pad has not settled or logged on prior to the sale it will do so automatically before firing the transaction, you will need to handle these cases.
- Listen for responses from Linkly Cloud REST API: these are usually display events notifying the POS that Linkly will display a message to the customer and on the POS PC (such as Present Card or Select Account)
- Handle receipt responses
- Listen for receipt responses from Linkly Cloud REST API notifying the POS that a receipt needs to be printed.
- Note if the PIN pad has not settled or logged on prior to the sale it will send logon receipts and settlement receipts prior to starting the sale. These need to be handled.
- Handle Merchant and Customer receipts.
- Listen and Handle the Transaction response from Linkly Cloud REST API.
ZipMoney
This extension adds to the core EFTPOS payment API that is provided to the POS by the Linkly EFT Client and allows the POS to perform the ZipMoney transactions outlined in this section.
Purchase
This method can be used to initiate a ZipMoney transaction. The POS must pass in the total purchase amount for the sale in the 'AmtPurchase' in cents. Tag The POS will receive a ZipMoney purchase number on the conclusion of the sale.
Example purchase request object
{
    "Request":
    {
        "Merchant": "89",
        "Application": "02",
        "AmtPurchase": "1000",
        "ReceiptAutoPrint":"0",
        "TxnType": "P",
        "TxnRef": "1234567890"
    },
    "Notification":
    {
        "Uri": "https://myPos.com.au/{{sessionid}}/{{type}}",
        "AuthorizationHeader": "Bearer <<token>>"
    }
}
Example purchase response object
{
    "AmtPurchase": 1000,
    "AvailableBalance": 0,
    "BalanceReceived": false,
    "Caid": "C00004600001002",
    "ClearedFundsBalance": 0,
    "Date": "2019-02-11T04:23:06",
    "Merchant": "00",
    "Pan": "956850",
    "PurchaseAnalysisData":
    {
        "HRC": "201",
        "REF": "<ZipMoney Purchase Number>",
        "RFN": "<ZipMoney Purchase Number>"
    },
    "ResponseCode": "00",
    "ResponseText": "TRANSACTION APPROVED",
    "Stan": 32,
    "Success": true,
    "TxnRef": "FQA5Q6LCW3U3EJGD",
    "TxnType": "P"
}
To perform a sale, the POS will:
- Connect to the Authentication Service
- Request a token using Username, Password and PIN pad PairCode
- Send a Transaction request
- Set Merchant to "89", which determines ZipMoney merchant for the sale. See Appendix A - Merchant Codes for other codes.
- Set Application to "02" to make extension payment.
- Set TxnType to "P".
- Set AmtPurchase to the actual purchase amount in cents.
- Set TxnRef to a unique number for this transaction.
- Set PAN and PANSource IF the POS has handled the customer presenting their card.
- Set the remaining properties as they apply to your specific sale or leave as their default is it does not.
- Send the Transaction Message to the Linkly Cloud REST API endpoint
- Handle display responses
- Listen for responses from Linkly Cloud REST API: these are usually display events notifying the POS that Linkly will display a message to the customer and on the POS PC (such as Present Card or Select Account)
- Note that if the PIN pad has not settled or logged on prior to the sale it will do so automatically before firing the transaction, you will need to handle these cases.
- Listen for responses from Linkly Cloud REST API: these are usually display events notifying the POS that Linkly will display a message to the customer and on the POS PC (such as Present Card or Select Account)
- Handle receipt responses
- Listen for receipt responses from Linkly Cloud REST API notifying the POS that a receipt needs to be printed.
- Note if the PIN pad has not settled or logged on prior to the sale it will send logon receipts and settlement receipts prior to starting the sale. These need to be handled.
- Handle Merchant and Customer receipts.
- Listen and Handle the Transaction response from Linkly Cloud REST API.
Refund
This transaction can be used to perform a Refund using ZipMoney. The POS must pass in the ZipMoney Purchase Number in the 'REF' Tag
Example refund request object
{
    "Request":
    {
        "Merchant": "89",
        "Application": "02",
        "AmtPurchase": "1000",
        "PurchaseAnalysisData":
        {
            "REF" : "<ZipMoney Purchase Number>"
        },
        "ReceiptAutoPrint":"0",
        "TxnType": "R",
        "TxnRef": "1234567890"
    },
    "Notification":
    {
        "Uri": "https://myPos.com.au/{{sessionid}}/{{type}}",
        "AuthorizationHeader": "Bearer <<token>>"
    }
}
Example refund response
{
    "AmtPurchase": 1000,
    "AuthCode": 0,
    "AvailableBalance": 0,
    "BalanceReceived": false,
    "Caid": "C00004600001002",
    "CardName": "00",
    "ClearedFundsBalance": 0,
    "Date": "2019-02-11T04:25:03",
    "Merchant": "00",
    "PurchaseAnalysisData":
    {
        "HRC": "204"
    },
    "ResponseCode": "00",
    "ResponseText": "TRANSACTION APPROVED",
    "Stan": 33,
    "Success": true,
    "TxnRef": "8V0LL1YRMM8PNN6P",
    "TxnType": "R"
}
A refund is where the amount is transferred from merchant's account to customer account:
- Connect to the Authentication Service
- Request a token using Username, Password and PIN pad PairCode
- Build a Transaction request
- Set Merchant to "89", which determines ZipMoney merchant for the sale. See Appendix A - Merchant Codes for other codes.
- Set Application to "02" to make extension payment.
- Set AmtPurchase to the actual refund amount requested.
- Set TxnType to "R".(Refund always 'R')
- Set TxnRef to a unique number for this transaction.
- Set REF Reference (ZipMoney Purchase Number) of the purchase to refund
- Send the Transaction Message to the Linkly Cloud REST API endpoint
- Handle display responses
- Listen for responses from Linkly Cloud REST API: these are usually display events notifying the POS that Linkly will display a message to the customer and on the POS PC (such as Present Card or Select Account)
- Note that if the PIN pad has not settled or logged on prior to the sale it will do so automatically before firing the transaction, you will need to handle these cases.
- Listen for responses from Linkly Cloud REST API: these are usually display events notifying the POS that Linkly will display a message to the customer and on the POS PC (such as Present Card or Select Account)
- Handle receipt responses
- Listen for receipt responses from Linkly Cloud REST API notifying the POS that a receipt needs to be printed.
- Note if the PIN pad has not settled or logged on prior to the sale it will send logon receipts and settlement receipts prior to starting the sale. These need to be handled.
- Handle Merchant and Customer receipts.
- Listen and Handle the Transaction response from Linkly Cloud REST API.
Appendix
Appendix A - Merchant Codes
Below are the Merchant codes that can be entered into a Merchant field, this will perform the request/method ONLY with the merchant specified, unless the merchant is '00'.
The Default merchant is '00' which is EFTPOS, for regular sales and requests use this Merchant code.
Note: Not all functions are supported by all merchants.
MERCHANT IDs & TID PREFIX FOR TPP DLL's
| Merchant Code / Merchant HostId | Description |
|---|---|
| 51 / WLT | Wishlist |
| 52 / GVX | Givex |
| 53 / BHN | Blackhawk |
| 54 / PPL | Paypal |
| 55 / ZOO | Zoo Republic |
| 56 / EPY | ePay (Not Used) |
| 57 / FDI | FDI |
| 58 / TBM | The Bored Monkey |
| 59 / WEX | WrightEXpress |
| 60 / RNT | Rental Payments / NAB Transact |
| 61 / HRS | Harris Scarfe |
| 61 / UNP | United Petroleum (Fuel Card/Shopper Docket) |
| 61 / FUS | Fusion Loyalty |
| 62 / QLG | Qantas Loyalty Gateway |
| 63 / EPY | ePay Universal Protocol |
| 64 / INC | Incomm |
| 65 / AFP | AfterPay |
| 66 / ALI | Alipay |
| 67 / ?? | Humm |
| 70 / KLA | Klarna |
| ?? / ARK | Arkade Loyalty |
| 89 / ZMY | ZipMoney |
| 90 / TRU | TruRating |
| 99 / SLV | Slave |
Note: 61 can be used for any proprietary in-house extension that will never be deployed outside a given merchant.
Appendix B - Response Codes
Below are the response codes to a specific function. The codes are usually associated with a 'Response Text' that describe the result of the function performed.
Eg. 00 for a transaction is approved and its Response Text is "APPROVED ".
Common Response Codes
| Response Code | Response Text | Additional Information |
|---|---|---|
| 00 | APPROVED | Transaction / function completed successfully |
| 78, 79, XG | SYSTEM ERROR | ANZ Specific: Bank configuration issue |
| 97 | ALREADY SETTLED | PIN pad already has been settled |
| B1 | PRINTER ERROR | Linkly setup to handle printing, but no printer defined |
| BB / BY | Client/Pinpad Busy | Pinpad/client are processing |
| N8 | SERVER ERROR | Invalid TID entered into the PIN pad |
| P7 | COMMS ERROR | Comms issue with the PIN pad or the EFT server |
| PF | Pinpad Offline | Pinpad is offline |
| S0 | MODEM ERROR | (Should be CBA only) Generic Connection error - can't connect to the bank |
| S7 | NO EFT SERVER | Linkly EFT Client is not connecting to EFT Server |
| S8 | NO EFT SERVER | Error in the lines tab of the EFT Server |
| TB | TMS REQUIRED | PIN pad needs to logon to TMS |
| TF | INIT REQUIRED | PIN pad needs to be logged on |
| TI | Operator Timeout | Input timeout |
| TM | Operator Cancelled | Operator cancelled sale |
| TX | Unable to Process | Reversal failed to process |
| X0 | NO RESPONSE | Bank not responding to the terminal |
| X0J | No Response | Message timeout |
| X2 | System Error | Internal Error |
| XG | Txn Not Supported | Txntype is not supported |
| XT | CONFIG REQUIRED | PIN pad not configured with TID/MID |
| Z0 | Modem Error | No connection from eftsrv |
| Z5 | Power Fail | The PINpad has lost power/recovered from a powerFail |
| ZB | PINPAD BUSY | ANZ Specific: PIN pad is not ready to accept transaction |
Developer-Specific Response Codes
| Response Code | Response Text | Additional Information |
|---|---|---|
| 00 | APPROVED | |
| 08 | Approved | |
| A1 | Recursive Call | ActiveX busy |
| A4 | Invalid Merchant | Merchant does not exist |
| A7 | Internal Buffer | ActiveX message smaller than expected |
| B2 | Unsupported Operation | |
| B3 | Client Offline | Client not running / another program using client |
| B4 | Internal Buffer | ActiveX message larger than expected |
| B5 | Invalid Amount | POS sent wrong amount |
| B6 | Invalid Dialog | |
| B7 | Invalid TxnType | |
| B8 | Invalid TxnRef | |
| BY | PINpad Busy | |
| D0 | Invalid AuthCode | POS sent wrong AuthCode |
| E2 | No Previous Txn | |
| TG | Display Error | POS display error |
| TH | Printer Error | POS Printer Error |
| Z0 | Modem Error | |
| Z5 | Power Fail |
AppHub Response Codes
| Response Code | Response Text | Description |
|---|---|---|
| 99 | General Decline | Unexpected Error |
| 97 | Auth Error | Linkly Auth Error – Token is invalid |
| H0 | Config Required | Lane Info/Third party host credentials are missing |
| H1 | POS Format Error | POS has sent a wrong/missing field in the request |
| HA | Invalid Amount | The Amount does not match Third party requirements |
| HB | Insufficient Funds | The customer account does not have sufficient funds for the transaction |
| HC | Host Format Error | The message is incorrect to the third party |
| HD | Txn Cancelled | The txn has been cancelled |
| HE | Bad Read | The card data/barcode provided is invalid |
| HG | Host Auth Error | Authentication error from the third party |
| HH | Txn Not Found | The txn reference does not exist on the third party system |
| HI | Expired payment | The barcode/qrcode/card has expired and cannot be processed |
| HL | Host Internal Error | Internal error on the third party system |
| HM | Activation Error | Third party activation error |
| HN | Account In Use | The account/payment authenticator is already in use |
| HQ | Account Funds Error | There is a funds error with the specified account |
| HR | Already processed | The specific sale is already processed |
| HS | Account Error | There is an issue with the customer account |
Appendix C - Purchase Analysis Data
{
    ...,
    "PurchaseAnalysisData": {
            "<TagName>": "<tagValue>",
            "PAT": "1"
        }
}
The purchase analysis data field allows the POS to send custom tag data to the pinpad.
It is also possible for the pinpad to return data to the POS in the field for certain messages.
The format for both send and receive of this data is the same. The value of each tag is dependent upon the pinpad application.
Only use this field if instructed by Linkly.
| Byte Position | Field | Length | Description |
|---|---|---|---|
| THE FOLLOWING FIELDS ARE REPEATED FOR EACH TAG. | |||
| 0 | Tag Name | 3 | The name of the tag as defined by the pinpad |
| 2 | Tag Data Length | 3 | The length of the tag data to follow, not including the tag name and data length fields. ASCII and padded with leading zeros. |
| 5 | Tag Data | X | The tag data as defined by the pinpad |
Example 1:
Setting the property to "XXX006ABCDEF" would mean the pinpad receives a tag called 'XXX' with a length of 6 and the data 'ABCDEF'
Example 2:
Setting the property to "XXX001aYYY003ABCZZZ00245" the pinpad receives:
- A tag called 'XXX' with a length of 1 and the data 'a'
- A tag called 'YYY' with a length of 3 and the data 'ABC'
- A tag called 'ZZZ' with a length of 2 and the data '45'
Silent Card Not Supported In Transaction
- This tag allows the pinpad to silently end a sale if the card that is presented is not handled by the pinpad.
- The pinpad will exit with a response code indicating the card is not accepted, but the pinpad will not do any displays on the POS.
- TAG:
- SLT0011
- Direction
- POS --> Linkly
- POS --> Linkly
- Banks Supported:
- CBA
- NAB?
- CBA
- Transaction Types Supported:
- Transaction
- Transaction
Limit Account Selection
- This tag instructs the pinpad to limit the accounts that are allowed for this sale. It can be used by the POS to stop a customer selecting a particular account (even if the bank rules allow it)
- TAG:
- LAS
- Where a = CHQ, b = SAV, c = CR
- Values are '0' for not allowed and '1' for allowed
- e.g. LAS003001 would only allow credit accounts
- LAS
- Direction
- POS --> Linkly
- Banks Supported:
- CBA
- CBA
- Transaction Types Supported:
- Transaction
- Transaction
Operator Display Prompts
- Optional return tag on the Display Event or Transaction Response that returns additional operator display information
- TAG:
- ODP
- ODP
- Direction
- POS --> Linkly
- Banks Supported:
- None. Custom add-on DLL required
- None. Custom add-on DLL required
- Transaction Types Supported:
- Display Events
- Transaction Events
- Display Events
Field 48 Data
- Data to be sent to the bank in Field 48
- TAG:
- F48
- F48
- Direction
- POS --> Linkly
- Banks Supported:
- ANZ
- ANZ
- Transaction Types Supported:
- All
- All
Myer Specific
- Myer Gift Card specific tags for ANZ to handle.
- TAG:
- MYR
- MYR
- Direction
- POS --> Linkly
- Banks Supported:
- ANZ
- ANZ
- Transaction Types Supported:
- All
- All
Tip value passed from POS
- Tip value collected by POS solution, only needed if the POS wishes to supress the tip collection by the Linkly solution. The value to be included is to be numeric and 4 characters long.
- TAG:
- TIP
- TIP
- Direction
- POS --> Linkly
- Banks Supported:
- All
- All
- Transaction Types Supported:
- Purchase
- Purchase
Amount tag
- Tag used to pass the outstanding total, used when transactions are performed that include incremental charges or additional values were added during the transaction. Numeric 9 digits
- TAG:
- AMT
- AMT
- Direction
- Linkly --> POS
- Banks Supported:
- All
- All
- Transaction Types Supported:
- All
SKU tag
- This tag is to contain the Basket ID that applies to this transaction.
- TAG:
- SKU
- Directionn
- POS --> Linkly
- Banks Supported:
- All
- Transasaction Types Supported:
- All
Unique Card Identifier
- The UCI tag may be returned to provide a unique hashed value of a card that can be used by the POS to identify the same card in future sales.
- The UCI will only be unique when returned from the same banks pinpad.
- TAG:
- UCI{hash value}
- Eg UCI1234567890
- UCI{hash value}
- Direction
- Linkly --> POS
- Banks Supported:
- None!
- None!
- Transaction Types Supported:
- All.
Available Balance
- Balance available after a sale
- TAG:
- ABA
- ABA
- Direction
- Linkly --> POS
- Banks Supported:
- ANZ
- ANZ
- Transaction Types Supported:
- Transaction Response
- Transaction Response
Cleared Funds Balance
- Balance of cleared funds.
- TAG:
- CFD
- CFD
- Direction
- Linkly --> POS
- Banks Supported:
- ANZ
- ANZ
- Transaction Types Supported:
- Transaction Response
- Transaction Response
Operator Reference
- The operator refernce.
- TAG:
- OPR
- OPR
- Direction
- POS --> Linkly
- Transaction Types Supported:
- Transaction Requests
- Transaction Requests
Unique Identifer
- The unique identifer for the transaction, this should be unique for the given transaction.
- TAG:
- UID
- UID
- Direction
- POS --> Linkly
- Transaction Types Supported:
- Transaction Requests
- Transaction Requests
POS Name
- The POS name, this must match the name used for the Linkly accreditation.
- TAG:
- NME
- NME
- Direction
- POS --> Linkly
- Transaction Types Supported:
- Transaction Requests
- Transaction Requests
POS Version
- The POS version.
- TAG:
- VER
- Direction
- POS --> Linkly
- Transaction Types Supported:
- Transaction Requests
- Transaction Requests
POS Vendor ID
- The POS vendor ID, this must match the ID supplied by Linkly during accreditation.
- TAG:
- VND
- VND
- Direction
- POS --> Linkly
- Transaction Types Supported:
- Transaction Requests
- Transaction Requests
POS Capabilities Matrix
- The POS capabilities matrix:
- Byte 1 - 1=POS has barcode scanner, 0=No barcode scanner
- TAG:
- PCM
- PCM
- Direction
- POS --> Linkly
- Transaction Types Supported:
- Transaction Requests
- Transaction Requests
Purchase REF
- Reference of the extention purchase. It's returned in "PurchaseAnalysisData" of Transaction responce. It's used to refund extention transaction.
- TAG:
- REF
- REF
- Direction
- Linkly --> POS
- POS --> Linkly
- Transaction Types Supported:
- Purchase
- Refund
- Notes
- Returned by AfterPay Purchase as AfterPay Order Id
- Returned by Alipay Purchase as Alipay Trade Number
- Returned by Humm Purchase as Humm Purchase Number
- Returned by ZipMoney Purchase as ZipMoney Order Id
- Returned by AfterPay Purchase as AfterPay Order Id
Host Response Code
- The host supplied response code, this can be useful for providing more detailed transaction information to the customer and merchant.
- TAG:
- HRC
- HRC
- Direction
- Linkly --> POS
- Transaction Types Supported:
- Transaction Responses
Host Response Text
- The host supplied response text, this can be useful for providing more detailed transaction information to the customer and merchant.
- TAG:
- HRT
- HRT
- Direction
- Linkly --> POS
- Transaction Types Supported:
- Transaction Responses
Appendix D - Application Codes
- These codes allow the POS to direct a command to a specific application.
- They should only be used in consultation with Linkly.
| Code | Application |
|---|---|
| '00' | EFTPOS |
| '01' | AGENCY |
| '02' | Linkly Configurable Application |
| '03' | Gift Card |
| '04' | Fuel |
| '05' | Medicare |
| '06' | Amex |
| '07' | Cheque Auth |
Appendix E - TxnType
Description:
This property should be set to indicate the type of transaction to be performed when calling DoTransaction or DoSettlement.
| Values | Application |
|---|---|
| B | Balance Enquiry. |
| P | Purchase, Purchase & Cash |
| R | Refund |
| C | Cash Only |
| D | Deposit The deposit amount is placed in AmtPurchase (excluding STG Agency terminal) St George Agency terminal note: AmtPurchase contains the cheque amount AmtCash contains the cash amount to deposit TotalPurchaseCount contains the total number of cheques to deposit. |
| L | Completion |
| M | Auto-Completion The following properties must be set prior to this call: - rrn (as returned in original request) - auth code (as returned in original request) - amtpurchase. - txnref - PANSource - track2 (as returned in original request) - AccountType(as returned in original request) |
| V | Voucher Entry The following properties must be set prior to this call: AccountType ('0' = Savings, '1' = Cheque, '2' = Credit, '3' = Account 1, '4' = Account 2, '5' = Account 3, '6' = Account 4, '7' = Account 5) - Date (DDMMYY) - Time (HHMMSS) - rrn (as returned in original request) - auth code (as returned in original request) - amtpurchase. - txnref - PANSource = 'K' - pan (contents of the PAN) - dateExpiry (MMYY) - CsdReservedString3 (Card Sequence Number. Normally 2 digits) - DataField (The original transaction type. 'P', 'C', 'R', 'D' ) |
| T | Tip-Adjustment The following properties must be set prior to this call: - rrn (as returned in original request) - auth code (as returned in original request) - amtpurchase. - txnref - PANSource - track2 (as returned in original request) - dateExpiry (if manually keyed) - Pan (if manually keyed) - AccountType (as returned in original request) |
| W | Withdrawal The withdrawal amount is to be set in the amtpurchase property. |
| F | Funds Transfer The amount to transfer is to be placed in the amtpurchase property |
| O | Order Request An order request will ask the bank to send something to the customer (eg statement, cheque book, etc) |
| H | Mini Transaction History Retrieve recent transaction details based upon the customer's card details |
| X | Get and Authorise a PIN Ask the customer for their PIN, and authorise it with the bank |
| K | Enhanced PIN command This will perform an enhanced PIN command as defined by the bank PIN pad The following properties can be set prior to this call: - amtpurchase. - txnref - PANSource - track2 (as returned in original request) - dateExpiry (if manually keyed) - Pan (if manually keyed) - AccountType (as returned in original request) - DataField |
| I | Void |
Settlement Types
- 'S' Settlement
- 'P' Pre-Settlement
- 'L' Last Settlement
- 'U' Sub Totals or Summary Totals for ANZ
- 'H' Shift Totals or Subtotals for ANZ
- 'I' Txn Listing
- 'M' Start Cash
- 'F' Store and Forward (SAF) Totals report
- 'D' Daily Cash Statement (STG Agency)
Returned by TransactionEvent and SettlementEvent.
Applies to DoTransaction and DoSettlement.
Note: Not all TxnTypes are supported by all acquirers.
Appendix F - Cloud Account
Steps to request a cloud test account
- Email the following details to [email protected]
- Company name
- POS software name
- Contact name, title, and email
- You will receive a response within two business days with your test account details
Appendix G - Virtual PIN pad
Steps to setup a virtual PIN pad
- Download VirtualPinpad.zip which contains the cloud VirtualPinpad.exe.
Appendix H - Legacy pairing
The Linkly Cloud REST API uses token authentication. A token is an encrypted and signed string of data that represents authentication credentials that are specific to a particular PIN pad, and the POS system will need to maintain the token for each PIN pad it uses. Linkly uses the industry standard JWT tokens, and the token is added to each request as an HTTP header with the keyword Bearer. The POS does not need to know how to create the token itself, it only needs to request one from the Linkly Authentication server.
To request a token the POS must have a valid Linkly Cloud Client username and password from Linkly, plus the PIN pad pair code. Once a valid token has been created, the POS can make API requests by including the token in the Authorisation header as outlined below.
Legacy Token Request
Legacy Token request
# replace <<username>>, <<password>>, and <<paircode>> with your own
# replace <<posName>> and <<posVersion>> with the name and version of your POS
# replace <<posId>> with a unique uuid that identifies your POS
curl "https://auth.sandbox.cloud.pceftpos.com/v1/tokens/cloudpos" \
  -X POST \
  -H 'Content-Type: application/json' \
  -H 'Accept: application/json' \
  -d '{
        "username": "<<username>>",
        "password": "<<password>>",
        "paircode": "<<paircode>>",
        "posName": "<<posName>>",
        "posVersion": "<<posVersion>>",
        "posId": "<<posId>>"
      }'
// replace <<username>>, <<password>>, and <<paircode>> with your own
// replace <<posName>> and <<posVersion>> with the name and version of your POS
// replace <<posId>> with a unique uuid that identifies your POS
var requestContent = new
{
    Username = "<<username>>",
    Password = "<<password>>",
    PairCode = "<<paircode>>",
    PosName = "<<posName>>",
    PosVersion = "<<posVersion>>",
    PosId = "<<posId>>"
};

var request = new HttpRequestMessage(HttpMethod.Post, "https://auth.sandbox.cloud.pceftpos.com/v1/tokens/cloudpos")
{
    Content = new StringContent(Newtonsoft.Json.JsonConvert.SerializeObject(requestContent), System.Text.Encoding.UTF8, "application/json")
};

var httpClient = new HttpClient(); // Note: in production don't create multiple HttpClient instances. Share one single instance.
HttpResponseMessage httpResponse = await httpClient.SendAsync(request);
string responseContent = await httpResponse.Content.ReadAsStringAsync();
import requests; # http://python-requests.org

# replace <<username>>, <<password>>, and <<paircode>> with your own
# replace <<posName>> and <<posVersion>> with the name and version of your POS
# replace <<posId>> with a unique uuid that identifies your POS
request_payload = {
    'username': '<<username>>',
    'password': '<<password>>',
    'pairCode': '<<paircode>>',
    'posName': '<<posName>>',
    'posVersion': '<<posVersion>>',
    'posId': '<<posId>>'
}
response = requests.post('https://auth.sandbox.cloud.pceftpos.com/v1/tokens/cloudpos', json=request_payload)
response_payload = response.json()
URI Path
Production:
POST https://auth.cloud.pceftpos.com/v1/tokens/cloudpos
Development Sandbox environment:
POST https://auth.sandbox.cloud.pceftpos.com/v1/tokens/cloudpos
Headers
| Parameter | Value |
|---|---|
| Content-Type | application/json |
| Accept | application/json |
Request Body
Example token request object
{
    "username": "123456789",
    "password": "QWERTY",
    "pairCode": "09876",
    "posName": "Test POS",
    "posVersion": "12.6.80.17",
    "posId": "3e7f5001-58a3-43fa-9129-6e84a7b4f2a0"
}
| Field KeyName | Required | Description |
|---|---|---|
| Username | Yes | The Linkly Cloud username |
| Password | Yes | The Linkly Cloud password |
| PairCode | Yes | The PIN pad pair code returning from the pairing process |
| PosName | Yes | The name of the POS requesting the token |
| PosVersion | Yes | The version of the POS requesting the token |
| PosId | Yes | A unique UUID that identifies the POS |
Status Codes
| Code | Description | Required action |
|---|---|---|
| 200 | Authorisation was successful. The response object will contain the auth token. | Store and maintain the token based on the expirySeconds property. |
| 401 | The username, password, or 'pair code' was invalid. | Re-check the Cloud username, try resetting the Cloud password, or try re-pairing the PIN pad to get a new pair code. |
| 400 | Invalid request. | Correct the request and try again. |
| 408 | Request Timeout. This should be rare: a transient error has occurred, possibly due to server overloading. | Wait a few seconds and attempt the request again. If the problem persists, contact Linkly Support. |
| 500-599 | A server error has occurred. | Wait a few seconds and attempt the request again. If the problem persists, contact Linkly Support. |
Legacy Auth Response
Example token response object
{
    "token":"x2MUks9vdreTp8aHjfcULkQxURurcRCb",
    "expirySeconds":86400
}
| Field KeyName | Description |
|---|---|
| token | The token to user for authentication. |
| expirySeconds | The number of seconds until the token expires. |
Using the token
The Bearer token is added to each request as an HTTP header with the keyword Bearer as shown below:
Authorization: Bearer <token goes here>
When a token is received from the Linkly Authentication service it is the responsibility of the POS to securely store and manage the lifetime of that token and request a new one when the old token has expired.
The expirySeconds is returned with each token response. This value indicates the number of seconds until the token expires. The POS can use this value to calculate and record the local expiry date and time.
We recommend requesting a new token if it is due to expire within a few minutes of the request.
The POS can request tokens as often as required, however if the POS requests a new token for each transaction or each request this will slow down transaction times. Be aware that requesting a new token does not currently cause existing valid tokens to be revoked, but this may change in future without warning.
During an async transaction, be aware that if the token expires mid-transaction it will need to be renewed if the POS needs to send a sendkey request to the PIN pad.
C# example: checks to see if the token has expired
class TokenResponse
{
    public string Token { get; set; }
    public double ExpiryMinutes {
        get
        {
            return (ExpiryDateTime - DateTime.UtcNow).TotalMinutes;
        }
        set
        {
            ExpiryDateTime = DateTime.UtcNow.AddMinutes(value);
        }
    }
    public DateTime ExpiryDateTime { get; set; } = DateTime.UtcNow;
}

TokenResponse token = null;

private async Task<T> PostRequestAsync<T>(Uri baseUri, Guid sessionId, string type, EFTRequest request, bool async)
{
    var httpClient = GetHttpClient(); // Get a pre-constucted HttpClient from some repository, factory, or static instance
    if (token == null || token.ExpiryDateTime < DateTime.UtcNow.AddSeconds(10)) // notice 10 second offset
    {
        token = await GetTokenAsync(appSettings.PinpadUsername, appSettings.PinpadPassword, appSettings.PinpadPairCode);

        if (token == null || string.IsNullOrWhiteSpace(token.Token))
        {
            throw new Exception("Failed to get valid token");
        }
    }

    var uri = new Uri(baseUri, $"sessions/{sessionId}/{type}?async={async.ToString().ToLower()}");

    var request = new HttpRequestMessage()
    {
        RequestUri = new Uri("http://www.someURI.com"),
        Method = HttpMethod.Post,
    };
    request.Headers.Accept.Add(new System.Net.Http.Headers.AuthenticationHeaderValue("Bearer", token.Token);
    HttpContent content = new StringContent(JsonConvert.SerializeObject(request), UTF8Encoding.UTF8, "application/json");

    var response = await httpClient.SendAsync(request);

    if (response.IsSuccessStatusCode)
    {
        if (async)
        {
            return default(T); // nothing to return, now it's time to wait for the postbacks
        }
        return JsonConvert.DeserializeObject<T>(await response.Content.ReadAsStringAsync());
    }
    else
    {
        switch (response.StatusCode)
        {
            case System.Net.HttpStatusCode.Unauthorized:
                throw new UnauthorizedAccessException("Looks like the username, password or pair code is no longer valid, or your account has been disabled. Try re-pairing the PIN pad or resetting the password.");
            case System.Net.HttpStatusCode.NotFound:
                throw new Exception("Ooops, this shouldn't happen.  Check that your base URI and type are correct.");
            case System.Net.HttpStatusCode.BadRequest:
                throw new Exception("That request wasn't valid! Inspect the response message to see what's wrong.");
            default:
                throw new Exception("Server error, timeout, PIN pad error, etc. Call GET /sessions/{id}/transaction to see the status of this transaction or try again later.");
        }
    }
}
Document Version
| Version | Date | Revisions |
|---|---|---|
| 1.0.3 | 18 August 2022 | - Updating POS Support email to [email protected] |
| 1.0.2 | 23 June 2022 | - Removing Deprecated TxnType 'G' (MOTO); Use PanSource to perform MOTO transactions |
| 1.0.1 | 31 May 2022 | - Updating jquery version - moving Document Version section to end of document |
| 1.0.0 | 16 May 2022 | - Removed pre-authorisation and bar tab |